Article
citation information:
Juzek, M., Pisula, J., Žuľová, L. Extended
analysis of selected deviations and precision of gears manufacturing as a
possibility for reduction of gearboxes’ vibroactivity
used in means of transport. Scientific
Journal of Silesian University of Technology. Series Transport. 2025, 126, 65-78. ISSN: 0209-3324. DOI: https://doi.org/10.20858/sjsutst.2025.126.4.
Michał
JUZEK[1], Jadwiga PISULA[2], Lucia ŽUĽOVÁ[3]
EXTENDED
ANALYSIS OF SELECTED DEVIATIONS AND PRECISION OF GEARS MANUFACTURING AS A
POSSIBILITY FOR REDUCTION OF GEARBOXES’ VIBROACTIVITY
USED IN MEANS OF TRANSPORT
Summary. The paper presents the
results of deviations and accuracy manufacturing measurement of selected
geometric parameters of pinions and gears made for the same nominal dimensions
and the same accuracy class. The measurement was made on the coordinate
measuring machine from Klingelnberg GmbH, which is
commonly used, among others, to assess the accuracy of gears manufactured for
air transport vehicles. Selected parameters of the tested pinions and gears
were measured and analyzed, which have a significant
impact on the emission of vibrations and noise of the operating gearbox. Vibroactivity of gearboxes in case of many means of
transport is a very important research topic because vibrations and noise
generated by drive systems of various means of transport affect passengers and
are the source of environmental noise pollution. The analysis of the obtained
results showed that despite adopting the same nominal dimensions and the same
accuracy class, the tested gears are characterized by significant (often strong
and exceeding the range of the adopted accuracy class) variability of specific,
selected geometric parameters. The use of gears, even those made in the same
precision class, in the case of gearboxes used in means of transport, whose
quiet operation is an important operational aspect, should be extended by
accurate measurement of selected geometric parameters.
Keywords: gears deviations, precision of gears
manufacturing, gears class of accuracy, means of transport drive systems
1. INTRODUCTION
Gearboxes are commonly used in the transmission
systems of many machines and devices. They are also widely used in the drive
systems of various means of transport such as motor vehicles, rail vehicles,
aircraft and ships. The key part of many drive transmission systems used in
means of transport is the gearbox. In order to ensure the correct operation of
the gearbox, high precision of the components and their assembly is required
[1-3]. The precision of the gearbox components, including gears, is extremely
important as it affects both the reliability of the gearbox and the vibrations
and noise emitted during its operation [1-7]. In many research works, the
recording and analysis of vibroacoustic signals is
used to assess the technical condition of the operating gearbox [8-12].
|
a) |
b) |
|
|
|
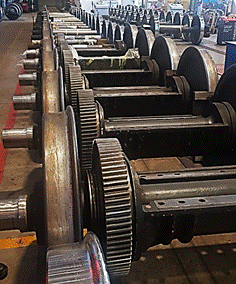
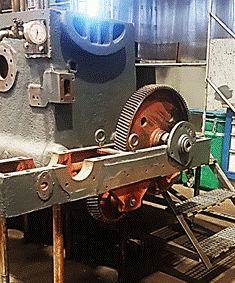
Fig. 1. Examples of gear applications in rail
vehicles: a) fragment of the wheelset gearbox, b) example of gearbox used in
the construction of locomotive engine
Irrespective of the means of transport type and
the drive system used in its construction, solutions are sought that are
characterized by the lowest possible emission of vibrations and noise. In the
case of gearboxes used in various means of transport, the issue of vibroactivity is extremely important and current because
vibrations and noise generated during gearbox operation affect the users of the
means of transport, significantly affecting the comfort of use. Increased
vibration emission can lead to accelerated wear of the vehicle's structural
elements. This is confirmed by the research presented in numerous scientific
papers aimed at finding possibilities of reducing the vibration activity of the
gearboxes [13-18]. Furthermore, vibrations and the associated noise generated
by means of transport also affect the environment in which the means of
transport is used. Noise generated by means of transport is one of the dominant
sources of environmental noise pollution [19, 20]. High noise levels in the
area of the transport mean structure and its surroundings have a significant
and negative impact on the health of passengers and people in the immediate
surroundings [21].
One of the directions of research aimed at
reducing vibrations of an operating gearbox is the modification of the internal
structure of gears and attempts to use new (in the context of gears) materials
and methods of their production. The patent [22] presents a modification of the
internal structure of the gear in order to limit the propagation of vibrations
from the meshing zone to the remaining gearbox elements. The effectiveness of
this solution is confirmed by the research results presented in [23]. It is
worth noting that in the case of the gear internal structure modification and
the use of different construction materials, the accuracy of manufacturing is
of great importance in the context of the operation of the gear. The papers [24-27]
present, among others, research devoted to the production of gears using
additive methods. The use of additive methods enables the use of new materials,
as well as more free shaping of the internal structure
of the gears in order to modify its mechanical properties and dynamic
characteristics. In the case of gears made using this type of manufacturing
method, the issue of gear manufacturing accuracy is often a priority research
area [28-31].
The issue of the accuracy of gear
manufacturing, both in the case of well-known machining methods and intensively
developed additive methods, is a significant research problem. Despite the use
of identical parameters during the gear manufacturing process, there is a
probability of obtaining significant differences in selected geometric
dimensions in relation to the adopted nominal dimensions, which affects the
running-in period and the proper operation of the gearbox, even in the case of
assigning the gear to a given manufacturing accuracy class. The continuous
development of measurement techniques and methods allows for an in-depth
assessment of deviations in the execution of selected geometric parameters of a
given gear. This paper presents selected measurement results of geometric
dimensions of 4 pinions and 4 gears that were subjected to running-in in the
same gearbox. To measure the geometric dimensions of the gears, a stand from Klingelnberg GmbH was used together with the software
provided by the manufacturer of the measuring machine. The analysis of the
obtained test results showed significant differences in selected geometric
dimensions of the tested gears manufactured for the same assumed nominal
dimensions, exceeding the range of the manufacturing accuracy class to which
they were assigned.
2. DESCRIPTION OF THE TEST STAND AND
CONDUCTED RESEARCH
The production of gears, as in the
case of many other machine parts, is burdened with inaccuracies resulting from,
for example, the technological limitations of the production process or the
quality of the tools and devices used. The mentioned gear deviations affect the
operation of the gearbox. Their complete elimination of these deviations is
difficult to achieve and highly unprofitable considering the manufacturing
costs, especially in the case of mass production. In order to precisely
describe a given gear, measurements of various deviations are made, the
descriptions of which are included in the appropriate DIN standards. Based on
them, it is possible to determine the accuracy class of the gear for many
geometrical quantities describing the precision of the gear meshing shape. The
DIN standards describing the deviations for gears with straight and helical
teeth are listed in the table below.
Tab. 1
List of valid DIN
standards for gears and gearboxes
|
Standard designation |
Description
of DIN standard |
|
DIN 3960 |
Definitions and parameters for cylindrical gears and cylindrical pair
with involute teeth |
|
DIN 3961 |
Tolerances for cylindrical gear teeth |
|
DIN 3962 part 1 |
Tolerances for cylindrical gear teeth; tolerances for deviations of
individual parameters |
|
DIN 3962 part 2 |
Tolerances for cylindrical gear teeth; |
|
DIN 3962 part 3 |
Tolerances for cylindrical gear teeth; |
|
DIN 3963 |
Tolerances for cylindrical gear teeth; |
|
DIN 3964 |
Centre distance allowances and shaft position tolerances of housing
for cylindrical gear transmissions |
|
DIN 3967 |
System of gear fits, backlash, tooth thickness allowances and tooth
thickness tolerances; bases, calculation of tooth thickness allowances,
conversion of allowances for the different measuring methods |
To measure selected geometrical
parameters of the tested pinions and gears specialist measuring equipment and
software designed for testing the geometrical dimensions of gears from Klingelnberg GmbH, located in the laboratory of the Rzeszów University of Technology – Department of Machine
Design, were used. The test stand enabled measurement of selected geometric
parameters of the tested pinions and gears with an accuracy of 0.1 µm.
|
|
|
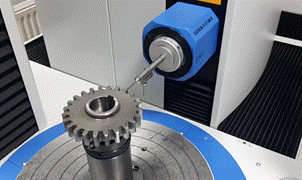
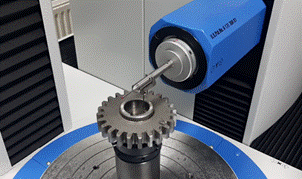
Fig. 2. Klingelnberg
GmbH test stand used during measurement of
selected geometrical parameters
The measurements were taken for 4
selected pinions and 4 gears, which were made using the same dimensions and
nominal settings. Then the tested pinions and gears were run-in in the same
gearbox. Selected parameters of the tested pinions and gears are presented in
table 2.
Tab. 2
List of selected
parameters of tested pinions and gears
|
Value of parameter |
|
|
Number of teeth z1 - pinions |
16 |
|
Number of teeth z2 - gears |
24 |
|
Module mn |
4,5 mm |
|
Helix angle β |
0° |
|
Face width b |
20 mm |
|
Center distance aw |
91,5 mm |
|
Profile shift coefficient - pinions |
0,864 |
|
Profile shift coefficient - gears |
-0,5 |
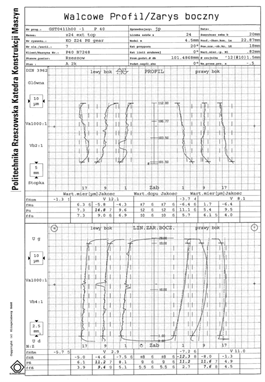
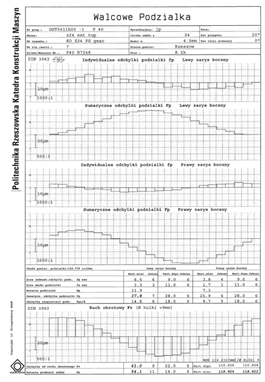
For each pinion and gear, the measurement of the same 3 teeth was performed, during which the right and left tooth face were tested, which means 18 different gears in terms of deviations in the production of the tooth sides. For each gear measurements were taken, in the case of the pinions - teeth numbers: 1, 7 and 12, and in the case of the gears - teeth numbers 1, 9, 17. An example measurement report is shown in figure 3.
|
|
|
Fig. 3. An example measurement
report obtained for gear number 1 (G_1)
During the measurements, the values
of selected deviations were checked, which have a significant impact on the
operation of the gearbox, and in particular the operation of the meshing, which
is an important area from the point of view of vibrations and noise generated
by the transmission. The measurement of geometric parameters of pinions and
gears was performed according to the recommendations presented in the standards
DIN 3960 – DIN 3964 and DIN 3967.
3. ANALYSIS AND DISCUSSION OF
OBTAINED MEASUREMENT RESULTS
This chapter presents selected
measurement results of geometric parameters of the tested pinions (P_1 – P_4) and gears (G_1 – G_4). The following
parameters (in accordance with DIN 3960 – DIN 3964 and DIN 3967 standards) were
selected for further analysis, as they have a significant impact on the
operation and vibration generation of the gearbox:
·
Ff - total profile deviation,
·
Fβ - tooth
trace total deviation,
·
Fp -
total/cumulative pitch deviation,
·
Fr - concentricity
deviation,
·
Rs - tooth thickness
fluctuation.
For each analyzed parameter, its
minimum value (min.), maximum value (max.), arithmetic mean (X̅)
and standard deviation (σ) were determined. Additionally, the coefficient of variation (CV)
value was also calculated.
3.1. Analysis of Ff
and Fβ measurement results
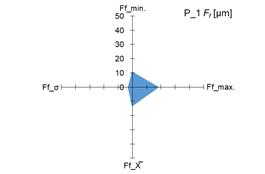
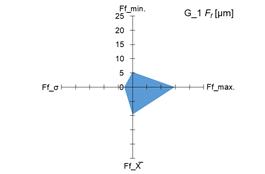
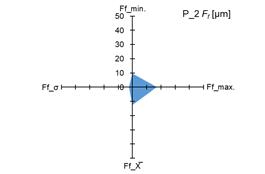
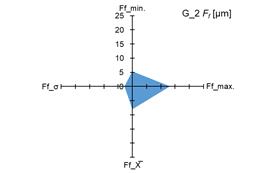
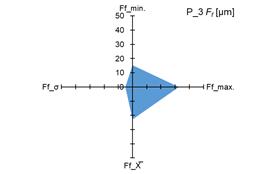
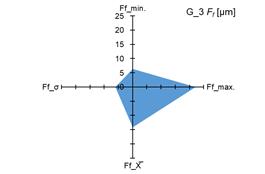
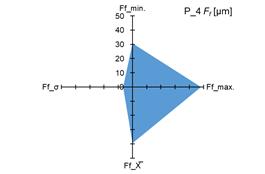
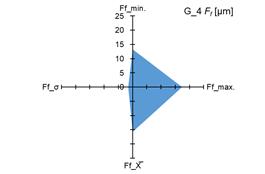
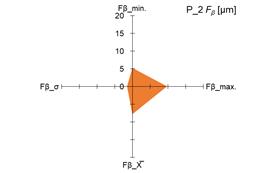
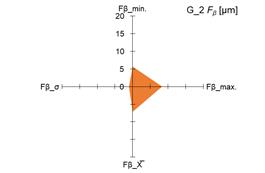
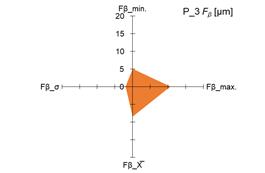
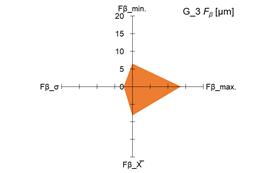
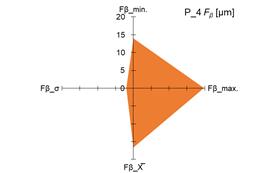
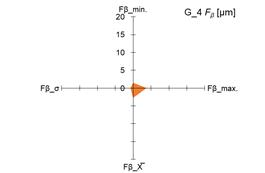
The graphs in fig. 4 and 5 show the
measured minimum and maximum values, as well as the calculated values of the
arithmetic mean (X̅) and standard deviation (σ) of the measurement results of the
parameters Ff and Fβ for tested pinions (fig. 4 and 5 –
a), c), e), g)) and tested gears (fig. 4 i 5 – b),
d), f), h)).
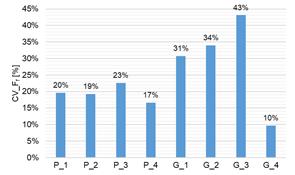
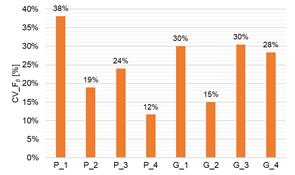
Additionally, the coefficient of
variation (CV) of the measured parameters Ff
and Fβ was also calculated. The calculated
coefficient of variation (CV) values are shown in fig. 6.
Based on the analysis of the
measured minimum and maximum values presented in the graphs in Fig. 4 and 5, as
well as the calculated values of the arithmetic mean (X̅) and the
standard deviation (σ) of the parameters Ff and Fβ, it was demonstrated that both for
the tested pinions and the tested gears there are significant changes in the
above-mentioned parameters. The scale of changes was presented graphically as
the area of a quadrangle whose vertices were created in the coordinate system
based on the measured and calculated values of the above-mentioned parameters Ff and Fβ.
In order to extend the analysis of
the obtained results, the coefficient of variation was also calculated for each
tested pinion and gear wheel, and the obtained values of the above-mentioned
coefficient are presented in the graphs in Fig. 6. Based on the calculated
values of the CV coefficient, it was shown that in the case of the
tested pinions (P_1 – P_4),
the highest variability of the measured parameter Ff
was observed for pinion no. 3 (P_3; CV_ Ff = 23%), while the highest variability
of the measured parameter Fβ was observed for pinion no. 1 (P_1; CV_ Fβ = 38%). In the case of the tested
pinions, the range of changes in the CV_ Ff
coefficient was 6 percentage points, and each calculated value was lower than
25%, which indicates a low variability of the parameter [32]. For the tested
pinions and the Fβ parameter, the range of changes in the CV_Fβ coefficient was 26 percentage points, and for
pinion no. 1 (P_1) it reached the value of 38%, which
indicates an average variability of the parameter [32]. In the case of the
tested gears (G_1 – G_4),
the highest variability of the measured parameter Ff
was observed for gear no. 3 (G_3; CV_ Ff = 43%), while the highest variability
of the measured parameter Fβ was observed for gears no. 1 and 3
(G_1 and G_3; CV_ Fβ = 30%). The range of changes in the
CV_ Ff coefficient was 33
percentage points, and in the case of 3 tested gears (G_1,
G_2, G_3) this value was
higher than 25%, which indicates an average variability of the parameter [32].
However, in the case of the tested gears and the Fβ parameter, the range of changes in
the CV_Fβ coefficient was 15 percentage
points and also in the case of 3 tested gears (G_1, G_3, G_4) this value was higher
than 25%, which indicates an average variability of the parameter [32]. For
tested pinion P_1 and gears (G_1-G_4),
the analysis of the results of the parameters Ff
and Fβ showed an average variability of these parameters. It is also worth
noting that in the case of several tested pinions and gears, significant
variability of one parameter is not associated with comparable variability of
the second analyzed parameter (P_1, G_2, G_4)
despite their assignment to the same manufacturing accuracy class.
3.2. Analysis of Fp,
Fr and Rs
measurement results
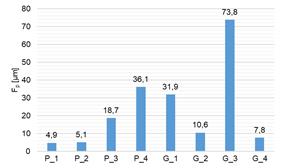
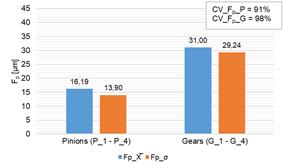
The graphs in Fig. 7, 8 and 9 show
the measured values as well as the calculated values of the arithmetic mean (X̅)
and the standard deviation (σ) of the measurement results of the parameters Fp, Fr and Rs for the tested pinions and gears.
Additionally, CV coefficient was also calculated for the analyzed
parameters.
Based on the analysis of the
measured values of the parameters Fp,
Fr and Rs
presented in the graphs in figs. 7-9, as well as the calculated values of the
arithmetic mean (X̅) and standard deviation (σ) of the mentioned parameters, it
was shown that both for the tested pinions and the tested gears there are
significant changes in the values of the above-mentioned parameters. In the
case of the Fp parameter defining
the cumulative pitch deviation and the measured pinions, the difference between
the measured maximum and minimum values was 31.2 µm, while for the measured
gears it was 66 µm. In these cases, the calculated values of the standard
deviation (σ)
were as high as 31 µm (pinions) and 29.24 µm (gears), and the calculated values
of the CV coefficient were 91% and 98%, respectively. This means that
the measured parameter Fp was
characterized by strong variability [32]. This is particularly important due to
the fact that pitch deviations significantly influence changes in the values of
dynamic forces in the meshing, contributing to increased vibration emission
from the gear meshing area.
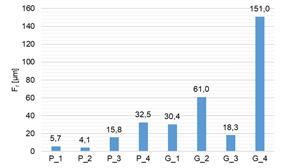
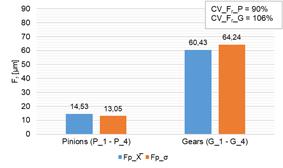
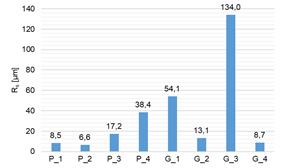
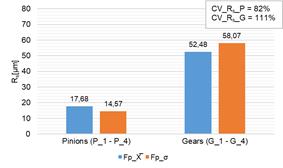
Additionally, the measured values of
the parameters Fr and Rs
defining the concentricity deviation and tooth thickness fluctuation were
analyzed. In the case of both of these parameters and the measured pinions and
gears, high values of the standard deviation (σ) were obtained in relation to the
calculated arithmetic mean value (X̅) as shown in fig. 8 b) and
fig. 9 b). Moreover, an extended analysis of the obtained values showed that
the calculated CV coefficient values were as follows: for the tested
pinions 90% and 82%, while for the tested gears 106% and 111% respectively. The
presented calculated CV coefficient values indicate strong variability
in the case of the tested pinions and very strong variability in the case of
the tested gears [32].
|
a) |
b) |
|
|
|
|
c) |
d) |
|
|
|
|
e) |
f) |
|
|
|
g) |
h) |
|
|
|
Fig.
4. Measured and calculated values of Ff parameter for: tested pinions – a), c), e), g); tested gears –
b), d), f), h)
|
a) |
b) |
|
|
|
|
c) |
d) |
|
|
|
|
e) |
f) |
|
|
|
g) |
h) |
|
|
|
Fig. 5. Measured and calculated values of Fβ parameter for tested pinions – a), c), e), g); tested gears – b),
d), f), h)
|
a) |
b) |
|
|
|
Fig. 6. Calculated
values of CV parameter for all tested pinions and tested gears:
a) in case of Ff parameter,
b) a) in case of Fβ parameter
|
b) |
|
|
|
|
Fig. 7. Measured and calculated values of Fp parameter for the tested pinions and
gears:
a) measured values of Fp, b)
calculated values of mean (X̅), standard deviation (σ) and coefficient of variation (CV)
|
a) |
b) |
|
|
|
Fig. 8. Measured and calculated values of Fr
parameter for the tested pinions and gears:
a) measured values of Fr, b) calculated values of mean (X̅),
standard deviation (σ) and coefficient of variation (CV)
|
a) |
b) |
|
|
|
Fig. 9. Measured and calculated values of the Rs parameter for the tested pinions and
gears:
a) measured values of Rs, b)
calculated values of mean (X̅), standard deviation (σ)
and coefficient of variation (CV)
4.
CONCLUSION
The presented results and their
analysis showed that in the case of gears production, maintaining similar
geometric values of selected parameters despite adopting the same nominal
dimensions is a complex issue. This phenomenon of significant variability of
selected geometric parameters of gears is an additional factor influencing the
emission of vibrations and noise of the operating gearbox. In the case of drive
systems used in various means of transport, excessive variability (often
exceeding the adopted manufacturing accuracy class) of the selected geometric
parameter may significantly contribute to an undesirable increase in vibration
and noise emissions affecting the entire structure of a given means of
transport and its users.
In the case of the tested pinions,
it was shown that despite the adoption of the same nominal dimensions, selected
measured deviations in many of the analyzed cases showed significant
differences. For the analysis of the measurement results of the Fβ parameter, the highest value of the
coefficient of variation CV was obtained for pinion no. 1 (P_1). In the case of the Ff
parameter, the calculated values were similar. Significant differences in
the tested group of pinions were noted for the parameters Fp,
Fr and Rs. The
obtained values of the coefficient of variation CV were 91%, 90% and
82%, respectively (fig. 7-9) and they indicate a strong variability of the
above parameters.
In the case of the tested gears, it
was shown that even despite adopting the same nominal dimensions, the selected
manufacturing deviations of the measured gears in many of the analyzed cases
showed significant differences. For the analysis of the measurement results of
the Ff parameter, the
highest coefficient of variation CV value was obtained for gear no. 3 (G_3), while the highest coefficient of variation CV
values for the Ff parameter were
calculated for gears no. 1 and 3 (G_1 and G_3). Significant differences in the tested group of gears
were noted for the parameters Fp, Fr
and Rs. The obtained values of the
coefficient of variation CV were 98%, 106% and 11%, respectively (fig.
7-9) and indicate strong and very strong variability of the above-mentioned
parameters.
The commonly used system for
assessing the manufacturing accuracy of gears using manufacturing accuracy
classes may not adequately reflect the actual deviations of a given gear. A
gear specimen that has been assigned a general class of high manufacturing
accuracy may be characterized by deviations in the context of selected
parameters from a range of several classes worse than the above-mentioned
assigned class. In such situation, some of the measured pinions and gears may
be classified as so-called outlier cases. This phenomenon was observed, for
example, for the tested pinion (P_3) and gears (G_3 and G_4). The use of such
gears in a gearbox which is an element of the drive system of any means of
transport may result in the generation of increased vibrations and noise. As a
result, the reliability of the drive system used in the construction of a given
means of transport may be reduced, and its service life may be shortened due to
accelerated wear. In addition, increased vibration and noise emissions
significantly reduce the comfort of using a given means of transport,
affecting, among others, passengers and the immediate surroundings. In order to
reduce vibrations and noise generated during the use of means of transport, it
is recommended to carry out an extended analysis of selected manufacturing
deviations of gears used in gearboxes intended for application in transport
means drive systems.
References
1.
Łazarz Bogusław. 2001. Zidentyfikowany
model dynamiczny przekładni zębatej jako podstawa
projektowania. [In Polish: Identified dynamic model of the gearbox as a basis
for design]. Katowice-Radom:
Publishing House and Printing Department of the Institute of Exploitation
Technology. ISBN: 83-7204-249-7.
2.
Madej Henryk. 2003. Minimalizacja
aktywności wibroakustycznej korpusów przekładni zębatych. [In Polish: Minimizing
vibroacoustic activity of gearboxes housings]. Katowice: Silesian University of Technology. ISBN:
83-7204-360-4.
3.
Müller Ludwik. 1996. Przekładnie zębate.
Projektowanie. [In Polish: Gearboxes. Design]. Warsaw: Scientific and Technical Publishing House. ISBN:
83-204-1983-2.
4.
Cempel Czesław. 1982. Podstawy
wibroakustycznej diagnostyki maszyn. [In Polish: Basics of vibroacoustic machine diagnostics]. Waraw: WNT. ISBN: 83-204-0378-2.
5.
Wieczorek Andrzej Norbert, Łukasz Konieczny, Grzegorz Wojnar,
Rafał Wyroba, Krzysztof Filipowicz, Mriusz Kuczaj. 2024. „Reduction of dynamic
loads in the drive system of mining scraper conveyors through the use of an
innovative highly flexible metal coupling”. Eksploatacja
i Niezawodnosc – Maintenance and Reliability 26(2): art. no. 181171. DOI: 10.17531/ein/181171.
6.
Wilk Andrzej, Henryk Madej, Bogusław Łazarz. 2009.
Wibroaktywność przekładni
zębatych. [In Polish: Vibroactivity
of gearboxes]. Katowice-Radom:
Scientific Publishing House of the Institute of Exploitation Technology – National Research
Institute. ISBN: 978-83-7204-875-2.
7.
Xie C., X. Shu. 2021. „A new mesh stiffness model for modified
spur gears with coupling tooth and body flexibility effects”. Applied
Mathematical Modelling 91: 1194-1210. DOI: 10.1016/j.apm.2020.11.003.
8.
Buzzoni Marco, E. Mucchi, G. D’Elia, Giorgio
Dalpiaz. 2017.
„Diagnosis of Localized Faults in Multistage Gearboxes: A Vibrational Approach
by Means of Automatic EMD-Based Algorithm”. Shock and Vibration: 1-22.
DOI: 10.1155/2017/8345704.
9.
Krot Pavlo, Volodymyr Korennoi, Radosław Zimroz. 2020.
„Vibration-Based Diagnostics of Radial Clearances and Bolts Loosening in the
Bearing Supports of the Heavy-Duty Gearboxes”. Sensors 20(24). DOI: 10.3390/s20247284.
10. Łazarz
Bogusław, Grzegorz Wojnar, Tomasz Figlus. 2007. „Comparison of the
Efficiency of Selected Vibration Measures Used in the Diagnosis of Complex
Cases of Tooth Gear Damage”. Diagnostyka 44(4): 11-18.
11. Wieczorek
Andrzej, Łukasz Konieczny, Rafał Burdzik, Grzegorz Wojnar,
Krzysztof Filipowicz, Mariusz Kuczaj. 2022. „A Complex
Vibration Analysis of a Drive System Equipped with an Innovative Prototype of a
Flexible Torsion Clutch as an Element of Pre-Implementation Testing”. Sensors
22(6). DOI: 10.3390/s22062183.
12. Wojnar Grzegorz, Rafał
Burdzik, Andrzej Norbert Wieczorek, Łukasz Konieczny. 2021. „Multidimensional
data interpretation of vibration signals registered in different locations for
system condition monitoring of a three-stage gear transmission operating under
difficult conditions”. Sensors 21:
art. no. 7808. DOI: 10.3390/s21237808.
13. Cheng Z., K. Huang, Y.
Xiong, G. Han. 2022. „An improved model for dynamic characteristics analysis of
high-contact-ratio spur gears considering localised tooth spall defect”. Engineering
Failure Analysis 140. DOI: https://doi.org/10.1016/j.engfailanal.2022.106600.
14. Franulovic M., K.
Markovic, Z. Vrcan, M. Soban. 2017. „Experimental and analytical investigation
of the influence of pitch deviations on the loading capacity of HCR spur
gears”. Mechanism and Machine Theory 117: 96-113. DOI: 10.1016/j.mechmachtheory.2017.07.006.
15. Grega R., J. Krajnak, L.
Žuľová, M. Kačír, P. Kaššay, M. Urbanský. 2023. „Innovative Solution of
Torsional Vibration Reduction by Application of Pneumatic Tuner in Shipping
Piston Devices”. Journal of Marine Science and Engineering 11(2). DOI: 10.3390/jmse11020261.
16. Hambric S. A., M. R.
Shepherd, R. L. Campbell, A. D. Hanford. 2013. „Simulations and Measurements of
the Vibroacoustic Effects of Replacing Rolling Element Bearings with Journal
Bearings in a Simple Gearbox”. Journal of Vibration and Acoustics
135(3). DOI: 10.1115/1.4024087.
17. Noga S., T. Markowski.
2016. “Vibration Analysis of a Low-Power Reduction Gear”. Strength of
Materials 48(4): 507-514. DOI: 10.1007/s11223-016-9792-x.
18. Wojnar Grzegorz, Michał
Juzek. 2018. „The Impact of Non-Parallelism of Toothed Gear Shafts Axes and
Method of Gear Fixing on Gearbox Components Vibrations”. Acta Mechanica et
Automatica 12(2): 165-171. DOI: 10.2478/ama-2018-0026.
19. Khan D., R. Burdzik.
2023. „Measurement and analysis of transport noise and vibration: A review of
techniques, case studies, and future directions”. Measurement 220. DOI: 10.1016/j.measurement.2023.113354.
20. Stassen K.R., P. Collier,
R. Torfs. 2008. „Environmental burden of disease due to transportation noise in
Flanders (Belgium)”. Transportation Research Part D: Transport and
Environment 13(6): 355-358. DOI: 10.1016/j.trd.2008.04.003.
21. Stansfeld S.A. 2015.
“Noise effects on health in the context of air pollution exposure”. International
Journal of Environmental Research and Public Health 12(10): 12735-12760.
DOI: 10.3390/ijerph121012735.
22. Pat.244312. Gear wheel
to reduce the transmission of vibrations. Silesian University of
Technology, Gliwice, PL. 19.10.2023.
23. Juzek
Michał. 2023. „Wpływ wybranych modyfikacji zastosowanych na drodze strefa
zazębienia – korpus przekładni na drgania przekładni zębatej”. [In Polish: „The
influence of selected modifications applied on the meshing zone – gearbox
housing path on the vibrations of the gear transmission”]. PhD thesis, Katowice:
Silesian University of Technology.
24. Ramadani R., A. Belsak,
M. Kegl, J. Predan, S. Pehan. 2018. „Topology optimization based design of
lightweight and low vibration gear bodies”. International Journal of
Simulation Modelling 17(1): 92-104. DOI: 10.2507/IJSIMM17(1)419.
25.
Scholzen P.,
D. Billenstein, G. Hammerl, C. Löpenhaus,
C. Glenk, C. Brecher, F. Rieg.
2019. „Investigation
of the Influence of Elastic Gear Body Structures on the Operational Behavior of
Gears”. Forschung
Im Ingenieurwesen/Engineering
Research 83(3): 435-444. DOI:
10.1007/s10010-019-00363-4.
26.
Sobczyk M., M. Oleksy, G. Budzik, R. Oliwa,
M. Stacel, H. Majcherczyk. 2020. „Polymers in
gearbox production”. Polimery 65(11/12): 749-756. DOI: 10.14314/polimery.2020.11.1.
27. Yang
J., Y. Zhang, C. H. Lee. 2022. „Multi-parameter optimization-based design of lightweight
vibration-reduction gear bodies”. Journal of Mechanical Science and
Technology 36(4): 1879-1887. DOI: 10.1007/s12206-022-0325-1.
28. Dziubek T. 2018.
„Application of coordination measuring methods for assessing the performance
properties of polymer gears”. Polimery 63(1): 49-52. DOI: 10.14314/polimery.2018.1.8.
29. Pisula J. 2021. „The
geometric accuracy analysis of polymer spiral bevel gears carried out in a
measurement system based on the Industry 4.0 structure”. Polimery 64(5):
353-360. DOI: 10.14314/polimery.2019.5.6.
30. Pisula J.,
G. Budzik, P. Turek, M. Cieplak. 2021. „An Analysis of Polymer Gear Wear in a Spur Gear
Train Made Using FDM and FFF Methods Based on Tooth Surface Topography
Assessment”. Polymers 13(10). DOI: 10.3390/polym13101649.
31. Zajdel M.,
J. Pisula, B. Sobolewski, T. Sanocki, H. Majcherczyk,
G. Budzik, M. Oleksy. 2022. „Geometrical accuracy of injection-molded composite gears”. Polimery
67(7-8): 324- 336. DOI: 10.14314/polimery.2022.7.5.
32. Everitt Brian. 1998. The
Cambridge Dictionary of Statistics. Cambridge, UK New York: Cambridge
University Press. ISBN: 978-0521593465.
Received 18.08.2024; accepted in revised form 11.11.2024
![]()
Scientific
Journal of Silesian University of Technology. Series Transport is licensed
under a Creative Commons Attribution 4.0 International License
