Article citation information:
Mańka, A. Problems and good practices of measuring the railway wheel rolling diameter. Scientific Journal of Silesian University of Technology. Series Transport. 2024, 125, 167-176. ISSN: 0209-3324. DOI: https://doi.org/10.20858/sjsutst.2024.125.11.
Adam MAŃKA[1]
PROBLEMS
AND GOOD PRACTICES OF MEASURING
THE RAILWAY WHEEL ROLLING DIAMETER
Summary. The article describes
the results of research on the influence of the methods used to measure
the rolling diameter of a railway wheel "D" and measuring instruments
on the accuracy of the obtained results. The differences in the results
obtained using five different measuring instruments are presented. In particular,
the difficulty of meeting the repair criterion |D-D'| was pointed out using the
current measurement method. The article also illustrates the original
measurement method proposed by author, which is a reference measurement for
currently used methods, along with its limitations.
Keywords: railway wheel, wheelset, diameter of railway
wheel, diameter difference, parameter |D-D'|, diameter measurement method,
new measurement method
1. INTRODUCTION
To enable the operation of railway vehicles, it
is necessary to ensure their required technical condition. As part of periodic
tests of the technical condition of the vehicle, measurements are taken of
those values that indicate the state of wear of elements that are important for
the technical safety of the vehicles. Taking measurements and comparing
them with the limit values contained in the maintenance manual system (MMS)
allows for an unambiguous engineering assessment of the vehicle's
condition and the approval or withdrawal of the vehicle from operation. The
railway wheel set, as an element particularly responsible for safety, is
subject to a rigorous maintenance process. This process is described in detail
in each documentation of the MMS of railway vehicles and includes a measurement
card. An important element of this measurement card is the indication of the
values that are to be measured together with the provision of reference values,
which are the basis for the engineer to make decisions on the further operation
of this element. Reference values, like other elements of the MMS, are
indicated as mandatory in [1 - (§13.2 c)], i.e.: design values, post-repair
values and limit values.
2. ANALYSIS OF NORMATIVE REQUIREMENTS IN TERMS
OF THE |D-D’| CRITERION
Requirements concerning the method
of measurement, maintenance process, measured values and reference values are
also the subject of Journals of Laws, Railway Instructions, standards and
Technical Specifications for Interoperability (TSI) among others in
publications [2÷12]. Currently, a significant part of the above-mentioned
documents is not obligatory due to the lack of reference in higher-level legal
acts (act, directive, regulation, including TSI, announcement). This leaves ECM
(Entity in Charge of Maintenance) units without superior guidelines and the
need to rely on good industry practices. It is important to emphasize the fact
that each new edition of TSI, standards or other industry requirements may
introduce the standards indicated below and then the provisions contained
therein become mandatory. This is another premise for constant monitoring of
railway regulations in the field of vehicle maintenance, introducing changes
and continuous improvement of MMS.
For the analysis of the requirements
of the selected value |D-D’| characterizing the railway wheel set, 12 normative
and legal sources [1÷12] were taken into account. Considering the maintenance
process, the analysis of legal requirements was started with the regulation
[1]. This regulation is a current mandatory legal act, but it does not define
precise requirements or values in the scope of the parameter |D-D’|. The
analysed TSI Loc&Pas [2] is a current and mandatory document. TSI
Loc&Pas [2] does not state this criterion directly but indicates the need
to maintain compliance with EN14363 standards and to apply EN 13979-1:2003+A2:2011
standards, however, within the scope of points 7.2.1, 7.2.2, 7.2.3 and 7.3 and
6 of this standard. TSI Loc&Pas also refers to EN 13260:2009 +A1:2010
(3.2.1). It should be noted that this standard has already been updated, but
due to the indication of a specific edition in the TSI, it is still legally
required. TSI [2] itself in Tables 1 and 2 contains requirements for SR, Sd, Sh
and qr, but without |D-D’|. From the standards listed in the TSI, the EN
14363+A2:2023-01 [3] and 13979-1:2020-12 [4] standards are up to date, but they
do not directly define the values of the post-repair geometric parameters of
the railway wheel. It is important that the TSI [2] refers to the EN
13260:2021-02 [5] standard as mandatory, but only indicates its point 3.2.1,
which means that although this standard precisely defines the geometric
parameters of railway wheels, including |D-D’| £0.3 mm and £0.5 mm, depending on the speed of movement for
V £120 km/h and over 200 km/h,
respectively, these elements are not mandatory, but only the elements included
in point 3.2.1 of the publication [5]. EN 15313 [6] is current and defines the
parameter |D-D’|, similarly to the above 0.3 and 0.5 mm for V£120 km/h and V>120 km/h,
respectively, but as a value after reprofiling and not as a decision
criterion for reprofiling.
EN 13715 [7] was also analysed due
to the subject of the standard "Running surface outline" included
even in the title. This standard is current, but it also does not indicate the repair
values of the measured geometric parameters of the wheel outline. The railway
standard PN-92/K-91056 [8], which is the prototype of the above standard, also
does not include permissible values for the geometric dimensions of the wheel.
The same applies to EN 15302 [8] and EN 14363 [10] as well as EN 17095
[11].
Only the PN-K-91045 [12] standard
from 2002 defines the outline of wheel sets and the parameters |D-D’| <
0.5 mm, however, this standard has been withdrawn from use. It is also worth
noting that this standard required a value below, but not equal to 0.5 mm
(important symbol) for all vehicles with an operating speed V below 200 km/h.
It can therefore be seen that the currently selected standards indicate
permissible values, but these requirements are not mandatory. Therefore, when
verifying the railway instructions of several carriers, a significant
discrepancy can be seen in the scope of this criterion, i.e. |D-D’| from £ 0.3 mm through < 0.5 mm to £ 1 mm. This is not a favourable
situation both from the point of view of the safety of the railway system and
the arguments for the values adopted by individual railway entities in the DSU.
This situation is also not conducive to the development of uniform requirements
for the maintenance of rail vehicles, which at the current stage of railway
development in the EU is becoming an expected and justified element from the
point of view of economics and ensuring safety.
3. ACCURACY OF MEASUREMENTS OF PARAMETERS
DESCRIBING A RAILWAY WHEEL SET AND WHEEL PROFILE
The most important parameters that
constitute the basis for determining the technical condition of railway wheel
sets include: qr, Az (AR), Ez (SR), Ow (Sh), Og (Sd), b (BR) and D and |D-D’|.
Based on current measurement experience and control, measurement and research
equipment used in the industry, these parameters are measured with the
following accuracies (measurement uncertainty / resolution):
•
qr,
rim steepness, (1 mm / 1 mm);
•
AR,
distance between the inner surfaces of the rims or wheel rims in wheel sets
without load (1 mm / 1 mm);
•
SR,
guide width (indirect measurement based on AR);
•
Sh
[h], rim height, (0.1 mm / 0.1÷0.01 mm);
•
Sd
[e], rim thickness, (0.1 mm / 0.1÷0.01 mm);
•
BR,
rim width, (0.1÷0.05 mm / 0.1÷0.05 mm);
•
D
[d], rolling circle diameter, (0.1÷0.2 (0.08*) mm/0.1÷0.01 mm);
•
|D-D’|,
difference in rolling diameter of a wheel for one wheel set, (indirect
measurement based on D);
•
|Dmax-Dmin|
difference in wheel diameters between drive and rolling bogie sets, between
drive bogie sets, between rolling bogie sets, between rolling and driving bogie
sets, (indirect measurement based on D).
It can therefore be seen that the measurement of the wheel rolling
diameter D mm, and even more so the differences |D-D’| and the series
|Dmax-Dmin| determined multiple times on this basis, are burdened with
measurement uncertainty, which is of significant importance for maintaining the
decision criterion.
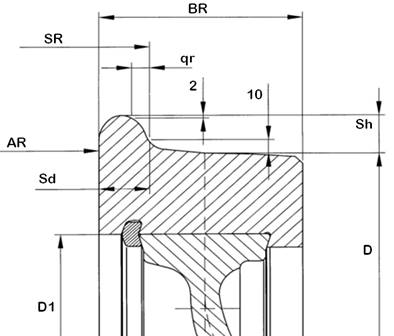
Fig. 1. Designations of the wheel rolling
profile elements, wheel cross-section and
wheel set geometry [13, 14]
4. RESEARCH METHODOLOGY
To identify possible problems and differences in the measurement of the
|D-D’| parameter, a series of measurements of the rolling diameter of the
railway wheel D were performed using several measuring devices, including:
•
3
devices – three-point diameter gauges of various types and manufacturers;
•
1
optical device;
•
1
vernier calliper with a range of 1000 mm and accuracy of ±0.02 mm equipped with
designed and manufactured measurement bases (designation in the study SN).
To verify measurement errors, a single, untied wheel of the 22WE type
vehicle made of ER8 material and a nominal diameter of 850 mm was tested. The
wheel was measured dismantled from the wheel set in the repair hall. The
nominal diameter of the new wheel of the tested type is 850 mm. The tested
wheel comes from a vehicle designed to travel at a maximum speed of 160
km/h. Before measurements, the wheel was cleaned of oxides and degreased with
CX80. One section was left raw for further verification of the effect of
cleaning on measurement accuracy.
5. THE COURSE OF THE RESEARCH AND THE OBTAINED
RESULTS
The AA type measuring device (AA, BB, CC - authors' designations) was
used to perform 95 measurements of the same railway wheel. The manufacturer of
the AA device declares measurement accuracy of ±0.1 mm and resolution of 0.1 mm
or 0.01 mm.
The first series of measurements (34 measurements) was performed within
5 minutes of the device being delivered to the hall, which did not guarantee
that the temperature of the measuring device would be established. The
measurements were performed in November at an outside temperature of approx. 100C
and an inside temperature of approx. 190C. The results obtained
unequivocally confirmed the significance of the manufacturer's recommendation
that to obtain correct measurement results, the measurement should be performed
only after the temperature of the device has been established and taking into
account the recommendations to hold the device in designated places (heating at
the temperature measurement points).
The average (maximum) value of the differences in the measured parameter
D for a single point was:
•
for
the first series of measurements: 0.47 mm (0.7 mm);
•
for
the second series of measurements: 0.13 mm (0.3 mm).
Based on the measurements performed,
it is therefore clear that failure to consider the need to establish and
equalize the temperature of the device with the temperature of the measured
object may result in obtaining an average difference value D more than 3.6
times greater than in the steady-state conditions. Therefore, only the second
measurement series and measurements with other devices performed after the
temperature had stabilized are considered for further tests. Analysing the
detailed measurement results presented in Fig. 2, it can be stated that
the average value of the wheel diameter was DmeanAA=797.47 mm with a spread
between the maximum and minimum value of as much as dDAA=1.6 mm.
Significant differences in the measurement values between individual points may
indicate ovalisation of the wheel or imperfections of the measurement method
for the three-point method.
Significant differences in the measurement values were also obtained
between the left, right and center / point sides. This is obtained for all
points, i.e. A, B and C: dDA=1.3 mm; dDC=1.2 mm; dDD=1.6
mm. It can be seen that changing the position of the measuring point by only
about ±120 mm around the circumference of the wheel (which is described as the
left or right side) results in a measurement result that differs by as much as
1.6 mm (with very good repeatability in a single point). This indicates that
the measuring device indicates repeatable results, while the place of
application of the measuring base on the wheel or its rolling diameter shows
significant deviations from the average value. Such a significant dispersion of
results depending on the measurement location makes it difficult to make a
clear decision on meeting the requirements in terms of the |D-D’| or |Dmax-Dmin|
criterion. i.e. both in the range of <0.5 mm after turning (repair
dimension)), requirements indicated in the MMS for the vehicle (limit dimension
|D-D’| <1 mm. Having the above measurement results available and the
unambiguous confirmation of very good repeatability of measurement results at
one point, proving the quality of the measuring device, it was necessary to
analyse whether the cause of these discrepancies is not caused by wheel ovality
or unevenness on its rolling surface. For this purpose, a parametric model of
the measuring system was introduced (Fig. 2), for which the influence of
unevenness at the point of contact between the measuring head and the wheel on
the obtained rolling diameter of the wheel D was simulated.
In Fig. 3, the red arrows represent two measurement bases, and the green
colour represents the measurement location with the measuring head (micrometre
sensor) of the three-point inside diameter gauge. The results obtained based on
this simulation clearly show that even the smallest local defects of the wheel
cause very large, often unacceptable changes in the measurement result. This
means that the measurement performed using this method depends on local defects
on the railway wheel surface. To minimize the impact of this dependence, this indication
should be taken into account when selecting the measurement location and,
if possible, avoid measuring at places with local unevenness of the wheel
surface (although of course this is not always possible).

Fig. 2. Summary of the results of measurements
with an AA diameter gauge
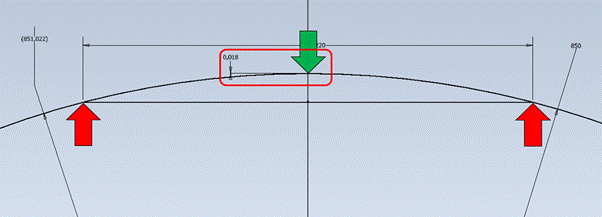
Fig. 3. Parametric model of the three-point
diameter measuring system
(the distance of supports was intentionally changed)
Based on this model, wheel defects
of different depths were intentionally introduced to illustrate the effect of
these local defects on the measurement result of the wheel rolling diameter D.
The selected measuring device was also used to measure the wheel
diameter in 23 places every 15.70. This measurement was aimed at determining
the wheel ovality. The results obtained are shown in Fig. 5. Despite the
relatively high repeatability of measurements at individual points, a
significant difference was obtained between the maximum and minimum measured
diameter D. In places where extreme values were obtained, the measurement was
repeated three times and very good repeatability was obtained. The maximum
difference in wheel diameters D measured at 23 points on the circumference is
dD23=2.25 mm.
Such a significant difference in diameters may indicate ovality of the
wheel or inaccuracy of the applied measurement method (Fig. 4). The obtained
average value of the diameter D is Dśr23=797.47 mm. In the
comparison of Dśr23 with the average value obtained using a vernier
calliper (VC), i.e. DVC=769.68 mm, a difference of 0.79 mm is
obtained. This measurement also indicates that averaging the results of 23
measurements does not guarantee obtaining correct measurement results that
could be compared with the criterion |D-D’|.
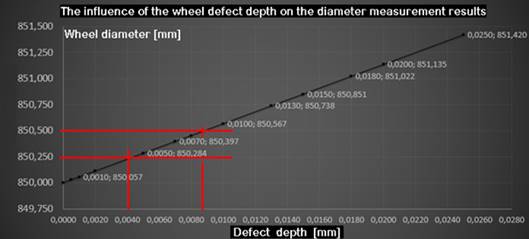
Fig. 4. Graph of changes in the
indications of the rolling diameter D resulting from
the local wheel irregularity
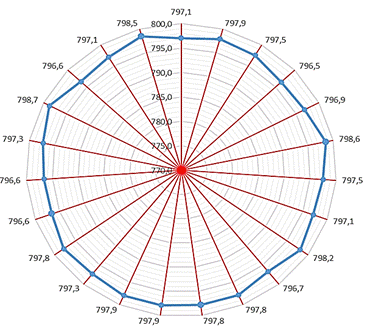
Fig. 5. Visualization of the measurement
results of the diameter D [mm] in 23 places on
the circumference of the wheel made with a three-point diameter gauge
In the further part of the work, measurements were performed using other
measuring devices, including an optical device. The influence of cleaning the
surface before measurement was also verified – Fig. 6. The obtained results
indicate that the measurement performed with the optical device (marked in Fig.
6 as CC) before cleaning had a smaller scatter of results, i.e. dD=0.18 mm than
after cleaning (shiny surface) dD=0.40 mm. After cleaning, the diameter DmeanCC=796.54
mm was obtained, i.e. 0.56 mm smaller than for the measurement without
cleaning. It can therefore be seen that both measurement methods are sensitive
to contamination of the measuring surface, however, in the tested case, the CC
device overestimated the measurement by 0.56 mm and the result obtained
from the three-point diameter gauge marked in Fig. 6 as BB was lower by 0.48 mm
in the case of cleaning the wheel surface.
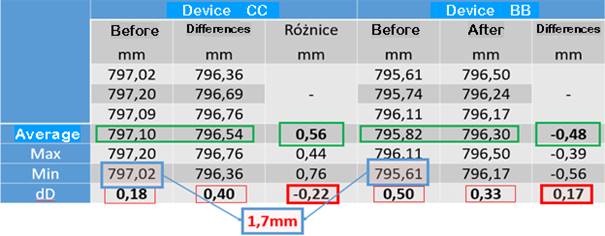
Fig. 6. Summary of measurement
results before and after cleaning the surface of the railway wheel
It should be noted that for both the CC and BB devices, the results most
similar to the VC vernier calliper are obtained in the case of measurement on a
cleaned surface. Taking the average value of DVCmean=796.68 mm,
the difference in relation to the CC measurement on the cleaned surface is dDVC-CC=0.14
mm and in relation to the BB measurement is
dDVC-BB=0.38 mm and in relation to the uncleaned surface,
respectively
dDVC-CC=(-0.42) mm and dDVC-BB=0.86 mm. The test
shows that cleaning the measurement site for both the CC and BB devices
significantly brings the measurement result closer to the reference value
(VC). It is also worth noting that surface contamination in the case of the CC
device always overestimated the measurement result and the BB device always
underestimated the measurement result in relation to the value obtained after
cleaning.
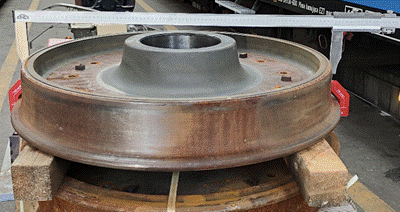
Fig. 7. View of the vernier calliper
measurement with measurement bases
To determine the reference value, it was proposed to measure using
specially designed measurement bases and a vernier calliper (VC) with a
measuring range of 1000 mm and an accuracy of ±0.02 mm – Fig. 7.
6. CONCLUSIONS AND DIRECTIONS FOR
FURTHER WORK
Based on the conducted research, it
was found that:
•
there
is an urgent need to standardize the requirements for the maintenance criteria
for wheel set geometry, in particular in the |D-D’| and |Dmax-Dmin| criteria,
and the need to standardize maintenance procedures throughout the European
Union along the lines of the introduced TSIs (to increase safety and reduce
maintenance costs);
•
the
tested methods and measuring instruments marked AA, BB, CC, EE showed
significant differences in the rolling diameter D. The rolling diameter values
obtained ranged from 796.17 mm to 798.50 mm, which gives a difference of 2.33
mm (on one and the same wheel);
•
even
minimal differences in the measurement performance compared to the measuring
instrument manufacturer's recommendations resulted in several times greater
differences in the measurement results at a single point (temperature, accuracy
of application to bases, calibration, surface cleaning);
•
such
significant differences in results using different measurement methods exclude
the simultaneous use of different measuring instruments for the purpose of
determining
|D-D’| for the vehicle;
•
in
all categories, the best parameters were shown by the vernier calliper, for
which the average dispersion at one point was 0.03 mm (14 times smaller
compared to CC (0.43 mm) and 4 times smaller compared to AA (0.13 mm));
•
an
obvious disadvantage of the method using a vernier calliper and measuring bases
is the possibility of measuring on a dismantled wheel set;
•
in
the example implemented, no clear advantage of any measuring device was
indicated (except for the vernier calliper);
•
significant
differences in the diameter were obtained depending on whether the surface was
measured in an operational state or cleaned, i.e. on average by -0.56 mm
("the diameter decreased" after cleaning) for the optical device
and by 0.48 mm ("the diameter increased" after cleaning) for the
internal diameter gauge.
Based on the measurements performed, it can be stated that despite the
considerable technical advancement of measuring instruments, the measurement
methods used so far without removing the wheel sets from the vehicle are
burdened with measurement uncertainty, which is significant in relation to the
maintenance criterion |D-D’| < 1 mm. It is advisable to support the
measurements performed with another method with higher measurement accuracy,
which in the case of obtaining the limit value will allow for unambiguous
verification of the difference in the diameter of the wheels in the railway
wheel set. It is obvious that the measured parameter is of great importance for
the safety of the railway system, as well as a significant impact on
operating costs, therefore increasing the accuracy and repeatability of
the measurement is particularly justified in this case.
References
1.
Announcement of the Minister of Infrastructure and
Construction of 27 January 2016 on the announcement of the uniform text of the
regulation of the Minister of Infrastructure on the general technical
conditions for the operation of railway vehicles. Dz.U. 2016 poz. 226 (replacing Dz.U. 2005 nr 212 poz.
1771). [In Polish: Obwieszczenie
Ministra Infrastruktury i Budownictwa z dnia 27 stycznia 2016 r. w sprawie
ogłoszenia jednolitego tekstu rozporządzenia Ministra Infrastruktury w sprawie
ogólnych warunków technicznych eksploatacji pojazdów kolejowych].
2.
Commission regulation (EU) No 1302/2014 of 18 November
2014 concerning a technical specification for interoperability relating to the
‘rolling stock - locomotives and passenger rolling stock’ subsystem of the rail
system in the European Union. Official Journal of the European Union,
2024. TSI Loc&Pas.
3.
EN 14363+A2:2023-01 Railway applications – Model tests
and simulations of the dynamic properties of rail vehicles before being
put into service – Running behaviour tests and stationary tests.
4.
EN 13979-1:2020-12 Railway applications – Wheelsets
and bogies – Monoblock wheels – Technical approval procedure – Part 1: Forged
and rolled wheels.
5.
EN 13260:2021-02 Railway applications – Wheelsets and
bogies – Wheelsets – Product requirements.
6.
EN 15313:2016-05E Railways – Performance requirements
for wheel set maintenance – Maintenance of wheel sets of vehicles in service
and out of service.
7.
EN 13715:2020-12 Railway applications –
Wheelsets and bogies – Wheels – Tread profile.
8.
PN-92/K-91056 Railway rolling stock – External outline
of rims and wheel rims of rimless wheel sets.
9.
EN 15302:2022-03 Railways – Parameters of wheel-rail
contact geometry – Definitions and evaluation methods.
10.
EN 14363+A2:2023-01 Railway applications – Model tests
and simulations of the dynamic properties of rail vehicles before being
put into service – Running behaviour tests and stationary tests.
11.
EN 17095:2019-05 Railway applications – Rolling stock
maintenance – Maintenance records.
12.
PN-K-91045:2002 Railway rolling stock – Wheel sets –
Requirements and test methods.
13. Instructions for
measuring and technical evaluation of traction vehicle wheel sets.
Bt-11. PKP Intercity, 2010.
14.
Młynarski, S., R.
Pilch, M. Smolnik, J. Szybka, G. Wiązania. 2019. “A simulation model for
regenerated objects with multiparameter evaluation of technical condition
reliability estimation”. Journal of
KONBiN 49(2). DOI: 10.2478/jok-2019-0023.
Received
29.09.2024; accepted in revised form 10.11.2024
![]()
Scientific
Journal of Silesian University of Technology. Series Transport is licensed
under a Creative Commons Attribution 4.0 International License