Article
citation information:
Vakulenko, I., Proydak,
S., Askerov, H.
The
calculation of stress intensity factor steel of railway wheels. Scientific Journal of Silesian University of
Technology. Series Transport. 2020, 109,
187-193. ISSN: 0209-3324. DOI: https://doi.org/10.20858/sjsutst.2020.109.17.
Igor VAKULENKO[1], Svetlana PROYDAK[2], Hangardas ASKEROV[3]
THE CALCULATION OF
STRESS INTENSITY FACTOR STEEL OF
RAILWAY WHEELS
Summary. From an analysis of the
dependence complex of carbon steel properties on structural parameters, it was
found that for an isostructural state, the influence of austenite grain
size on impact strength exceeds the dependence on carbon content. As a result
of explaining correlation relationships between individual mechanical
characteristics, to evaluate critical stress intensity factor, a relationship
is proposed based on the use of impact strength. The proportionality
coefficient in proposed dependence is determined by ratio of elongation to
narrowing at tensile test.
Keywords: stress intensity factor, impact strength,
elongation, narrowing, austenite, pearlite
1. INTRODUCTION
During
operation of railway transport, elements railway wheels are exposed to complex
total stresses [14,16,17]. Achievement maximum permissible concentration
defects of crystalline structure in metal of wheels determine the conditions
for the formation and growth of fracture centres [18]. In addition, dispersion
and morphology of phase components that determine the level of strength
properties, reliability operation of the wheels largely depends on the
sensitivity of metal to stress concentrators from micro- and macro- mechanical
damage rolling surface, cracks various origin [6], etc. Of the many
characteristics, certain propagation was obtained by the stress intensity
factor at beginning of interval unstable crack growth
(K1c) [15]. The specified
characteristic determines the condition for the formation of a plane-deformed
state of metal at the mouth of the crack. According to the results of numerous
studies [3,13,19], use K1c
allows us to estimate the maximum allowable stress at which there is no growth
formed crack a certain size. Similarly, ambiguity of the dependence K1c on certain structural
components of carbon steel [7] and the static conditions for its determination
can distort the nature of its change. This situation is due to absence of
considering explicit effect shock pulse of the load when K1c determining, although, during operation, the railway
wheels are subjected to numerous dynamic influences. On the other hand, the
search for K1c correlations
with other fracture toughness characteristics may be the basis for the
development of a comprehensive parameter that considers larger number factors
determining the metal resistance to fracture.
2. MATERIALS
AND METHODS
The material used for this study was carbon steels of
railway wheels with different contents of chemical elements: 0,47% С,
0,71% Mn, 0,3% Si, 0,015% P, 0,012% S (St. A); 0,55% C, 0,64% Mn, 0,34% Si,
0,014% P, 0,009% S (St. B); 0,59% C, 0,81% Mn, 0,3% Si, 0,019% P, 0,017% S (St.
C); 0,63% C, 0,72% Mn, 0,29% Si, 0,017% P, 0,02% S (St. D); 0,65% C, 00,73% Mn,
0,31% Si, 0,017% P, 0,009% S (St. E). The blanks of samples for tests on static
tension, determination of K1c,
impact strength (KCU) and fatigue
were processed to obtain different austenite grain sizes (d) using heating and holding at temperatures above AC3. The thickness ferrite
layer of perlite colonies was regulated by changing the temperature of
isothermal transformation austenite at pearlite region on thermo kinetic
diagram. The yield stress (sy),
stress strengths (ss),
and plastic properties (elongation -d and narrowing
-y) were
determined from analysis of tensile diagrams obtained at a temperature of +20![]() and
a strain rate of
and
a strain rate of
10![]() . Values K1c and KCU were determined according to known
methodologies [5,13]. The microstructure was examined under a light and
electron microscopes. The austenite grain size and thickness ferrite layer of
perlite colony (l) were estimated in accordance with methods of
quantitative metallographic [2].
. Values K1c and KCU were determined according to known
methodologies [5,13]. The microstructure was examined under a light and
electron microscopes. The austenite grain size and thickness ferrite layer of
perlite colony (l) were estimated in accordance with methods of
quantitative metallographic [2].
3. RESULTS
AND DISCUSSION
Based on studies [9], it was found that regardless
of nature loading metal material, the fracture process consists of several
successively developing stages: from moment formation lesion focus, its growth
up to final destruction of the metal. Assuming that process, micro crack
nucleation to a certain extent is determined by ability metal to strain
hardening [11], under conditions of static loading, the differences dependences
of strength and plastic properties on size of structural element are completely
justified. For carbon steel, of rim railway wheel dispersion of perlite colony
is the main structural parameter. The ability of perlite to deform as a whole [1],
restriction of dislocation reactions to the thickness of ferrite gap of a
pearlite colony, and parabolic nature of hardening from l [1,10,11] are determined by the
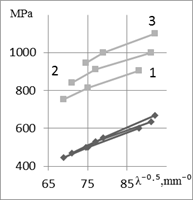
relations ![]() (Fig. 1). Low
degree accumulation of dislocations during loaded steel up to level of yield
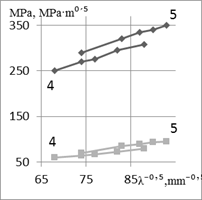
stress explains the absence of explicit influence volume fraction of cementite (f) (Fig.1a). A similar explanation, at
case of slight change in f, albeit
with certain reservations, can be propagated and for fatigue limit (s-1)
(Fig.1b). The value of ss,
to a greater extent, in comparison with sy,
depends on f. If the level ss is largely
determined by development of processes strain and dispersion hardening [10],
then plasticity characteristics should apparently be related to compatibility
of propagated deformation in phase components of steel [11]. Indeed, the
plasticity level of steel, on the one hand, is limited by ability, a cementite
of pearlite colony endure certain plastic deformations [1], on the other hand,
is determined by the higher ductility of structurally free ferrite. Thus,
compatibility conditions at propagation plastic flow in pearlite colonies and
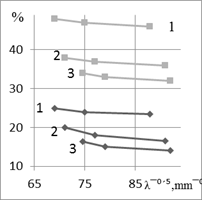
in areas of structurally free ferrite can be characterised by d and y. However, after stress reaches the level ss and the
corresponding plastic deformation, exhaustion of accumulation resource of
defects crystal structure in any of phase components carbon steel will be the
beginning of a complex fracture process. Starting from moment of crack
initiation, critical growth conditions at various stages are estimated by the
stress intensity factor at mouth of crack [3,13,19]. The dependence K1c on the
thickness of ferrite gap pearlite colony (Fig.1b) is similar sy (Fig.1a), for
same interval of variation volume fraction of cementite. Thus, an increase
dispersion of pearlite at same carbon content is one of the main directions of
increase K1c for steel
railway wheels. Meanwhile, the discovered evidence of deviations from indicated
nature of K1c change
indicates the need to consider additional influence factors. Indeed, for the
carbon steel of railway wheel, in addition to pearlite colony dispersion, the
state of austenite grain boundaries has a definite effect on the crack
resistance of the metal [4]. It is known that with constant content atoms of
harmful impurities in steel, at increase in d
thereby increases their concentration at grain boundaries, contributing to the
transition of metal to a brittle state, especially under conditions of impact
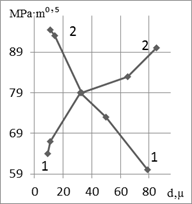
loading. The nature effect of d on K1c and s-1 of studied
steels is given in Fig. 2. In contrast to K1c and s-1,
impact strength, being a rather sensitive characteristic for evaluation state
of grain boundaries austenite of carbon steel [1,4], is used in regulatory
documents as a parameter for the quality of railway wheels for various
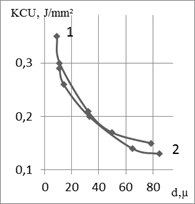
purposes. Effect of d on KCU is shown in Fig. 2c. The practically
absent effect of carbon content in steel can be considered as evidence of a
certain sensitivity, this characteristic to concentration of harmful impurities
at austenite grain boundaries. In general, the stress intensity factor is
estimated by the dependence [6,15]:
(Fig. 1). Low
degree accumulation of dislocations during loaded steel up to level of yield
stress explains the absence of explicit influence volume fraction of cementite (f) (Fig.1a). A similar explanation, at
case of slight change in f, albeit
with certain reservations, can be propagated and for fatigue limit (s-1)
(Fig.1b). The value of ss,
to a greater extent, in comparison with sy,
depends on f. If the level ss is largely
determined by development of processes strain and dispersion hardening [10],
then plasticity characteristics should apparently be related to compatibility
of propagated deformation in phase components of steel [11]. Indeed, the
plasticity level of steel, on the one hand, is limited by ability, a cementite
of pearlite colony endure certain plastic deformations [1], on the other hand,
is determined by the higher ductility of structurally free ferrite. Thus,
compatibility conditions at propagation plastic flow in pearlite colonies and
in areas of structurally free ferrite can be characterised by d and y. However, after stress reaches the level ss and the
corresponding plastic deformation, exhaustion of accumulation resource of
defects crystal structure in any of phase components carbon steel will be the
beginning of a complex fracture process. Starting from moment of crack
initiation, critical growth conditions at various stages are estimated by the
stress intensity factor at mouth of crack [3,13,19]. The dependence K1c on the
thickness of ferrite gap pearlite colony (Fig.1b) is similar sy (Fig.1a), for
same interval of variation volume fraction of cementite. Thus, an increase
dispersion of pearlite at same carbon content is one of the main directions of
increase K1c for steel
railway wheels. Meanwhile, the discovered evidence of deviations from indicated
nature of K1c change
indicates the need to consider additional influence factors. Indeed, for the
carbon steel of railway wheel, in addition to pearlite colony dispersion, the
state of austenite grain boundaries has a definite effect on the crack
resistance of the metal [4]. It is known that with constant content atoms of
harmful impurities in steel, at increase in d
thereby increases their concentration at grain boundaries, contributing to the
transition of metal to a brittle state, especially under conditions of impact
loading. The nature effect of d on K1c and s-1 of studied
steels is given in Fig. 2. In contrast to K1c and s-1,
impact strength, being a rather sensitive characteristic for evaluation state
of grain boundaries austenite of carbon steel [1,4], is used in regulatory
documents as a parameter for the quality of railway wheels for various
purposes. Effect of d on KCU is shown in Fig. 2c. The practically
absent effect of carbon content in steel can be considered as evidence of a
certain sensitivity, this characteristic to concentration of harmful impurities
at austenite grain boundaries. In general, the stress intensity factor is
estimated by the dependence [6,15]:
![]() ,
(1)
,
(1)
where E - is Young's modulus, G is the energy of deformed metal. When
the formed of volumetric stress state, the required energy at growth unit
surface of the crack does not exceed absorbed energy by metal, the relation [8]
is satisfied:
 ,
(2)
,
(2)
where l - is half length of crack. After
substituting (2) in (1), obtain dependence for determining stress intensity
factor under static loading:
![]() (3)
(3)
Existing
difficulties in the interpretation [3,15] and definition of G [8,12] indicate the need to search for another parameter to
determine K1c. Considering
that value of material’s fracture energy during impact test actually
consists of the nucleation and crack growth energies, an attempt was made to
use the impact strength instead of G
in (1). After replacing G by KCU, relation (1) takes the form:
![]() ,
(4)
,
(4)
where B - is the coefficient. At case of
formation plane-deformed state of metal at the mouth of growing crack,
Poisson's ratio (![]() ) or another quantity with its participation: (
) or another quantity with its participation: (![]() ) [13,15] is used as В.
After substituting in (4) instead of B
) [13,15] is used as В.
After substituting in (4) instead of B
![]() = 0.25 (for carbon steels average value of
interval Poisson's ratio is 0.24-0.26), E = 202 GPa [8] and corresponding KCU values (Fig.2c), was calculated
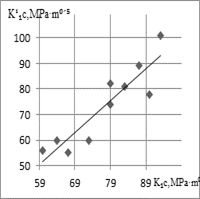
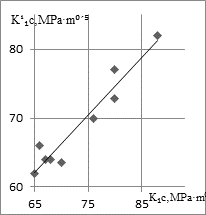
stress intensity factor. Result of ratio experimental values K1c (Fig.2b) from
calculated values according to (4) (denoted
= 0.25 (for carbon steels average value of
interval Poisson's ratio is 0.24-0.26), E = 202 GPa [8] and corresponding KCU values (Fig.2c), was calculated
stress intensity factor. Result of ratio experimental values K1c (Fig.2b) from
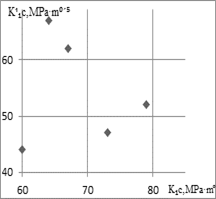
calculated values according to (4) (denoted ![]() ), shown in Fig. 3a,b. The presented
relationships indicate a practically absent correlation between the calculated
and experimental values of the critical stress intensity factor. A similar
relationship between them was also obtained after substituting B = (
), shown in Fig. 3a,b. The presented
relationships indicate a practically absent correlation between the calculated
and experimental values of the critical stress intensity factor. A similar
relationship between them was also obtained after substituting B = (![]() ) in (4). One of the reasons for lack of
coincidence between
) in (4). One of the reasons for lack of
coincidence between ![]() and K1c may be
constancy of B, although their
numerical values correspond approximately same order of magnitude. In general
terms, the
and K1c may be
constancy of B, although their
numerical values correspond approximately same order of magnitude. In general
terms, the ![]() value, being the ratio of transverse to
longitudinal deformations [8], characterises behaviour of material in region of
uniform plastic flow. The metal at mouth of a growing crack (at determined K1c) is in a plane-deformed
state, and to a greater extent should be characterised by the ratio between
elongation and narrowing in the region of local deformation. Given that by
definition
value, being the ratio of transverse to
longitudinal deformations [8], characterises behaviour of material in region of
uniform plastic flow. The metal at mouth of a growing crack (at determined K1c) is in a plane-deformed
state, and to a greater extent should be characterised by the ratio between
elongation and narrowing in the region of local deformation. Given that by
definition ![]() <1, the presence of metal in a triaxial
stress state will lead to values greater than 1. Given that regulatory
documents on railway wheels
provide for use d and y as quality parameters of metal, for
fulfillment of condition of B <1,
is necessary to replace B in (4) on
the ratio d to y dependence:
<1, the presence of metal in a triaxial
stress state will lead to values greater than 1. Given that regulatory
documents on railway wheels
provide for use d and y as quality parameters of metal, for
fulfillment of condition of B <1,
is necessary to replace B in (4) on
the ratio d to y dependence:
 (5)
(5)
Results of
calculating K1c value after substituting
experimental values d, y in (5) from Fig. 1c and KCU from Fig. 2c for the steels St. B
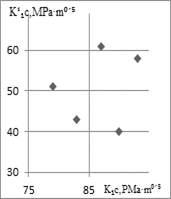
and St. E, are presented in Fig. 3c, and for St. A, St. C and St. D in
Fig. 4a. A comparative analysis of the obtained values indicates a better
coincidence of values![]() and K1c in comparison with
calculation according to dependence (4). To further verify fulfillment of
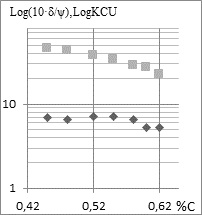
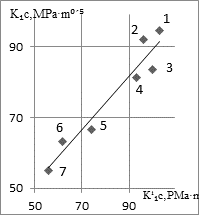
dependence (5), experimental data current production of railway wheels were
used (Fig. 4b). The calculation results according to (5) and experimental
values K1c for different
carbon contents in steel showed a similar level of quality (Fig. 4c). In
addition, existing differences in absolute values K1c and
and K1c in comparison with
calculation according to dependence (4). To further verify fulfillment of
dependence (5), experimental data current production of railway wheels were
used (Fig. 4b). The calculation results according to (5) and experimental
values K1c for different
carbon contents in steel showed a similar level of quality (Fig. 4c). In
addition, existing differences in absolute values K1c and ![]() , can be eliminated by account of the possible
dependence of angular coefficient in relation (5) on additional
characteristics. Thus, excluding complex operations for the manufacture of
sample and its testing in the determination K1c,
it is possible to use the relation (5) to evaluate the critical stress
intensity factor according to mechanical characteristics metal of the railway
wheels current production.
, can be eliminated by account of the possible
dependence of angular coefficient in relation (5) on additional
characteristics. Thus, excluding complex operations for the manufacture of
sample and its testing in the determination K1c,
it is possible to use the relation (5) to evaluate the critical stress
intensity factor according to mechanical characteristics metal of the railway
wheels current production.
a
b
c
Fig. 1. Effect l on ♦-sy,
■-ss (а); ■- K1c,
♦-s-1 (b); ♦-d; ■-y (с),
where St. A-(1), St. C-(2), St. D-(3), (4)-St. B, (5)-St. E
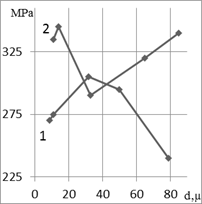
a
b
c
Fig. 2. The effect of austenite grain size on s-1 (а), K1c (b) and KCU
(с),
where (1) - St. B, (2) - St. E
a
b
с
Fig.
3. Ratio between K1c and ![]() calculated by the relation (4) at B =
calculated by the relation (4) at B = ![]() for
for
St. B (a), St. E (b); for B=![]() by
relation (5) of the same steels (St. B and St. E) (c)
by
relation (5) of the same steels (St. B and St. E) (c)
a
b
с
Fig.
4. Relationship between K1c and ![]() after calculation according to (5) for
St. A, St. C, St. D (a), effect of carbon content in steel of the wheels of
current production on
after calculation according to (5) for
St. A, St. C, St. D (a), effect of carbon content in steel of the wheels of
current production on ![]() -(♦), KCU
(■)-(b) and corresponding values of K1c and
-(♦), KCU
(■)-(b) and corresponding values of K1c and ![]() : 1-0.45 ; 2-0,48; 3-0,52;
: 1-0.45 ; 2-0,48; 3-0,52;
4-0,55; 5-0,58; 6-0,6 and 7-0.62% C (c)
4.
CONCLUSIONS
1. For
carbon steel in isostructural state, effect of austenite grain size on impact
strength exceeds dependence on carbon content.
2. To assess the critical stress intensity
factor, a relationship is proposed based on the use of impact strength.
3. The proportionality coefficient in the
proposed dependence is determined by ratio of elongation to narrowing at
tensile test.
Gratitude
The authors
are grateful to Dr. O.N. Perkov for material provided for research. Thanks to Dr. O.A.
Tchaikovsky for valuable advice when discussing research results at manuscript
writing.
References
1.
Babich V.K., Yu.P. Gul, I.E. Dolzhenkov. 1972. Strain hardening of steel. Moscow:
Metallurgy.
2.
Boljshakov V.I., G.D. Sukhomlin, N.Eh. Pogrebnaya. 2001. Atlas
struktur metallov I splavov. Dnepropetrovsk, Ukraine: Gaudeamus.
3.
Bujang A.H.I.A., M. Hrairi, M.S.I.S. Dawood. 2019.
“Determination of stress intensity factor of actuated cracked aluminum
plate using strain gages”. International
Journal of Recent Technology and Engineering 7: 241-245.
4.
Celada-Casero C., C.
Kwakernaak, J. Sietsma, M.J. Santofimia. 2019. “The influence of the
austenite grain size on the micro structural development during quenching and
partitioning processing of a low-carbon steel”. Materials &
Design 178: 107847.
5.
En N.F. 2009 “European standard for Wheels
– EN 12262 Product requirements”.
6.
Gubenko S., Y. Proidak, A. Kozlovsky, et. al. 2008. “Influence of
nonmetallic inclusions on micro breaks formation in wheel steel and railway
wheels”. Transport Problems 3:
77-81.
7.
Joshi. S.,
A.V. Bhosale. 2013. “Determination of Stress Intensity Factors using
Finite Element Method”. Struct.
Integr. Life 4: 1651-1658.
8.
Knott J.F. 1973. Fundamentals of fracture mechanics. London: Butterworths.
9.
Koymatcik H., T. Tozlu, H. Cug, Y. Sun, H. Ahlatci.
2013. “Hardening of the head portions of the
pearlitic rails by accelerated cooling”. JESTECH 16: 53-58.
10.
Masoum M., E. Anderson, A.
Echeverri, A.P. Tschiptschin, H. Goldenstein. 2019.
“Improvement of wear resistance in a pearlitic rail steel via quenching
and partitioning processing”. Sci.Rep 9: 7454. DOI: 10.1038/s41598-019-43623-7.
11.
Pickering F.B. 1978. Physical metallurgy and the design of steels. Applied science
publishers LTD.
12.
Rolfe S.T., John M. Barsom, T.
Stanley. 1999. Fracture and fatigue
control in structures applications of fracture mechanics. 3. ed. West Conshohocken, Pa.: ASTM. ISBN: 0803120826.
13.
Rooke D.P., F.I. Baratta, D.J. Cartwright. 1981. “Simple
methods of determining stress intensity factors”. Engineering Fracture Mechanics 14(2): 397-426.
14.
Šťastniak P., L. Smetanka, P. Drozdziel.
2019. “Computer aided simulation analysis for wear investigation of
railway wheel running surface”. Diagnostyka
20(3): 63-68.
15.
Tasdemir B. 2015.”Determination of stress
intensity factor using digital image correlation method”. Matter. 2: 20-24.
16.
Vasauskas V., Ž. Bazaras, V. Čapas. 2005.
“Strength anisotropy of railway wheels under contact load”. Mechanika 51(1): 31-38.
17.
Veskovic S., Z. Dordevic, G. Stojic, J. Tepic, I.
Tanackov. 2012. “Necessity and effects of dynamic systems for railway
wheel defect detection”. Metalurgija
51(3): 333-336.
18.
Walther F., D. Eifler. 2004. “Fatigue behaviour
of railway wheels at different temperatures”. Mater. Test. 46: 158-162.
19.
2017. “Weight function, stress intensity factor and
crack opening displacement solutions to periodic collinear edge hole
cracks”. Fatigue
& Fracture of Engineering Materials & Structures 40: 2068-2079.
Received 19.07.2020; accepted in revised form 21.10.2020
![]()
Scientific
Journal of Silesian University of Technology. Series Transport is licensed
under a Creative Commons Attribution 4.0 International License