Article
citation information:
Jírová, R., Pešík, L. Identification and verification of
dynamic parameters for the welding manipulator. Scientific Journal of Silesian University of Technology. Series
Transport. 2020, 106, 51-61.
ISSN: 0209-3324. DOI: https://doi.org/10.20858/sjsutst.2020.106.4.
Radka JÍROVÁ[1],
Lubomír PEŠÍK[2]
IDENTIFICATION
AND VERIFICATION OF DYNAMIC PARAMETERS FOR THE WELDING MANIPULATOR
Summary. Welding production lines are indispensable parts of
the production processes in the automotive industry. In many cases, the
production line operation is ensured by equipment with linear conveyors or
robots, wherein linear guiding systems are basic elements of these
manipulators. The failure of some linear guiding system may lead to significant
production losses. Hence, the knowledge of their operating loads is necessary
to determine very exactly. The objective of this article is to identify and
verify the basic dynamic parameters of the welding manipulator, as a starting
point for the operating loads calculation of linear guiding systems. This issue
was solved by combining the measurement of kinematic values and MBS (Multi-body
System) analysis in case of the concrete linear welding manipulator, which was
the main part of the observed welding line. We have measured time values of
acceleration in defined points of the manipulator and evaluated them by FIR
(Finite Impulse Response) filter, FFT (Fast Fourier
Transformation) analysis and ODS (Operating Deflection Shapes) analysis. The
obtained frequency spectrum showed oscillation frequencies, which could be
compared with frequencies of the manipulator dynamical model by different mass
and stiffness parameters. In this way, the dynamic parameters of the welding
manipulator can be identified and used for the next calculations and
simulations, where loads of linear guiding systems will produce very important
results.
Keywords: dynamic parameters,
dynamic system, welding production line, welding manipulator, linear guiding
system
1. INTRODUCTION
Nowadays, during the Industry 4.0,
great emphasis is placed on production machines reliability. Operating
conditions of all important machines should be thoroughly analysed and
evaluated. These precautions should increase their reliability, predict
possible failures and prevent possible production losses [4-8,10,11,13-15,17].
In case of welding production
lines, a prediction of linear guiding system failures in one of the first
places is needed, because these parts enable in these lines the transport of
car bodies for the welding process. Should they fail, the production must be
stopped for a few days. This situation can lead to significant production
losses. Therefore, the prediction of the failures is very necessary and the
determination of the linear guiding systems loads is the main task for
calculations and simulations on the welding manipulator mechanical model [2,3,16].
To identify these operating loads,
it is necessary to have sufficient notions about the dynamical behaviour of the
welding manipulator. In this article, the issue is solved as the planar motion
of the manipulator.
2. MEASUREMENT
In Fig. 1 is displayed
the 3D model of the welding manipulator with positions of two acceleration
sensors (S-V and S-Z). The major parts of the manipulator are the cart, two
so-called Z-axes and two clamping frames with car bodies.
The welding manipulator
exercises a translation motion, which is provided by the stepper motor through
a rack gear and linear guiding systems. The linear guiding systems connect the
cart with the frame by means of guide profiles. However, the elastic
construction parts and clearances of linear guiding systems cause oscillations
of the manipulator against the mashing point of the rack gear. The rack gear,
the stepper motor and linear guiding systems are placed on the cart of the
manipulator. The clamping frames with the car bodies are connected to the cart
through the Z‑axis that enables their vertical translation motion.
Kinematics of the
welding manipulator was measured by two three-axis acceleration sensors [12]. The first sensor S-V
was situated close to the stepper motor that powers the manipulator. The second
one S-Z was situated close to the car bodies clamping frame (Fig. 1). The
knowledge of the kinematic parameters in two positions gives sufficient notions
about the dynamic system behaviour of the welding manipulator [1].
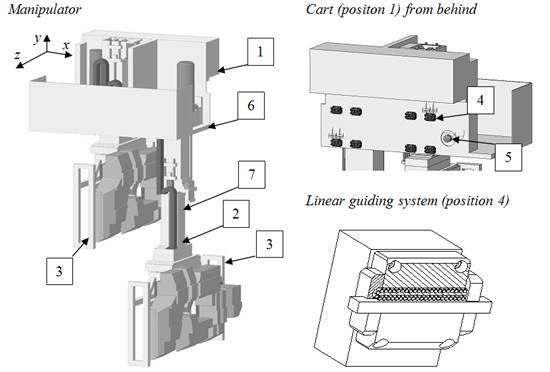
Fig. 1.
Model of the welding manipulator with positions of two acceleration sensors:
1 - cart,
2 - Z-axis, 3 - clamping frame, 4 - linear guiding system,
5 - rack gear, 6 - acceleration sensor S-V, 7 - acceleration sensor S-Z
2.1. Finite Impulse
Response (FIR) filter
Measured data were
evaluated by the FIR filter that enabled the identification of the system basic
motion in each coordinate axis. Considering the Fast Fourier Transformation (FFT) analysis result, the FIR filter was used as a low pass
filter with the cut-off frequency 3 Hz. The higher order of the filter was used
for reaching the sufficient slope of the transition band.
Measured and filtered
values are shown in Fig. 2 – Fig. 7. Wherein Fig. 2 shows acceleration
measured by the first sensor S-V in the translational direction and its result
by FIR filtration. The maximum value of the filtered acceleration was 1,63 m/s2.
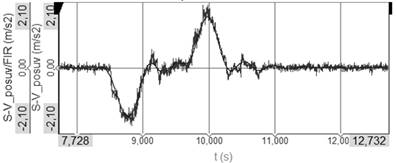
Fig. 2.
Acceleration on the place of the sensor S-V in the translational direction
– FIR filter
Fig. 3 shows the
acceleration measured by the sensor S-V in the vertical direction and its
result by FIR filtration. The maximum value of the filtered acceleration was 0,07 m/s2.
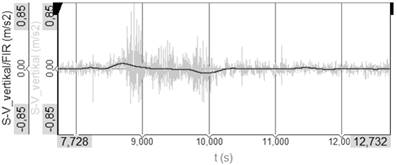
Fig. 3.
Acceleration on the place of the sensor S-V in vertical direction – FIR
filter
Fig. 4 shows the
acceleration measured by the first sensor S-V in the transversal direction and
its result by FIR filtration. The maximum value of the filtered acceleration is
0,18 m/s2.
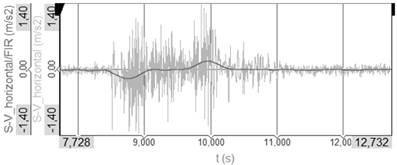
Fig. 4.
Acceleration on the place of the sensor S-V in transversal direction –
FIR filter
Fig. 5 shows the
acceleration measured by the second sensor S-Z in the translational direction
and its result by FIR filtration. The maximum value of the filtered
acceleration is 1,74 m/s2.
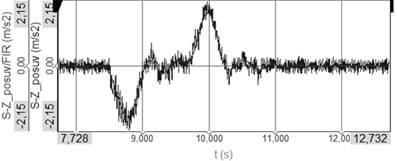
Fig. 5.
Acceleration on the place of the sensor S-Z in translational direction –
FIR filter
Fig. 6 shows the
acceleration measured by the second sensor S-Z in the vertical direction and
its result by FIR filtration. The maximum value of the filtered acceleration is
0,21 m/s2.
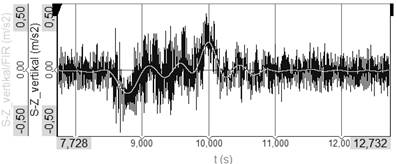
Fig. 6.
Acceleration on the place of the sensor S-Z in vertical direction – FIR
filter
Fig. 7 shows the
acceleration measured by the second sensor S-Z in the transversal direction and
its result by FIR filtration. The maximum value of the filtered acceleration is
0,04 m/s2.
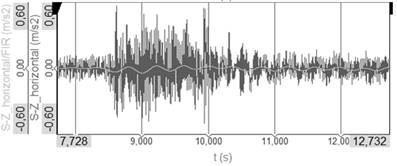
Fig. 7.
Acceleration on the place of the sensor S-Z in transversal direction –
FIR filter
2.2. FFT
analysis
The results of the FFT analysis are shown in Fig. 8.
Fig. 8 shows the results
of the FFT analysis by previously introduced filtered
signals. The basic oscillation
frequency of the manipulator is around 1,2 Hz.
2.3. Operating
Deflection Shapes (ODS) analysis
The ODS analysis was
made for the operating frequency 1,2 Hz of the
manipulator. Eight one-axis acceleration sensors were placed in the
translational direction on the longer Z‑axis and on the clamping frame.
The result of this analysis is shown in Fig. 9.
3. MULTI-BODY SYSTEM
(MBS) ANALYSIS
The basis for creating
the dynamic model of the manipulator is its 3D model that provides its mass
parameters. Kinematic, elastic and damping connections are assigned to the 3D
model. The dynamic system of the manipulator has the kinematic excitation,
where the acceleration values are given by the data of the stepper motor. The
dynamic model with corresponding connections is shown in Fig. 10.
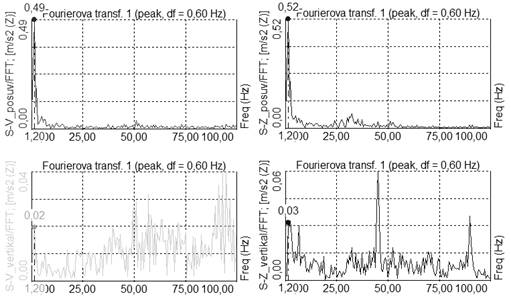

Fig. 8.
Frequency spectrum
3.1. Elastic and damping
parameters of the system
The vertical stiffness
of the elastic connection may be calculated:
 , (1)
, (1)
wherein ![]() is the
torsion stiffness,
is the
torsion stiffness, ![]() moment of
inertia about the
moment of
inertia about the ![]() axis,
axis, ![]() basic
oscillation frequency (1,2 Hz) of the manipulator about the
basic
oscillation frequency (1,2 Hz) of the manipulator about the ![]() axis (Fig.
10),
axis (Fig.
10), ![]() distance
between elastic and damping connections and the rotational point
distance
between elastic and damping connections and the rotational point ![]() and
and ![]() number of
elastic and damping connections [4].
number of
elastic and damping connections [4].
The vertical damping
coefficient is:
 , (2)
, (2)
wherein ![]() is
relative damping coefficient.
is
relative damping coefficient.
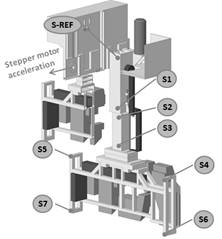
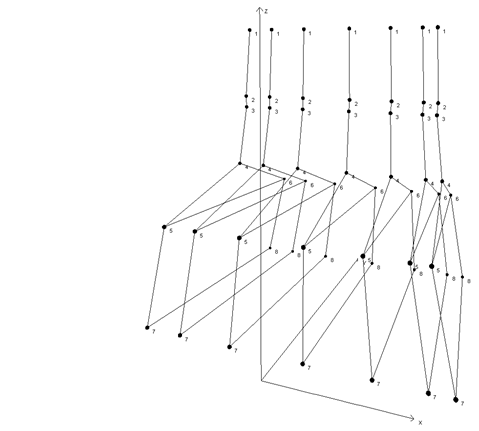
Fig. 9.
Operating deflection shapes of the manipulator
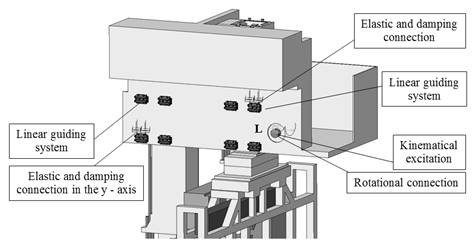
Fig. 10.
Connections in the dynamic model of the manipulator
3.2. Kinematical
excitation
For the kinematical
excitation, the time function of the stepper motor velocity and its derivation
may be used. This was reached by “the five point method” with
equation:
![]() , (3)
, (3)
wherein ![]() is new
value of acceleration (velocity) and
is new
value of acceleration (velocity) and ![]() is last
value of acceleration (or velocity).
is last
value of acceleration (or velocity).
The final acceleration
function used for the kinematical excitation of the system is shown in Fig. 11.
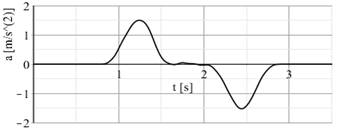
Fig. 11.
Kinematical excitation of the manipulator dynamic system
The maximum value analysed of the
stepper motor acceleration was 1,5 m/s2.
4. Comparison of measured and simulated
acceleration values
Results show the relatively sufficient matching
between measured and simulated acceleration values. However, it should be noted
that for the achievement of better results, it would be appropriate to solve
the system as nonlinear. But in this case, it is necessary to know more input
parameters.
The comparison of
measured and calculated acceleration values is shown in the following figures.
In Fig. 12 is shown the comparison between filtered acceleration values of
the first sensor S-V in the translational direction and the acceleration as the
simulated result of the MBS analysis in the same direction.
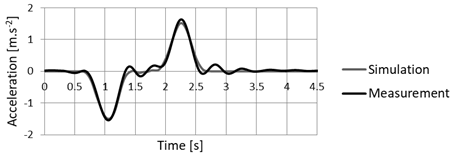
Fig. 12. Acceleration in
the place of the sensor S-V in translational direction
Fig. 13 shows comparison
between filtered acceleration values of the first sensor S-V in the vertical
direction and the acceleration as the simulated result of the MBS analysis in
the same direction.
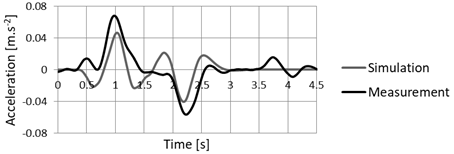
Fig. 13. Acceleration in
the place of the sensor S-V in vertical direction
Fig. 14 shows comparison
between filtered acceleration values of the second sensor S‑V in the
translational direction and the acceleration as the simulated result of the MBS
analysis in the same direction.
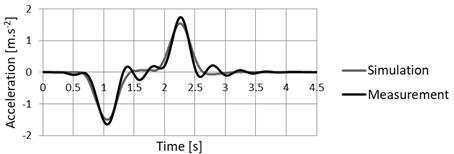
Fig. 14.
Acceleration in the place of the sensor S-Z in translational direction
Fig. 15 shows comparison
between filtered acceleration values of the second sensor S‑V in the
vertical direction and the acceleration as the simulated result of the MBS
analysis in the same direction.
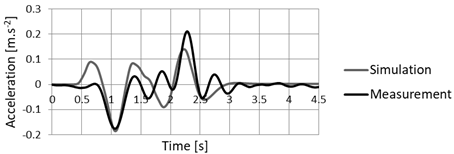
Fig. 15. Acceleration in
the place of the sensor S-Z in vertical direction
5. CONCLUSIONS
Nowadays, linear guiding
systems are used in a wide range of applications, especially for enabling the
linear motion of manipulators, robots, transporting parts etc. Usually, the
linear guiding systems are present in the very important part of these
machines. However, their operating load by the relative complicated dynamic
behaviour is not well known, hence, the linear guiding systems might be
overloaded, which can lead to their premature failure. Therefore, the knowledge
of their operating load is strictly demanded. For the operating load
calculation, it is first necessary to identify and verify the dynamical
parameters of these machines with the help of the corresponding dynamic model
to determine the values of the operating load.
This article illustrates
the process of identifying dynamical parameters and their verifications. This
process is based on the combination of the measurement and mathematical
methods, which can be described in a few steps. First, the process uses
measured acceleration values in two points of the moving part. They are
evaluated by FIR and FFT. The evaluation of operating
deflection shapes can be added for the visualisation of the part oscillation.
In the second step, it is necessary to identify mass parameters and elastic and
damping parameters of parts connection in the system. 3D modelling and its
integrated functions can be used. The system movement can be calculated using
the MBS analysis. Finally, the measured kinematical values are compared with
the calculated ones. The dynamic parameters are correctly determined in the
case of good accordance between the measured and simulated results.
Acknowledgements
This publication was written at the Technical
University of Liberec as part of the project "Vibration damage
identification of linear guiding system" with the support of the Specific
University Research Grant provided by the Ministry of Education, Youth and
Sports of the Czech Republic in 2019.
References
1.
Dresig H., Holzweißig F. 2008. Maschinendynamik. [In German: Machine dynamics]. Berlin: Springer-Verlag. ISBN
978-3-540-87693-9.
2.
Gąska
Damian, Tomasz Haniszewski. 2016. “Modelling
studies on the use of aluminium alloys in lightweight load-carrying crane
structures”. Transport Problems 11(3):
13-20. DOI: 10.20858/tp.2016.11.3.2.
ISSN: 1896-0596.
3.
Haniszewski
Tomasz, Damian Gaska. 2017. “Numerical
modelling of I-Beam jib crane with local stresses in wheel supporting flanges -
influence of hoisting speed”. Nase More 64(1):
7-13. DOI: 10.17818/NM/2017/1.2. ISSN: 0469-6255.
4.
Homišin
J., R. Grega, P. Kaššay, G. Fedorko, V. Molnár. 2019 „Removal
of systematic failure of belt conveyor drive by reducing vibrations”.
Engineering Failure Analysis 99: 192-202. ISSN
1350-6307.
5.
Jacyna Marianna, Mariusz
Izdebski, Emilian Szczepański, Paweł Gołda. 2018. „The task assignment of
vehicles for a production company”. Symmetry-Basel
10(11). Article number: 551.
6.
Jacyna-Gołda Ilona,
Mariusz Izdebski, Emilian Szczepanski. 2016. „Assessment of the method
effectiveness for choosing the location of warehouses in the supply
network”. Challenge of Transport
Telematics, TST 2016. Communications in Computer and
Information Science 640: 84-97.
7.
Jacyna-Gołda Ilona,
Mariusz Wasiak, Mariusz Izdebski, Konrad Lewczuk, Roland Jachimowski, Dariusz
Pyza. 2016. „The
evaluation of the efficiency of supply chain configuration”. Proceedings of the 20th International
Scientific Conference Transport Means 2016. Transport Means - Proceedings of
the International Conference: 953-957.
8.
Liptai Pavol, Marek Moravec, Ervin Lumnitzer, Marcela
Gergeľová. 2017. „Proposal of the
sound insulating measures for a vibrational sorter and verification of the
measured effectiveness”. Advances
in Science and Technology-Research Journal 11(3): 196-203. ISSN 2299-8624.
DOI: 10.12913/22998624/76068.
9.
Maláková
Silvia. 2017. „Analysis of gear wheel body influence on gearing
stiffness”. Acta Mechanica Slovaca 21(3): 34-39. ISSN 1335-2393.
10.
Mazurkiewicz D.
2014. „Computer-aided maintenance and reliability management systems for
conveyor belts”. Eksploatacja i Niezawodnosc – Maintenance and Reliability 16(3):
377–382.
11.
Mazurkiewicz D.
2010. „Tests of extendability and strength of
adhesive-sealed joints in the context of developing a computer system for
monitoring the condition of belt joints during conveyor operation”. Eksploatacja i Niezawodnosc – Maintenance and Reliability 3:
34-39.
12. Navrátil M. 1981.
Měření mechanického
kmitání. Úvod do teorie snímačů. [In
Czech: Measurement of mechanical
vibration. Introduction to sensor theory]. Praha: SNTL.
13.
Puškár
Michal, Melichar Kopas.
2018. „System based on thermal control of the HCCI
technology developed for reduction of the vehicle NOX emissions in order to
fulfil the future standard Euro 7”. Science
of the Total Environment 643: 674-680. ISSN 0048-9697. DOI: 10.1016/j.scitotenv.2018.06.082.
14. Sága Milan, Peter Kopas, Milan Uhríčik. 2012. „Modeling and experimental
analysis of the aluminium alloy fatigue damage in the
case of bending - torsion loading”. Procedia
Engineering. 48: 599-606. ISSN 1877-7058.
15. Sága
Milan, Milan Vaško, Nadežda Čuboňová, Wiesława
Piekarska. 2016. Optimisation
algorithms in mechanical engineering applications. Harlow:
Pearson. ISBN 978-1-78449-135-2.
16. Tomeh E. 2015. Technická diagnostika. Vibrační diagnostika strojů a zařízení.
[In Czech: Technical diagnostics. Vibration diagnostics of machines and equipment].
Liberec: Technical university
in Liberec. ISBN 978-80-7494-174-0.
17. Zul'ová L., Grega R., Krajňák J. 2017. „Optimization of
noisiness of mechanical system by using a pneumatic tuner during a failure of
piston machine”. Engineering
Failure Analysis 79: 845-851. ISSN 1350-6307.
Received 18.11.2019; accepted in revised form 12.01.2020
![]()
Scientific
Journal of Silesian University of Technology. Series Transport is licensed
under a Creative Commons Attribution 4.0 International License