Article
citation information:
Juzek, M. Analysis of the impact of
non-parallelism of shafts' axes on the contact area of cooperating teeth and
gearbox's components vibrations. Scientific
Journal of Silesian University of Technology. Series Transport. 2019, 104, 37-45. ISSN: 0209-3324. DOI: https://doi.org/10.20858/sjsutst.2019.104.4.
Michał JUZEK[1]
ANALYSIS OF THE IMPACT OF NON-PARALLELISM OF
SHAFTS' AXES ON THE CONTACT AREA OF COOPERATING TEETH AND GEARBOX'S COMPONENTS
VIBRATIONS
Summary. In this article, the results of experimental research
and simulation studies using a geometric model made in CAD software were
presented. The aim of the conducted research and simulations was to determine
the influence of non-parallelism of shafts' axes on gearbox vibroactivity and
the contact area of the cooperating teeth. The results showed that the change
of the non-parallelism of shafts' axes significantly affects the vibrations of
selected components of the operating gearbox and the contact area of
cooperating teeth.
Keywords: non-parallelism of shaft
axes, gearbox vibrations, contact area of cooperating teeth.
1. INTRODUCTION
Gearboxes are an element of complex
drive systems used in many types of transport means, such as vehicles, trains,
aircraft or vessels [3,4]. Regardless of the purpose of the transmission, the
demands placed on them are similar. The transmissions should transfer power and
torque with minimal losses while maintaining an adequate level of reliability
[10,11]. This is particularly important considering the global tendencies to
reduce the dimensions of the transmissions and attempts to use
unconventional materials while the values of transferred loads remain
unchanged. It also imposes keeping slight deviations of the
transmission’s components and their correct assembly.
A very important
factor is the impact of the operating transmission on the immediate surroundings. The operating gearbox generates vibrations
and noise, which has a negative impact on
the users and passengers of various means of
transport. Analysing
the research works of world-class scientific centres, many concepts of
searching for vibration reduction of an operating transmission can be noticed.
It includes investigations on the shape of the gearbox housing, the study of
the influence of the type of lubricant used, the study of the influence of the
characteristics of the clutches cooperating with the transmission and many more
[1,6,7,9]. The tendency to improve the well-known models and the development of new
transmission models is also noticeable [2,5,8]. Undoubtedly, these are valuable scientific works, but it
should be noted that, in the
case of gearboxes, the main source of vibrations is the meshing
zone, which involves the issues connected with the surface of the contact area and load distribution along the line of action. These issues have a significant impact on
the level of vibrations generated during the operation of transmission. One of
the reasons for the deterioration of the value of the surface of the contact area and load distribution along the line of action is the non-parallelism of the
transmission axes, which may be the result
of deviations in the transmission components, errors during assembly or
excessive shafts deflection and housing deformation. The paper presents the results of
experimental research and simulation made in CAD software showing the effect of
non-parallelism of the transmission axes and change of the value of this
phenomenon on the surface of contact area of cooperating gears and vibrations
of selected transmission components.
2.
EXPERIMENTAL STUDIES
2.1.
Experimental studies – description of test stand
In
order to evaluate the impact of non-parallelism of gearbox’ axes on the
vibrations of its components, experimental studies were conducted using a
specially modified back-to-back test stand. The test stand modifications included
disassembly of the closing gearbox and its shafts in order to eliminate
additional sources of undesired disturbances. In the tested transmission, the
shaft of the driven gear was replaced by a stationary axis. The bearings of the
stationary axis were fixed by eccentric bushings whose rotation enabled the
mutual position of the transmission’s axes to be changed. One full
rotation of the eccentric bushing was divided into 24 positions in intervals of
15 degrees. Because of made modifications, during the tests, the transmission
operated without load. Table 1 presents selected parameters of the used
transmission.
Piezoelectric
sensors were used to measure vibrations accelerations. The sensors were placed
on the gearbox’s housing and on the stationary axis of driven gear (Fig.
1) to obtain the smallest distance between the meshing zone and the sensor. The
tests were carried out for various rotational frequencies of the drive gear.
During the tests, the mutual position of the transmission’s axes was changed
by rotation of the eccentric bushing.
Tab. 1
Selected parameters of tested
gearbox
|
Parameter |
Value |
|
Number of teeth – driven gear z1 [-] |
16 |
|
Number of teeth – drive gear z2 [-] |
24 |
|
Module mn [mm] |
4,5 |
|
Helix angle β [o] |
0 |
|
Face width b [mm] |
20 |
|
Axes distance [mm] |
91,75 |
|
Profile shift
coefficient – driven gear x1 |
0.864 |
|
Profile shift
coefficient–
drive gear x2 |
-0,5 |
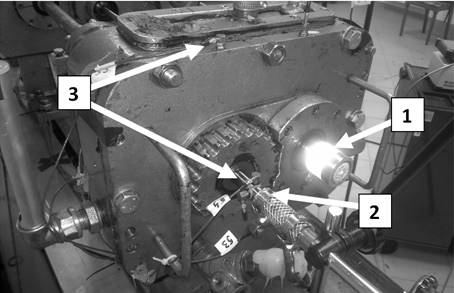
Fig. 1. Modified back-to-back test stand. 1- shaft of drive gear, 2 - stationary
axis of driven gear, 3 -vibration sensors
2.2.
Experimental studies – obtained results
Based
on the vibration signals recorded during the tests, their relative mean square
(RMS) values were calculated. The obtained values are shown below in the
function of bearing position of stationary axis. The results are presented for
two selected rotation frequencies of the drive gear.
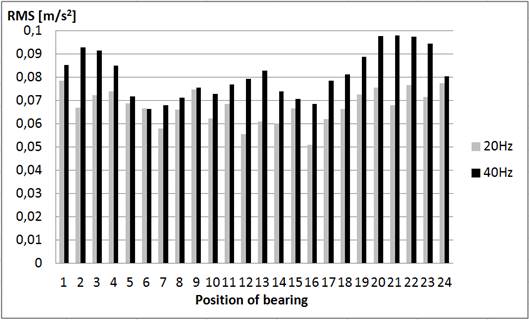
Fig. 2. RMS values of vibration signal measured at gearbox’s
housing for two selected rotational frequencies 20Hz and 40Hz in function of
bearing position
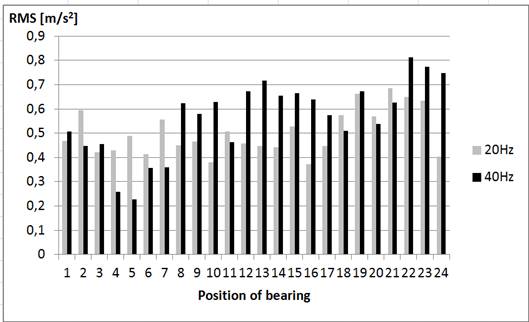
Fig. 3.
RMS values of vibration signal measured at stationary axis for two selected
rotational frequencies 20Hz and 40Hz in function of bearing position
3.
SIMULATION TESTS USING THE AUTODESK INVENTOR SOFTWARE
3.1.
Description of developed 3D model
The geometric 3D model
of the gearbox was created using the Autodesk Inventor software. The model
reflects all important parameters of the actual transmission used during
experimental research. In addition, it is also possible to change the
non-parallelism of the gearbox’s axes. The created model was used to
determine the surface of the contact area of cooperating gears. The measurement
was made for 24 positions reflecting the bearing position of the driven gear
due to use of the eccentric bushing. The tests were carried out for two
selected values of solids penetration, which simulated flattening of the flank
of the teeth because of the transferred load. The created transmission model is
shown in Fig. 4.
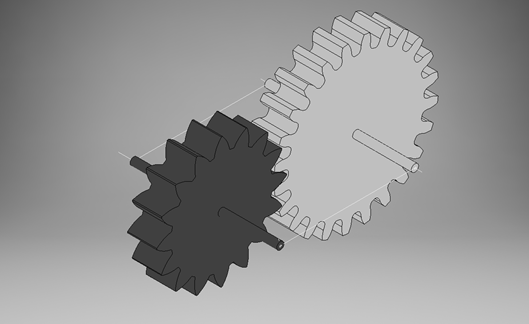
Fig. 4. Developed
3D model of tested gearbox
3.2. Simulation tests – obtained results
Using the developed
model, the analysis of the change of surface of the contact area of cooperating
teeth depending on the position of the driven gear bearing was made. The results
are presented for two selected tooth flattening values: 5 and 10μm. An example of the obtained
surface of the contact area is shown in Fig. 5. Area of contact of cooperating
teeth in function of bearing position for two selected values of tooth
flattering is shown in Fig. 6.
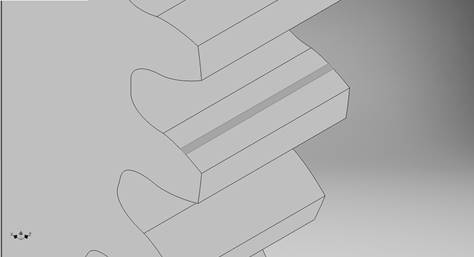
Fig. 5.
Example of obtained contact area
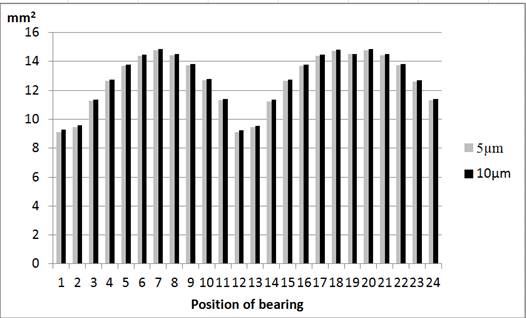
Fig. 6. Area of contact
of cooperating teeth in function of bearing position for two selected values of
tooth flattering
3.3. Comparison of
experimental studies results and simulation studies results
Figures 7 and 8 present
the course of changes in the values of surface of the contact area and obtained
RMS values of recorded signals as a function of the bearing position of
stationary axis. The values presented in the diagrams, in the majority of
analysed cases, confirm the relationship between the change in the surface of
contact area of the cooperating teeth and the level of vibrations recorded on
selected elements of the transmission.
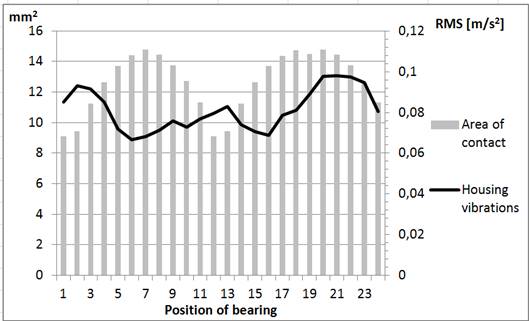
Fig. 7.
Area of contact of cooperating teeth and RMS values of vibration signals in
function of bearing position
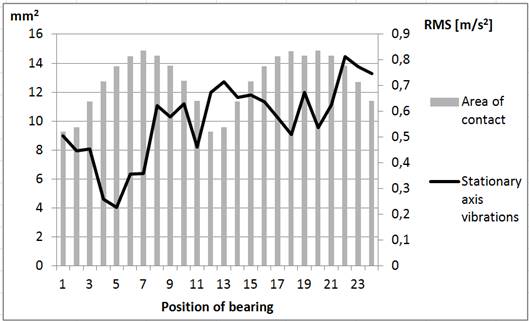
Fig. 8.
Area of contact of cooperating teeth and RMS values of vibration signals in
function of bearing position
4.
CONCLUSION
Based on analysis of results obtained during
experimental studies, it was discovered that the occurrence of the non-parallelism
of the gearbox shafts’ axes and its change during test significantly
affects the level of vibrations measured at transmission’s components.
Differences of vibration signals’ RMS values, depending on the position
of the stationary axis’ bearing, was even tens of per cent.
Using the geometrical model made in the CAD software
of the gearbox, the change of contact area of cooperating teeth was presented
for two selected tooth-flattening values. Results obtained during simulation
show dependence of the contact area of cooperating teeth and non-parallelism of
the gearbox shafts’ axes. The change of non-parallelism of the gearbox
shafts’ axes significantly affects the size of the contact area, which
changes reached several dozen per cent.
Comparatively,
changes in the RMS values of vibration signals and values of the contact area
of cooperating gears were found to be in majority of analysed cases of
stationary axis’ bearing positions, the increase surface of contact area
resulted in lowering the level of recorded vibrations. This phenomenon confirms
the relationship between the surface of contact area of the cooperating teeth
and the vibrations generated by the operating transmission.
References
1.
Figlus Tomasz, Andrzej Wilk, Henryk Madej. 2010. ,,A study of the influence of ribs
shape on the gear transmission housing vibroactivity”. Transport Problems 5 (1): 63-69. ISSN
1896-0596.
2. Guo Yi, Scott Lambert, Robb Wallen, Robert
Errichello, Jonathan Keller. 2016. ,,Theoretical and experimental study on
gear-coupling contact and loads considering misalignment, torque, and friction
influences”. Mechanism and Machine
Theory 98: 242-262. ISSN: 0094-114X. DOI: http://dx.doi.org/10.1016/j.mechmachtheory.2016.11.014.
3.
Łazarz Bogusław. 2001. Zidentyfikowany model dynamiczny przekładni zębatej jako
podstawa projektowania. [In Polish: Identified
dynamic gear model as the basis for design]. Katowice-Radom: Wydawnictwo i
Zakład Poligrafii Instytutu Technologii Eksploatacji. ISBN 83-7204-249-7.
4.
Madej Henryk. 2003. Minimalizacja
aktywności wibroakustycznej korpusów przekładni zębatych.
[In Polish: Minimization of vibroacoustic
activity of gear body]. Katowice-Radom:
Wydawnictwo i Zakład Poligrafii Instytutu Technologii Eksploatacji.
ISBN 83-7204-360-4.
5.
Ristivojević Mileta, Tatjana Lazović , Aleksandar Vencl.
2013. ,,Studying the load carrying
capacity of spur gear tooth flanks”. Mechanism
and Machine Theory 59: 125-137. ISSN:
0094-114X. DOI: http://dx.doi.org/10.1016/j.mechmachtheory.2012.09.006.
6.
Shen
A., R.B. Randall. 2008. ,,Optimal rib stiffening for noise reduction of
constant speed gearboxes”. In 15th International Congress on Sound and Vibration: 1-8. International
Institute of Acoustics and Vibration. 6-10
July 2008, Daejeon Korea, 2008. ISBN 978-89-9612-841-0.
7.
Shuting
Li. 2007. ,,Effects of machining errors, assembly errors and tooth
modifications on loading capacity, load-sharing ratio and transmission error of
a pair of spur gears”. Mechanism
and Machine Theory 42: 698-726. ISSN: 0094-114X. DOI:
http://dx.doi:10.1016/j.mechmachtheory.2006.06.002.
8.
Wei Li , Pengfei Zhai, Jingyun Tian, Biao Luo.
2018. ,,Thermal
analysis of helical gear transmission system considering machining and
installation error”. International
Journal of Mechanical Sciences 149: 1-17. ISSN: 0020-7403. DOI:
https://doi.org/10.1016/j.ijmecsci.2018.09.036.
9. Wieczorek
Andrzej. 2010. ,,Rola smarowania w
ograniczeniu hałasu towarzyszącego eksploatacji przekładni
zębatych”. [In
Polish: „The role of lubrication in reducing noise associated with the
operation of gears”]. Mechanizacja
i Automatyzacja Górnictwa 478(12): 34-39. ISSN 2450-7326.
10.
Wilk Andrzej, Bogusław Łazarz, Henryk Madej. 2009. Wibroaktywnośc przekładni
zebatych. Wpływ cech konstrukcyjnych i zużycia elementów na
wibroaktywność układów napędowych z
przekładniami zębatymi. [In Polish: Gear vibroactivity. Impact of design features and wear of elements on
the vibroactivity of drive systems with gears]. Katowice-Radom: Wydawnictwo Naukowe Instytut
Technlogii Eksploatacji. ISBN 978-83-7204-875-2.
11. Wojnar Grzegorz. 2010. ,,Minimization of
dynamic forces in gear meshing by selection of the flexible couplings
parameters”. Journal of Kones.
Powertrain and Transport 17(3): 497-504. ISSN 1231-4005.
Received 12.05.2019; accepted in revised form 17.08.2019
![]()
Scientific
Journal of Silesian University of Technology. Series Transport is licensed
under a Creative Commons Attribution 4.0 International License