Article
citation information:
Nemchinov, S., Khristenko, A. Stress-strain state of
pneumatic flexible shaft coupling for ball mill drives. Scientific Journal of Silesian University of Technology. Series
Transport. 2018, 99, 125-134.
ISSN: 0209-3324. DOI: https://doi.org/10.20858/sjsutst.2018.99.12.
Serge NEMCHINOV[1],
Alexander KHRISTENKO[2]
STRESS-STRAIN
STATE OF PNEUMATIC FLEXIBLE SHAFT COUPLING FOR BALL MILL DRIVES
Summary. The article explores the stress-strain state of the
pneumatic flexible shaft coupling of the tumbling mill drive using a software
of finite element analysis. The study has revealed that the stress-strain state
of the pneumatic flexible shaft coupling is characterized by an uneven general
and local distribution of stresses. Areas of maximum stress and strain in the
pneumatic flexible shaft coupling have been defined. The study allowed for
changing the geometry and reducing the mass of the disc of the pneumatic
flexible shaft coupling with a slight change in stresses and strains. The results
of the study can be applied to the design of pneumatic flexible shaft couplings
and serve as a basis for further research.
Keywords: pneumatic flexible
shaft coupling; finite element method; geometry; stress; strain; displacement
1. INTRODUCTION
Various couplings that serve to transmit rotary motion from one shaft to
another are widely used in many industries. Drive couplings may also perform
other important functions: compensation for small mounting misalignments of
units and assemblies, disconnection of shafts, automatic control of machine
operation, smooth coupling of shafts on machine start-up, protection of
machines from breakdowns in emergency mode etc [1]. In today’s mechanical
engineering context, couplings with non-metal flexible elements, which possess
high compensating and damping properties, are widely used [2]. However, these
couplings are generally applied for the transmission of low and medium torque
because of the low strength of rubber and polymers. The studies by Vinogradov
and Homisin show that pneumatic flexible shaft couplings are free from these
disadvantages and can transmit high torques with the possibility of adjusting
rigidity within a wide range [3-7]. At present, there are no recommendations
for calculating the mechanical strength and stiffness of pneumatic flexible
shaft couplings intended for ball mill drives.
Consequently, the study of the stress-strain state (SSS) and the choice
of a rational form of the pneumatic flexible shaft coupling at the design stage
are of great importance and involve not only technical but also economic
aspects.
In the last decade, numerical methods have been increasingly used for
the calculation of machine parts and mechanisms, with the finite element method
(FEM) taking a key place amongst them. As numerical research tools, proprietary
programming systems for finite element analysis (ANSYS, Nastran, SolidWorks,
Abaqus, Lira, Scad) and open-source software programs (CalculiX, Elmer, and
Code_Aster) are used today. These methods, unlike traditional ones based on the
postulates of the strength of materials and the theory of elasticity, allow for
a thorough study of a general SSS and the distribution of local stresses when
formulating two-dimensional and three-dimensional problems. In many cases, this
enables us to dispense with experimental studies, although the latter retain
their importance as a means of verifying the results of stress-strain analysis
[8-11].
Today, practically no experience has been reported of designing
pneumatic flexible shaft couplings, so, in most cases, they have been
calculated approximately, which can be explained by difficulties describing the
SSS and by structural features.
The purpose of the work is a stress-strain analysis of the pneumatic
flexible shaft coupling intended for use in ball mill drives and justifying the
choice of its possible rational geometry.
2. FORMULATION OF PROBLEM
A pneumatic flexible
shaft coupling, whose geometric model is shown in Fig. 1, is subject to a
uniformly distributed load. It is necessary to determine its SSS.
A pneumatic flexible
shaft coupling is a structure of complex configuration; therefore, analytical
methods for its calculation are, in practice, unacceptable. Reliable results
can only be obtained by numerical methods implemented on a computer. Therefore,
to solve this problem of the theory of elasticity, we apply the FEM, which, in
our time, is obviously the world standard for calculations of strength,
stiffness and durability.
The FEM allows for
obtaining a system of algebraic equations:
![]() , (1)
, (1)
where ![]() is the stiffness matrix of the FEM,
is the stiffness matrix of the FEM, ![]() is the nodal displacement vector, and
is the nodal displacement vector, and ![]() is the vector of the nodal forces.
is the vector of the nodal forces.
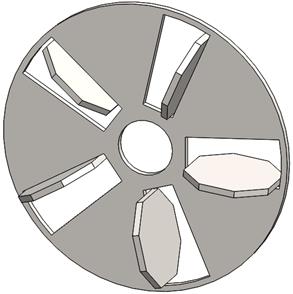
Fig. 1. Geometric model of a
pneumatic flexible shaft coupling
Having solved the system
in (1), we find the displacement![]() ,
after which we find stress
,
after which we find stress ![]() and strain
and strain ![]() using the strain-displacement
relations (Cauchy) and stress-strain relations (Hooke’s law).
using the strain-displacement
relations (Cauchy) and stress-strain relations (Hooke’s law).
The application of the
FEM involves the simulation of the geometry of a structure and its meshing into
finite elements, the formation of a global stiffness matrix and solving large
systems of linear equations (5,000÷500,000). The above problems have
prompted the authors to apply the Salome-Meca platform-based, open-source
Code_Aster application as a tool of numerical simulation. Code_Aster software
allowed for the analysis of the SSS of the pneumatic flexible shaft coupling,
taking into account the features and modes of operation.
3. RESULTS OF NUMERICAL EXPERIMENTS
The study focused on a
numerical calculation of the SSS of a pneumatic flexible shaft coupling with
the overall dimensions of 2,200 x
Prior to the simulation
of a FEM, a solid-state spatial model of the pneumatic flexible shaft coupling
(Fig. 1) was created using the KOMPAS-3D system for three-dimensional
modelling. Taking into account the fact that the pneumatic flexible shaft
coupling consists of two identical parts, the stress-strain analysis was
performed on one part of the model.
The created solid-state
model was then transferred to the Salome-Meca platform-based, open-source
Code_Aster, which was used to set the boundary conditions, loads and areas
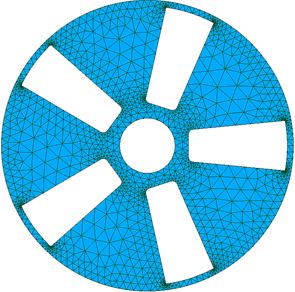
where the load was applied, and to create a mesh of the FEM.
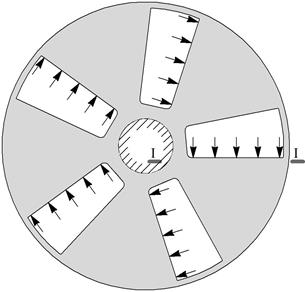
The boundary conditions
were set so as to exclude the displacements of the pneumatic flexible shaft
coupling as an absolutely rigid body. According to the working conditions, with
the dynamic factor taken into account, the load on the pneumatic flexible shaft
coupling was assumed to be 250 kN for every air spring. Fig. 2 presents the
calculation schematic with the loads and boundary conditions indicated.
a
b
Fig. 2. Calculation schematic (a)
and FEM (b) of the pneumatic flexible shaft coupling
Three-dimensional finite
elements with a maximum size of
The material selected
was DIN 1.1181 (C35E) steel with Young’s modulus ![]() ,
Poisson’s ratio ν=0.28, yield strength
,
Poisson’s ratio ν=0.28, yield strength ![]() ,
and tensile strength
,
and tensile strength ![]() .
.
As a result of a static
calculation, the following SSS parameters of the pneumatic flexible shaft
coupling were obtained: stress and strain along the corresponding axes;
principal stresses and corresponding strains; equivalent stresses ![]() calculated by Huber-Mises energy theory
of strength; total displacements; displacements along corresponding axes; and
factors of safety.
calculated by Huber-Mises energy theory
of strength; total displacements; displacements along corresponding axes; and
factors of safety.
The results of the
calculation show that the SSS of the pneumatic flexible shaft couplings is
characterized by an uneven general and local distribution of stresses and
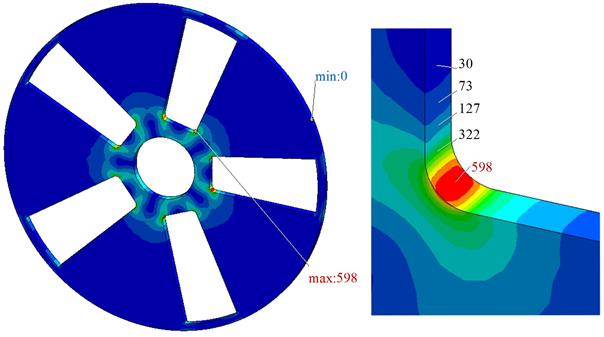
displacements (Fig. 3). It has been established that high equivalent stresses
(175 to 225 MPa) are observable in the areas located between the surface of the
openings and the mounting surface for the shaft. This indicates that these
areas need to be strengthened, that is, pneumatic flexible shaft couplings need
to have a hub. Over a large area of the disc, the magnitudes of equivalent
stresses are small and do not exceed 50 MPa. This indicates that the depth of
the disc can be reduced. The maximum equivalent stresses calculated by the
Huber-Mises theory are observed in the areas of abrupt changes in geometry
(Fig. 3a). The maximum equivalent stresses occurring in the fillets reach 598
MPa, i.e., ![]() .
It should be noted that the maximum equivalent stresses occur within a small
(in size) area (Fig. 3b), that is, they are localized and do not change
throughout the depth of the disc.
.
It should be noted that the maximum equivalent stresses occur within a small
(in size) area (Fig. 3b), that is, they are localized and do not change
throughout the depth of the disc.
a
b
Fig. 3. Iso-surfaces of equivalent
stresses ![]() ,
MPa (a) and the area of maximum equivalent stresses (b)
,
MPa (a) and the area of maximum equivalent stresses (b)
The study has also
revealed the following:
- A dependence ![]() of normal stresses was observed on a
significant surface of the disc
of normal stresses was observed on a
significant surface of the disc
- The values of tangential stresses
are much lower than the values of normal stresses
- The values of tangential stresses
![]() are higher than the values of tangential
stresses
are higher than the values of tangential
stresses ![]()
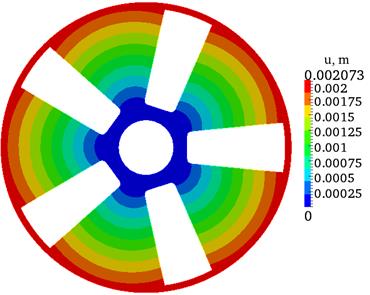
Fig. 4. Iso-surfaces of total
displacements ![]()
The total displacement u diagram, shown in Fig. 4, indicates
that total displacements vary linearly and equally over the entire surface,
with the maximum total displacement (
The
study shows that the maximum normal stresses (![]() ,
,
![]() ,
, ![]() ),
observed in zones with regular geometry and in zones of sharp geometry change,
do not exceed the permissible stress
),
observed in zones with regular geometry and in zones of sharp geometry change,
do not exceed the permissible stress ![]() for the selected
material. These
findings allow for changing the geometry of the disc of the pneumatic
flexible shaft coupling so as to reduce its weight. The authors have proposed a
pneumatic flexible shaft coupling, in which the thickness of
the disc was reduced to
for the selected
material. These
findings allow for changing the geometry of the disc of the pneumatic
flexible shaft coupling so as to reduce its weight. The authors have proposed a
pneumatic flexible shaft coupling, in which the thickness of
the disc was reduced to
The analysis of the n diagram of the proposed disc
of the pneumatic flexible shaft coupling (Fig. 6) shows that the values of
factors of safety ranged from 1.15 to 11.1.
Thus, the study
indicates that the strength and stiffness of the proposed disc
of the pneumatic flexible shaft coupling are ensured. The changes in geometry
allowed for reducing the mass of the disc by almost 30%.
An analysis of the
experimental data (Fig. 3) revealed that the maximum normal stresses are
observed in areas of sharp change in geometry (in areas of stress
concentrators) and in the lower fibres of the curved surface of the disc, which
are located next to the trapezoid openings. Reducing the maximum stresses in
zones of sharp change in geometry is achieved by smooth transitions from one
surface to another.
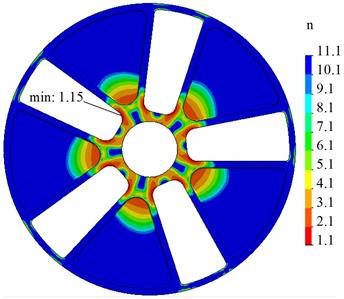
Fig.
5. Safety factor diagram of the proposed
disc of the pneumatic flexible shaft coupling
To determine the maximum
stresses, we have allocated a part of the disc, which was located between two
trapezoid openings. The selected part of the disc can be considered as a large
curvature beam (![]() ),
which undergoes pure bending (Fig. 6).
),
which undergoes pure bending (Fig. 6).
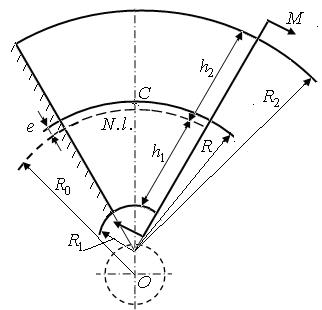
Fig. 6. Calculation scheme of the beam of great curvature
To determine the normal stresses in the selected part, the positions of the neutral layer were first determined by the following formula [4]:
![]() , (2)
, (2)
where  is the distance between the neutral layer and the layer passing through the centres of gravity of the sections of the beam,
  is the height of the curvilinear beam, and
 is the radius of the layer passing through the centre of gravity of the sections of the curvilinear part.
The radiuswas determined by the formula below:
 , (3)
, (3)
whereand
are the radii of curvature of the inner and outer fibres, respectively, and
is the angle formed by the creations carried through the major sides of the trapezoid openings.
Substituting the values of the radii and the angle (,
,
) in (3), we find that
.
The resulting valueand height
of the curvilinear beam (
) are substituted in (2) and we find that
. It should be noted that the position of the neutral layer in the global coordinate system, whose centre is located in the centre of the shaft on which the disc is planted, is determined by the radius
, the value of which is equal to
. From Fig. 7, constructed based on the results of finite element analysis, it is clear that
. Thus, the difference between the values obtained by two methods does not exceed
.
To calculate the strength, it is necessary to always determine the greatest stresses that arise in the cross section. In the curvilinear beam, the largest absolute magnitudes of normal stress occur in the extreme fibres of the cross section, which are located on the curved surface of the beam. We wish to draw attention to the fact that the largest absolute magnitudes of normal stress in the muff disc also arise in the extreme fibres located on the curved surface of the beam (Fig. 3а). To determine such stresses, we apply a known formula, i.e.:
![]() , (4)
, (4)
where ![]() is the
bending moment in the cross section,
is the
bending moment in the cross section, ![]() is the
distance between the neutral line and the inner fibre (Fig. 6),
is the
distance between the neutral line and the inner fibre (Fig. 6), ![]() is the
cross-sectional area, and
is the
cross-sectional area, and ![]() is the
radius of curvature of the internal fibre of the curved beam.
is the
radius of curvature of the internal fibre of the curved beam.
Substituting the values of all the quantities in (4) (,
,
,
), we find that
. From Fig. 7, constructed based on the results of finite element analysis, it is clear that
. Thus, the difference between the values obtained by the two methods does not exceed
.
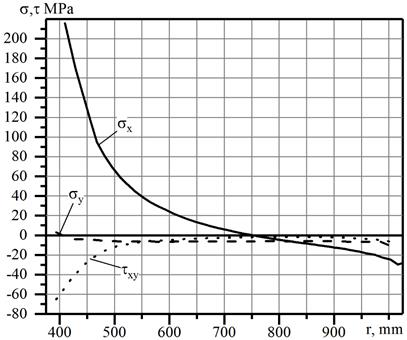
Fig. 7. Graph showing the variation in the normal and tangential stresses in Section I-I
Consequently,
the calculations revealed that the values of the obtained values and by the
formulas in (2) and (4) almost coincide with the values of those obtained by
the finite element method. This indicates that the part of the coupling that is
limited by two trapezoid openings can be considered as a
beam of large curvature and, in the first stage of designing the formulas in
(2) and (4), used to determine the maximum normal stresses on which to determine
the required sizes. After the first stage of the design, it is necessary to
conduct a thorough finite element analysis of the SSS and, based on this
analysis, select the final shape and dimensions of the coupling.
4. CONCLUSIONS
The SSS of pneumatic flexible
shaft couplings, which was analysed by means of finite element modelling, is
characterized by an uneven general and local distribution of stress. Changes in
the total displacement were of a similar nature over the entire surface of the
pneumatic flexible shaft coupling. The results of the SSS analysis enabled us
to identify areas of maximum stresses in pneumatic flexible shaft couplings,
which proved to be the areas of abrupt changes in the geometry. It has been
found that the values ![]() and
and ![]() are higher than the values
are higher than the values ![]() . It has been established that the values
of the tangential stresses
. It has been established that the values
of the tangential stresses ![]() are higher than the values
are higher than the values ![]() ,
,
![]() .
The study allowed for changing the geometry and reducing the mass of the disc of the pneumatic flexible shaft coupling with a slight change in
stresses and strains.
.
The study allowed for changing the geometry and reducing the mass of the disc of the pneumatic flexible shaft coupling with a slight change in
stresses and strains.
The study also confirmed that, in determining
the stresses in the parts of the couplings located between the two holes, it is
possible to use the formulas for the large curvature bars, with which these
parts can be replaced. The findings will have a practical application in
designing new pneumatic flexible shaft couplings.
References
2.
Homišin
J. 2016. “Characteristics of pneumatic tuners of
torsional oscillation as a result of patent activity”. Acta Mechanica et Automatica 10(4):
316-323. ISSN: 1898-4088. DOI: 10.1515/ama-2016-0050.
3.
Годжаев
З.А., A.A.
Поповский, C.B.
Гончаренко 2011.
“Исследование
характеристик
пневматического
упругого
элемента
рукавного
типа в зависимости
от давления
воздуха, хода
и формы
поршня”. Вісник
СевНТУ 120: 306-311. ISSN: 2307-6488.
[In Russian: Godjayev Z.А., A.A. Popovskiy, S.V. Goncharenko. 2011.
“Research on the performance of the pneumatic elastic sleeve element
depending on air pressure, piston stroke and form”. Visnik SevNTU 120: 306-311. ISSN: 2307-6488.]
4.
Homišin J.,
P. Kaššay, M. Puškár, R. Grega, J. Krajňák,
M. Urbanský, M. Moravič. 2016. “Continuous tuning
of ship propulsion system by means of pneumatic tuner of torsional
oscillation”. International Journal
of Maritime Engineering: Transactions of The Royal Institution of Naval
Architects 158(A3): 231-238. ISSN: 1479-8751. DOI: 10.3940/rina.ijme.2016.a3.378.
5.
Поляков
В.С., И. Д. Барбаш,
О.А
Ряховский. 1974. Справочник
по муфтам.
Ленинград,
СССР:
«Машиностроение».
[In Russian: Polyakov V.S., I.D. Barbash, O.A. Ryakhovsky. 1974. Handbook of Couplings. Leningrad, USSR:
“Mechanical Engineering”.]
6.
Виноградов,
Б.В. 2012.
“Проблемы
создания
двухдвигательных
приводов
барабанных
мельниц”. Науковий
вісник Національного
гірничого
університету
5: 61-65. ISSN: 2071-2227.
[In Ukrainian: Vinogradov, B.V. 2012. “Problems in the creation
of a two-motor drive tumbling mill”. Scientific
Bulletin of National Mining University 5: 61-65. ISSN: 2071-2227.]
7.
Lušić Z., S. Kos, S. Krile. 2008. „Structural Analysis of Positioning Methods at Sea”. Nase More 55(1-2): 3-17.
8.
Gąska
D., T. Haniszewski, 2017. „Numerical Modelling
of I-Beam Jib Crane with Local Stresses in Wheel Supporting Flanges - Influence
of Hoisting Speed”. Nase More
64(1): 7-13.
9.
Gąska
D., T. Haniszewski, J. Margielewicz. 2017. "I-beam girders dimensioning
with numerical modelling of local stresses in wheel-supporting flanges". Mechanika 23(3): 347-352. ISSN
1392-1207.
10.
Weskamp
C., A. Koberstein, F. Schwartz, L. Suhl, S. Voss. 2018. “A two-stage
stochastic programming approach for identifying optimal postponement strategies
in supply chains with uncertain demand”. Omega. DOI: 10.1016/j.omega.2018.02.008. ISSN: 0305-0483.
11.
Wittek
A.M., D. Gąska, B. Łazarz, T. Matyja. 2014. "Automotive
stabilizer bar - stabilizer bar strength calculations using FEM, ovalization of
radial areas of tubular stabilizer bars". Mechanika 20(6): 535-542. ISSN 1392-1207.
Received 04.03.2018; accepted in revised form 02.06.2018
![]()
Scientific
Journal of Silesian University of Technology. Series Transport is licensed
under a Creative Commons Attribution 4.0 International License