Article
citation information:
Němček, M. Remarks and corrections
to the standard ISO 6336. Scientific
Journal of Silesian University of Technology. Series Transport. 2018, 99, 115-124. ISSN: 0209-3324. DOI: https://doi.org/10.20858/sjsutst.2018.99.11.
Miloš NĚMČEK[1]
REMARKS AND
CORRECTIONS TO THE STANDARD ISO 6336
Summary. The standard ISO 6336 for the calculation of load
capacity of spur and helical gears was introduced in 2006. There were some
later amendments, but several typographical and other errors. These can cause
some misunderstandings during applications of the standard and are irritating
for its users. This contribution seeks to highlight some aspects of the use of
this standard, as well as drawing users’ attention to the errors it contains
and, at the same time, properly worded content. To fully appreciate this
article, the reader is advised to have a copy of the standard itself. Parts 3
and 6 of the standard are covered in the contribution.
Keywords: ISO 6336; Part 3; Part
6; typos; errors; recommendations
1. INTRODUCTION
ISO 6336 is a key standard for gear
checking and loading capacity assessment. It also addresses service life. In
any task related to the design and optimization of the drive of mechanical
systems, its application is absolutely necessary. Therefore, the standard
cannot be misinterpreted or misunderstood. As such, this article highlights
some of the mistakes and misinterpretations it contains. Due to the scale of
this standard, only the third and sixth parts are addressed, as the other parts
are highly effective. The results of this work will be immediately applied to
the software.
2. ISO 6336, PART 3
“Calculation of
Tooth Bending Strength”, which is the third part of the standard ISO 6336
on the calculation of load capacity of spur and helical gears, was introduced
in 2006. This part was amended in 2008 with Technical Corrigendum 1, which is
still valid. This is a basic standard and instruction for highly important
calculations of bending stress in the roots of gear teeth. This chapter deals
with some aspects of the use of this part of the standard. It also draws
users’ attention to the typographical and other errors it contains. At
the same time, it highlights where the content is properly worded.
The latest edition of this
part of the standard is considerably shorter (42 against 72 pages). It is
interesting that the simplified calculation method C was fully removed from
this part. In addition, some procedures for the calculations of some factors
were changed. Of note is the revised procedure for calculating the form factor
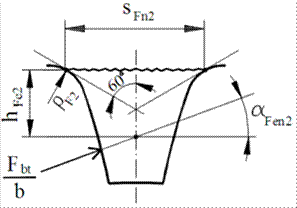
YF2 for internal gearing. The tooth root’s critical section (sFn2)
starts from the root radius at a tangent point of the line inclined at 60°
towards to the tooth axis; see Fig. 1 (it was 30° in the previous edition).
Unfortunately, the new calculation of the tooth root’s critical section sFn2
shows a relatively large deviation from the exact value; see Tab. 1.
We can even say that the
equations used, e.g., in the standard DIN 3990 for the calculation of the form
factor YF2 for internal gearing, give more accurate (although not
entirely accurate) results than ISO 6336. Several comparative calculations for
setting up the form factor YF2 for internal gearing are given in
Tab. 1, which compares the calculations from the latest version of ISO 6336 - 3
with the calculations made for exact geometric dimensions sFn2 a hFe2
(see Fig. 1). This geometrical
calculation is quite easy (simple numerical calculation).

Fig. 1. Tooth root’s critical section
There are examples for
internal gear pairs in Tab. 1. These are concerned with manufacturing internal
gearing with straight teeth, with a standard basic profile and the module mn=1
[mm]. A tool is the standard pinion-type shaper cutter with z0=25
teeth and a sharp addendum (ρa02=0). Its addendum modification
coefficient is simply x0=0. The mating pinion has always 20 teeth.
The manufacturing pair z
0=25, z 2=-40 with shifting coefficients x 0=0, x
2=-0.968 comprises the so-called pole gears (the pitch point lies on the
tip of the circle of the wheel). In this case, a tool (pinion-type shaper
cutter) does not create a root radius; rather, it only makes its
“imprint” on the gear blank during manufacturing. Hence
a ”sharp” root is created: ρf2=0.
Tab.
1.
Calculation
of the form factor YF2
|
z 2 |
x 2 |
ISO 6336 - 3 |
Exact geometric calculations |
|
||||||
|
sFn2 |
hFe2 |
ρF2 |
YF2 |
sFn2 |
hFe2 |
ρF2 |
YF2 |
ΔYF2 |
||
|
[mm] |
[mm] |
[mm] |
[ - ] |
[mm] |
[mm] |
[mm] |
[ - ] |
[% ] |
||
|
-40 |
0 |
2.488 |
1.161 |
0.297 |
1.123 |
2.851 |
1.159 |
0.081 |
0.8539 |
31.5 |
|
-40 |
-0.968 |
2.857 |
1.500 |
0.560 |
1.065 |
3.019 |
1.305 |
0 |
0.830 |
28.3 |
|
-80 |
0 |
2.379 |
1.175 |
0.247 |
1.245 |
2.729 |
1.179 |
0.128 |
0.949 |
31.2 |
|
-80 |
-0.8 |
2.508 |
1.267 |
0.340 |
1.186 |
2.826 |
1.198 |
0.069 |
0.883 |
34.3 |
2.1. ISO 6336, Part 3:
typographical and other errors
Page 3, Paragraph 3 - replace ... YDT. with
… YDT.
Page 8, in the middle - replace … amount mn … with … amount xE ·
mn …
Page 16, under the figure - replace … Y β > 25°… with … Y β for β > 25°
…
Page 18, Line 2, from the top down - replace … 2 ≤ εαn <2,5
… with … 2,05 ≤ εαn
…
Page 21, note b - replace … ZNT … with … YNT …
Page 21, note b - remove text … , where pitting must be minimal
Page 22 - number (49) belongs to the previous equation
Page 23, note b - replace … σS0,2. with … σ0,2.
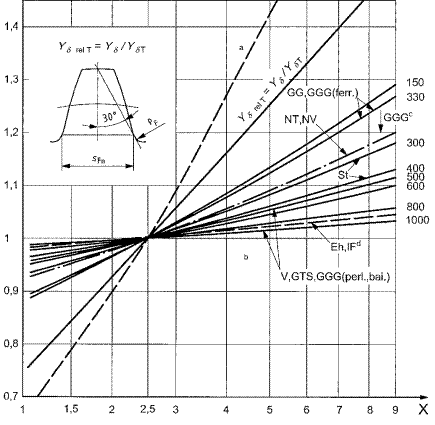
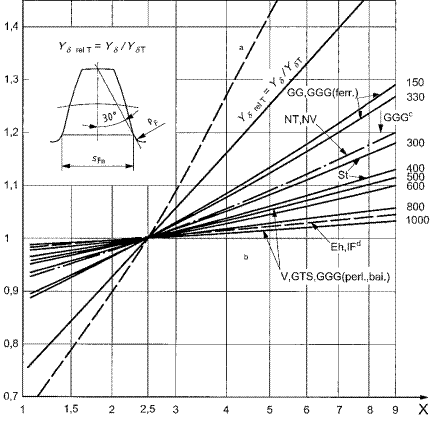
Page 24, Fig. 10 - one of the arrows at GG, GGG(ferr) belongs to the line
above
Page 25, Fig. 12 - the curve for the material GTS is missing
Page 29, in the text and in Fig. 14 - data for the material GTS are
missing
Page 29, Line 3, from the top down - replace … (55) to (61). with … (56) to (62).
Page 29 - what is Rz > 40 valid for?
Page 34, Line 7, from the bottom up - replace … σ k lime …
with … σ p lim
…
Page 36, Line 4, from the bottom up - replace … of YSa or qs and the
material, all
relevant to the gear … with … of qs, and the material of the gear …
Subclauses A.6.3.2.2, A.6.4.2.2, A.7.2.2.2 and Fig. A1 - data for the
material GTS are missing
Page 37, Eq. (A.15) - replace … Yδk = … with … Yδ = …
Page 38, Eq. (A.17) - replace … YRk = … with … YR rel k = …
Page 39, Line 6, from the top down - replace … 1 μm < Rs < 40 μm
with … 1 μm ≤ Rs
≤ 40 μm
Page 40, line 9, from the top down - replace … 1 > R > 0. with … -1.2 < R <0.
Page 41, Line 2, from
the top down - replace … with R = 1 … with … with R = -1 …

Fig.
2. Current Fig. 10

Fig.
3. Corrected Fig. 10
2.2. ISO
6336, Part 3: conclusion
The latest edition of
the third part of the standard ISO 6336 improves on the
previous edition. Firstly, it is shorter and more readable. However, the
simplified calculation method C was apparently omitted.
There is no need to simplify a calculation for bending stress. But it is a pity
that not all errors were caught by Technical Corrigendum 1. That said, we
can say that this part of the standard is still of great benefit to users,
although it is advisable to consider modifying the calculation of the
form factor YF2 for internal gearing.
3. ISO 6336, PART 6
“Calculation of Service Life
Under Variable Load”, which is the sixth part of the standard ISO 6336
for the calculation of load capacity of spur and helical gears, was introduced
in 2004. This part was updated in
2006 and is still valid. This is a fairly effective tool, which defines the procedure for processing a gear pair
loading spectrum using stress levels method. On this basis, we can numerically
calculate service life or safety factors for the required service life. This
chapter also seeks to highlight some aspects of the use of this standard, as
well as draw users’ attention to the typographical and other errors. At
the same time, we point out where the wording is properly worded.
The standard firstly
describes the so-called the Palmgren-Miner’s rule, which states that the
order in which each stress cycle is applied is not considered significant and
the damage accumulation takes place linearly. Failure should be expected when
the sum equals 1. The standard further mentions that, when stress is
calculated, for each level, all factors K
(for contact and bending) should be separately determined. The rotational speed
for the concerned level is the mean one. For the determination of the resulting
safety factors for the required service life, the standard provides a graphic
algorithm for the necessary numerical calculation (Fig. 4 in the standard).
Of interest is Annex A,
which contains a technique to determine the application factor KA without knowledge of an
endurance limit. For the calculation of KA
from a loading spectrum, it is enough to know the values of the slope of the
Wöhler damage line p and the
endurance limit cycles Nlim.
There is also presented
a classical calculation for an equivalent torque Teq in the
form of an equation (Eq. A2 in the
standard). Standard ISO 6336 rightly points out that this principle is
incorrect. The limit cycles Nlim
are achieved in the same way as described earlier; see Figs. 3 and A2 in the
standard. In other words, using Eq. A2 leads to the application of a greater
number of cycles in the calculation (this technique is not correct). For
potential applications, precise values of an equivalent torque for loading
spectra, according to Tab. A2, are as follows:
According to Eq. A2, ... Teq =
1138,4 KA = 1,198
According to the Fig. A2, ... Teq
=1124,9
KA = 1,184
This means that the gear design
according to Eq. A2 would give a greater gear pair.
3.1. ISO 6336, Part 6:
typographical and other errors
Tab. 3 - replace N38 with n38; replace N39 with n39
Under Fig. 3 - replace de damage with damage
Eq. (5) - replace KFαii
with KFαi
Fig. 4 - fourth box from above, replace ... to 5.1 to 5.3 with ... to 5.1
to 5.4
Page 10 - fourth line from below, replace ... in A.2.2 shall ... with
... in A.3.2 shall
Under Fig. A.2 - replace (T2e, N2e) with (T2,
N2e)
Page 12 - second line from below - replace ... cycles NL ...
with ... cycles NLref
Tab. A.2 - heading for the fourth column - replace ![]() with
with
![]()
Tab. B3 - replace calendars
with calenders; should sleve be slave?
Tab. B4 - change Moderate to Light; change Medium to Moderate
Tab. C1 - see Tabs. 2 and 3 in all
columns
Tab.
2.
Tab. 3.
|
Item |
Pinion |
Wheel |
Unit |
|
No. of teeth, z |
17 |
80 |
- |
|
Gear ratio, u |
3,529 41 |
- |
|
|
Normal module, m n |
8,467 |
mm |
|
|
Normal pressure angle, α n |
25 |
° |
|
|
Helix angle, β |
15,5 |
° |
|
|
Centre distance, a |
339,738 |
mm |
|
|
Face width, b |
152,4 |
mm |
|
|
Tip diameter, d a |
169,192 |
544,127 |
mm |
|
Profile shift coefficient, x |
0,172 0 |
0,001 5 |
- |
C1 (incorrect)
C1
(correct)
|
Item |
Pinion |
Wheel |
Unit |
|
No. of teeth, z |
17 |
80 |
- |
|
Gear ratio, u |
3,529 41 |
mm |
|
|
Normal module, m n |
8,467 |
° |
|
|
Normal pressure angle, α n |
25 |
° |
|
|
Helix angle, β |
15,5 |
mm |
|
|
Centre distance, α |
339,727 |
mm |
|
|
Face width, b |
152,4 |
mm |
|
|
Tip diameter, d a |
169,212 |
544,132 |
mm |
|
Profile shift coefficient,
x |
0,172 0 |
0,001 5 |
- |
Page 19 - 10th line - replace ... (14), and ISO 6336-3:2006, Eq. (7). with ... (11), and ISO 6336-3:2006, Eq. (8).
Page 19 - sixth line from below - replace Using the nominal ... with Using
the reference ...
Page 20 - fourth line - replace ... Fig. 9). with ... Fig. 9.
Page 20 - fifth line - replace ... 5.3.3.2, and ... with
... 5.4.3.2, and ...
Page 20 - fifth line from below - replace ... Fig. 7, with ... Fig. 4,
Page 20 - second line from below - replace ... 1,428 ... with ... 1,3355 ...
Page 20 - second line from below - replace ... 1,324 ... with ... 1,677 ...
Page 20 - incorrect set of equations
For contact stress:
![]() (1)
(1)
![]() (2)
(2)
![]() (3)
(3)
For bending stress:
![]() (4)
(4)
![]() (5)
(5)
![]() (6)
(6)
Page 20: correct
set of equations
For contact stress:
![]() (7)
(7)
![]() (8)
(8)
![]() (9)
(9)
For bending stress:
![]() (10)
(10)
![]() (11)
(11)
![]() (12)
(12)
Tab.
4.
Replacing ... 1,428 with ... 1,3355 - incorrect first row
|
|
|
|
|
Stress cycles in 30 years N |
Face load factor KHβ |
Contact stress σH ∙ SH N/mm2 |
Life factor ZNT |
Cycles to failure N f |
Damage parts Ui (N/N f) |
|
|
|
|
|
|
|
|
|
|
|
Tab. 5.
Correct
first row
|
|
|
|
|
Stress cycles in 30 years n |
Face load factor KHβ |
Contact stress σH ∙ SH N/mm2 |
Life factor ZN |
Cycles to failure N |
Damage parts Ui (n/N) |
|
|
|
|
|
|
|
|
|
|
|
Tab. 5.
Replacing ... 1,324 with ... 1,677 - incorrect first row
|
|
|
|
|
Stress cycles in 30 years N |
Face load factor KFβ |
Bending stress σF ∙ SF N/mm2 |
Life factor YNT |
Cycles to failure N f |
Damage parts Ui (N/N f) |
|
|
|
|
|
|
|
|
|
|
|
Tab. 6.
Correct first row
|
|
|
|
|
Stress cycles in 30 years n |
Face load factor KFβ |
Bending stress σF ∙ SF N/mm2 |
Life factor YN |
Cycles to failure N |
Damage parts Ui (n/N) |
|
|
|
|
|
|
|
|
|
|
|

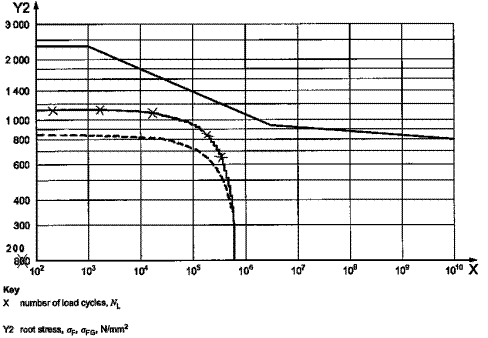
Fig. 4. Wöhler damage curve for bending:
corrected curve (dashed) of the spectrum and one value of the scale y2
3.2. ISO 6336, Part 6:
conclusion
Lifetime calculations of gear pairs
for a given safety factor are standard requests when they are being designed or
checked. The standard ISO 6336 - 6 makes progress towards
satisfying these demands. But, despite some minor confusion
and mistakes, it is a very useful tool for designers. To this extent, this
article seeks to improve the readability of this part of the standard ISO 6336,
while taking into account Technical Corrigendum 1 (2007).
References
1.
ISO 6336
- 3:2006(E). Calculation of Load Capacity of Spur and Helical Gears - Part 3:
Calculation of Tooth Bending Strength.
2.
ISO 6336 - 6:2006(E). Calculation of Load Capacity of
Spur and Helical Gears - Part 6: Calculation of Service Life Under Variable
Load.
3.
DIN 3990.
Tragfähigkeitsberechnung von Stirnrädern.
4.
DIN
3960. Begriffe und Bestimmungsgrößen für Stirnräder
(Zylinderräder) und Stirnradpaare (Zylinderradpaare) mit
Evolventenverzahnung. [In English: Terms and Parameters for Spur Gears
(Cylindrical Gears) and Pairs of Spur Gears (Pairs of Cylindrical Gears) with
Involute Toothing.]
5.
Linke H. 2010. Stirnradvezahnung.
[In English: Spur]. Munich: Carl
Hanser Verlag München. ISBN: 978-3-446-41464-8.
6.
Litvin
F., A. Fuentes. 2004. Gear Geometry and
Applied Theory (Second Edition). Cambridge: Cambridge University Press.
ISBN: 0-521-81517-7.
Received 14.03.2018; accepted in revised form 29.05.2018
![]()
Scientific
Journal of Silesian University of Technology. Series Transport is licensed
under a Creative Commons Attribution 4.0 International License