Article
citation information:
Oeljeklaus, M., Pešík,
L. Control system for slow running bearings. Scientific Journal of Silesian University of Technology. Series
Transport. 2018, 100, 157-164.
ISSN: 0209-3324. DOI: https://doi.org/10.20858/sjsutst.2018.100.13.
Michael OELJEKLAUS [1],
Lubomír PEŠÍK [2]
CONTROL SYSTEM FOR
SLOW RUNNING BEARINGS
Summary. The subject of this
paper is the design of a control system for slow running bearings including a
strength analysis and load capacity measurement. The intention here is to apply
the results to the manufacturing operation of chain conveyors in paint shops.
Keywords: slow running bearing;
diagnostics of bearing; vibrodiagnostics; paint shop.
1. INTRODUCTION
The design of a control system for slow running bearings is highly
desirable across a wide range of industrial sectors. Especially for transport,
technologies are necessary to identify damaged bearings before production
failure and large economic losses occur.
Chain conveyors are used in the bodywork painting process, with chain
wheels mounted on the shaft, which is in turn mounted on two roller bearings.
Shaft speed is relatively slow in terms of rpm. There is no doubt that the
reliability of this construction has a major influence on the volume of production,
especially since the paint shop is the bottleneck of the whole production
process of cars.
The diagnostics of high-speed bearings are based on vibration
measurement, which has been reliably used for many years. For the diagnostics
of slow running bearings, there is no appropriate physical method able to
identify the bearing damage.
2. USED METHODS
The design of a control system for slow running roller bearings is based
on the analysis of the current state. The basis is to determine a load under
all manufacturing conditions and the force of the chain in the most exposed
position. With knowledge of the manufacturing operation force of the chain, it
is possible to calculate the load of shaft and roller bearings. The results may
be used for FEM analysis, calculation stresses and deformations in each part of
the current state as the basis of a design solution.
The design solution for a system of diagnostics for slow running roller
bearings can be based on the principle of rolling resistance or vibration
measurement. However, effective vibration detection depends on a sufficient
level of measured acceleration, which cannot be achieved in slow rotational
movements. This means, for the current state, dismounting the chain and then
measuring the rolling resistance, or increasing the rpm by external power and
measuring the vibration.
Pursuant to the demand for reliable chain conveyors and mounting for
shafts and chain wheels, we designed a system consisting of two pairs of roller
bearings: shaft and frame. These are connected to each other by the so-called
reference part, which is a freely rotatable part. This solution allows us to
identify the bearing damage with the two methods. The first method is dependent
on changes in rolling resistance during the forced rotation of reference part.
The other method uses vibration measurement by increasing the rpm with properly
connected external power. This innovative solution is protected by patent.
A kinematic link between the shaft and reference part allows for the distribution
of the dynamic load between the shaft and frame bearings, which is convenient
for manufacturing operational matters. Based on this kinematic link, the shaft
and reference part are in forced rotation. Due to the kinematic link of the
shaft, reference part and frame, the design solution leads to the integration
of a planetary mechanism with spur or bevel cogwheels. This solution is
protected by patent as well.
After the strength analysis of the designed solution, the prototype was
made with the intention to experimentally measure deformation using the nominal
and maximum load value. The fatigue test has already been prepared.
2. DESCRIPTION OF CURRENT STATE
The current state of the shaft mounting of the conveyor chain wheel is
made up of two spherical roller bearings mounted to the frame by bearing units.
The chain wheel is connected to the free end of the shaft and separated by the
frame’s front plate, which is connected to the frame of the paint shop
production line.
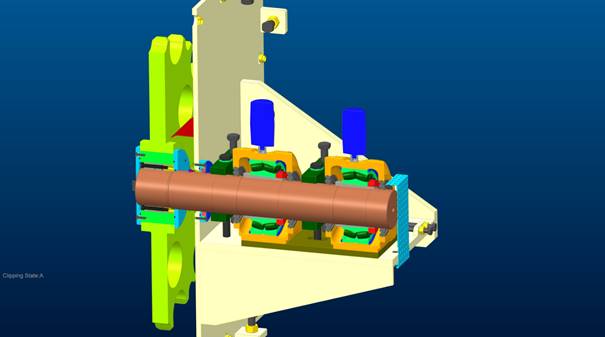
Fig. 1. Current state of
the shaft mounting of the chain wheel
The
advantage of the current shaft mounting of the conveyor chain wheel is its
relative simplicity. Significant disadvantage is complicated by the dismounting
and changing of the bearings. As a result, the bearings are subjected to
vibrodiagnostics using the latest technologies. Low-frequency vibration sensors
are used for the identification of damaged bearings. The difficulty relates to
the insufficient intensity in the vibrations of slow running bearings, whose value
merges with the vibrational background of the paint shop production line. The
reliability of the identification of damaged bearings is insufficient.
3. DESIGN SOLUTION FOR
THE DIAGNOSTIC SYSTEM
The reliable design of a control system for slow running bearings can be
based on the identification of changes in the rolling resistance of the
bearings or their vibrations in the case of sufficient rpm. Both these methods
are difficult to be realized during the manufacturing operation. A change in
rolling resistance can only be identified with increased power load, which is
usually too late. The sufficient rpm value of the bearing can only occur if the
standard, low-speed operation is off.
The design solution for a control system for slow running bearings, which
is the topic of this paper, comes from the idea that, if one ring of the roller
bearing is forced into a low speed, the second ring of the roller bearing is
freely rotatable. This diagnostic solution allows for the identification in the
change in the rolling resistance of the shaft bearing or a sufficient rpm
increase in its freely rotatable ring, which enables the damage to the bearings
to be determined using known vibrodiagnostics methods. The freely rotatable
ring of the shaft bearing is rotatably mounted to the frame using the frame
bearing. The reference part is mounted between the shaft and the frame bearing
(Figure 2).
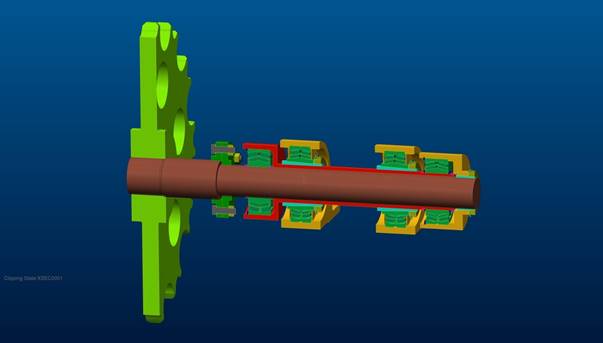
Fig. 2.
Drafted solution of the chain wheel shaft mounting
Changing the bearings is quite a difficult operation and, because of
that, the shaft is divided between the chain wheel and the bearing. This design
allows us to repair or change the bearing outside of the paint shop production
line.
This solution provides a number of design variants, one of which is
chosen as optimal and analysed.
4. STRENGTH ANALYSIS
Strength analysis is an important element of every design solution.
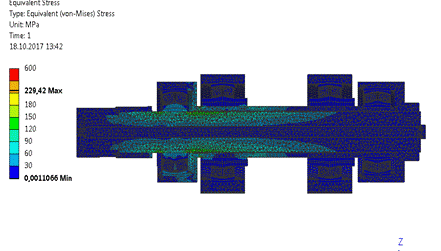
Fig. 3.
Equivalent stress (von Mises test) of the designed solution
With this shaft mounting solution, strength analysis is mainly focused
on stress and deformation calculations. In all cases, Ansys software for FEM
analysis was used.
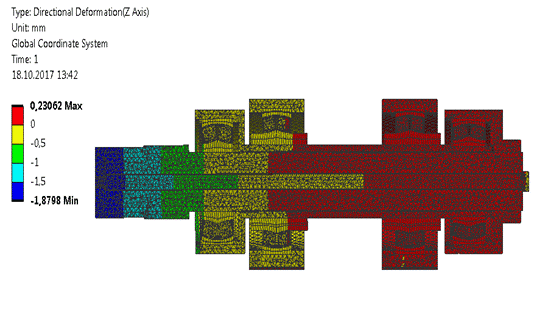
Fig. 4.
Deformation in the z-axis direction of the designed solution
5. DAMAGE IDENTIFICATION SYSTEM
The identification of the damaged shaft or frame bearing can be made
based on the change in rolling resistance. For this purpose, the kinematic and
moment link in the shaft, reference part and frame, consisting of a planetary
gear with simple planets and bevel cogwheels, was designed. The shaft cogwheel
with the main axis of rotation is tightly connected to the shaft. The frame
cogwheel with the main axis of rotation is connected to the frame by an
adjustable frictional moment. The link between these cogwheels is made by
satellites mounted on the pins of the reference part.
The motion of the reference part is determined by a kinematic and moment
link of the planetary gear. If the rolling resistance of the shaft bearing
increases beyond the load capacity limit, the frictional moment between the
frame cogwheel and frame is exceeded. The frame cogwheel then starts to rotate
in the same shaft direction.
If the rolling resistance of the frame bearing increases beyond the load
capacity limit, the frictional moment between the frame cogwheel and the frame
is exceeded. The frame cogwheel then starts to rotate in the countershaft
direction.
Both rotations of the frame cogwheel against the frame can be easily
identified by a connected sensor (Figure 5).
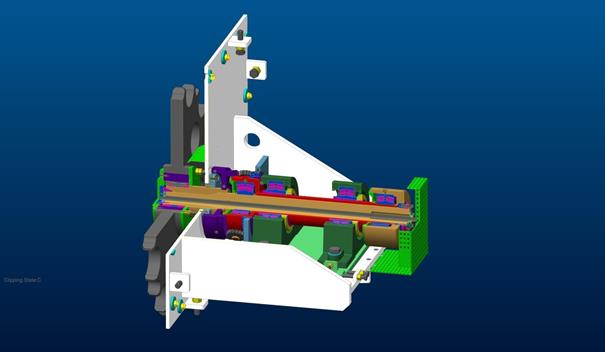
Fig. 5.
Designed solution of shaft mounting of chain wheel
5. CONCLUSION
The paper is focused on the actual issue of the diagnostics of slow
running roller bearings. The designed solution uses a reference part between
the shaft and the frame bearing. A change in rolling resistance, which leads to
bearing damage, can be identified using the reference part. This can be
realized during the manufacturing operation. The designed diagnostic system
consists of a planetary gear with bevel cogwheels. Considering this is an
original solution, two patent applications have been filed, one of which has
been granted.
References
1.
Altschuller G.S. 1984. Erfinden.
Wege zur Lösung technischer Probleme. [In German: Inventing. Ways to Solve Technical Problems.] Berlin: Verlag
Technik.
2.
Bachman W. 1992. Signalanalyse. [From
German: Signal Analysis.]
Braunschweig/Wiesbaden: Vieweg Publishing Company.
3.
Bearing Damage. Damage Detection and Inspection off Used Rolling
Bearings. Schaeffler Technologies AG & Co. KG, 2013.
4.
Broch J.T. 1984. Mechanicel
Vibration and Shock Measurements. Nærum: Brüel&Kjær.
5.
Czech Piotr, Jerzy Mikulski. 2014.
“Application of Bayes Classifier and Entropy of Vibration Signals to
Diagnose Damage of Head Gasket in Internal Combustion Engine of a Car”.
In Telematics - Support for Transport. Book
Series: Communications in Computer and
Information Science 471: 225-232. Springer-Verlag Berlin Heidelberg ISSN:
1865-0929. ISBN: 978-3-662-45316-2.
6.
Dresig Hans. 2006. Schwingungen
mechanischer Antriebsysteme. [In German: Vibrations of Mechanical Drive Systems.] Berlin: Springer. ISBN-13
978-3-540-26024-0.
7.
Figlus Tomasz, Jozef Gnap, Tomas Skrucany, Branislav Sarkan, Jozef
Stoklosa. 2016. “The use of denoising and analysis of the acoustic signal
entropy in diagnosing engine valve clearance”. Entropy 18(7): article number 253.
8.
Figlus Tomasz, Marcin Stańczyk. 2016.
“A method for detecting damage to rolling bearings in toothed gears of
processing lines”. Metalurgija
55(1): 75-78. ISSN: 0543-5846.
9.
Figlus Tomasz, Marcin Stańczyk. 2014.
“Diagnosis of the wear of gears in the gearbox using the wavelet packet
transform”. Metalurgija 53(4):
673-676. ISSN: 0543-5846.
10.
Goreczka, Stefan, Jens Strackeljan. 2010. “Automatic parameter
setting for the signal processing in rolling bearing CM”. In Seventh International Conference on
Condition Monitoring and Machinery Failure Prevention-CM2010.
11.
Hauptmann Peter. 1991. Sensoren.
Prinzipien und Anwendungen. [In German: Sensors.
Principles and Applications.] Munich and Vienna: Verlag C. Hanser.
12.
Herold H. 1993. Sensortechnik.
[In German: Sensor Technology.]
Heidelberg: Verlag Hüthigure.
13.
Jedliński Ł. 2016. “A new
design of gearboxes with reduced vibration and noise levels”. Diagnostyka 17(4): 93-98.
14.
Kolerus J. 1995. Zustandsüberwachung
von Maschinen. [In German: Condition
Monitoring of Machines.] Renningen: Verlag Expert.
15.
Kosicka E., Kozłowski E., Mazurkiewicz
D. 2015. “The use of stationary tests for analysis of
monitored residual processes”. Eksploatacja
i Niezawodnosc - Maintenance and Reliability 17(4): 604-609. DOI: http://dx.doi.org/10.17531/ein.2015.4.17.
16.
Lahdelma Sulo. Esko Juuso, Jens Strackeljan. 2008. “Vibration
analysis with generalised norms in condition monitoring”. In Proceedings of the Seventh Aachen Colloquium
for Maintenance, Diagnosis and Plant Monitoring. Aachen.
17.
Liscak Stefan, Tomasz Figlus. 2014. “Assessment of the
vibroactivity level of SI engines in stationary and non-stationary operating
conditions”. Journal of
Vibroengineering 16(3): 1349-1359.
18.
Randall Robert. 1987. Frequency
Analysis. Nærum: Brüel&Kjær.
19.
Schoppnies E. 1992. Lexikon der
Sensortechnik. [In German: Lexicon of
Sensor Technology.] Berlin and Offenbach: Verlag VDE.
20.
Seeliger A., P. Burgwinkel. 2008. Aachener
Schriften zur Rohstoff und Entsorgungstechnik, Vol. 70. [In German: Aachen Writings on Raw Material and Disposal
Technology, Vol. 70.] R. Zillekens.
21.
Sturm Adolf, Rudolf Förster. 1990. Einführung in die Theorie der Technischen Diagnostik. [From
German: Introduction to the Theory of
Technical Diagnostics.] Berlin: Springer Verlag.
22.
Tomeh E. 2007. Diagnostics
Methodology of Rolling Element and Journal Bearings. Liberec:
Technická univerzita v Liberci. ISBN 978-80-7372-278-4.
23.
Töpfer H. 1989. Grundlagen
der Automatisierungstechnik. [In German: Basics of Automation Technology.] Berlin: Verlag Technik.
24.
Mazurkiewicz D. 2014.
“Computer-aided maintenance and reliability management systems for
conveyor belts”. Eksploatacja i
Niezawodnosc - Maintenance and Reliability 16(3): 377-382.
25.
Mazurkiewicz D. 2010. “Tests of
extendibility and strength of adhesive-sealed joints in the context of
developing a computer system for monitoring the condition of belt joints during
conveyor operation”. Eksploatacja i
Niezawodnosc - Maintenance and Reliability 3: 34-39.
26.
Wittek Adam Marek, Damian Gąska,
Bogusław Łazarz, Tomasz Matyja. 2014. “Automotive
stabilizer bar - stabilizer bar strength calculations using FEM, novelization
of radial areas of tubular stabilizer bars”. Mechanika 20(6): 535-542. ISSN 1392-1207.
Received 05.03.2018; accepted in revised form 11.08.2018
![]()
Scientific
Journal of Silesian University of Technology. Series Transport is licensed
under a Creative Commons Attribution 4.0 International License