Article citation information:
Vojtková, J.
Determining and verifying the geometric characteristics of helical
grooves in the worm in planetary toroidal drives in a more effective way. Scientific
Journal of Silesian University of Technology. Series Transport. 2017, 96, 197-204. ISSN: 0209-3324. DOI:
https://doi.org/10.20858/sjsutst.2017.96.18.
Jarmila VOJTKOVÁ[1]
Determining
and verifying the geometric characteristics of helical grooves in the worm in planetary
toroidal drives in a more effective way
Summary. In
the toroidal drive, a screw-shaped groove is cut into the globoid worm. There
is contact with the rolling element in this groove. This helix can be described
by parametric equations. When calculating the values of the first and second
curvature of the curve, as well as the radius of curvature, we must calculate
the individual derivations. A new, more effective way is to determine the
values already mentioned by using NX software only. When using Siemens PLM NX
software, it is not necessary to determine individual derivations and their
values, although the NX software determines the radii of the first and second
curvature, based on the defined helix curve.
Keywords: groove in the globoid worm; helix;
curvature; parametric equations
1. INTRODUCTION
In practice, different types of rolling
transmissions are used. The helical grooves in which the rolling elements are
rolled can be described by equations. These grooves correspond to the teeth in
the toothed gears. The values of the radii of curvature of the groove and the
rolling elements influence the contact pressures in the transmission. The
article deals with the values of the first and second curvature and the radii
of curvature of the helical grooves that are on a non-cylindrical surface.
Helical grooves can also be cut into a globoid or toroidal surface, mostly in
special rolling transmissions. An example is a toroidal planetary drive. So
far, the above-mentioned values, that is, the first and second curvature and
the radii of curvatures, have been solved only by mathematical methodology,
i.e., by calculating the individual partial derivations and then calculating
the radii of curvature. Siemens PLM NX10 software provides the option to
determine these required characteristics in a more efficient, simpler way,
without calculating derivations. The aim of this article is to propose a new
method, which is very effective on globoid and toroidal surfaces. On such
surfaces, the values of the radii of the first and second curvatures are
variable in their entirety.
After the design process, various types of
checks are performed (e.g., by FEM [1, 2]). Then, it is necessary to be mindful
of the diagnostics during the operation of the element (e.g., by non-invasive
methods [3-7]).
2. DRIVE Members
Mechanical planetary toroidal drives
consist of the following basic members (Fig. 1): 1) globoid worm, which is the
driving member, 2) rollers, 3) divided stator, 4) planet and 5) carrier. [8,
9]. Turning the worm into motion is provided by means of the rolling body in
the planet. Without a stator, the planet would only rotate around its own axis.
The carrier is activated by the grooves cut in the stator, which is the output
of the transmission. Such a drive can be classified as transmissions with very
low clearance and good efficiency [8].
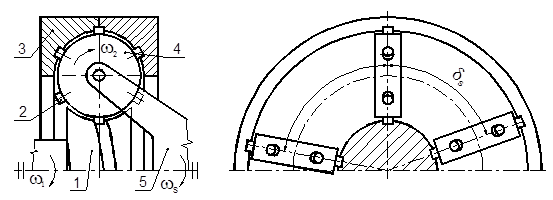
Fig. 1. Planetary
toroidal roller drive
3. Screw
grooves in the globoid worm
There is a
screw-shaped groove in the globoid worm. In Fig. 2, there is a defined
general point of the helix before cutting the shape itself, which takes into
account whether the rolling elements are rollers or balls. For defining this
helix, which is the basis for the groove modelling, equations are used. When
describing parametric equations, the parameter used here is an angle, which is
a general parameter. In Siemens PLM NX software, the main parameters are first
determined by the command EXPRESSIONS,
namely, the number of grooves z1,
the number of rolling bodies in the planet z2,
the diameter of the worm d1
and the diameter of the planet d2
in the middle section. One groove in the worm is considered in the article,
i.e., z1 = 1. In
parametric equations, the angle parameter j1 is defined by the
vertical axis. The variance of the angle j1 is defined by the
parameter t, which takes values from
0 to 1 with a step. The helix is created as a LAW CURVE using coordinates xt,
yt, zt (Fig. 3). In Fig. 3, z1
= 1, z2 = 8, j1 = 60⁰.
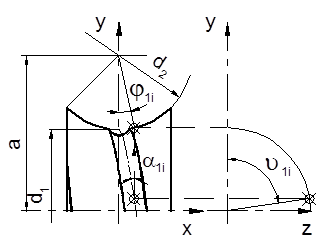
Fig. 2. Helical
groove in the worm
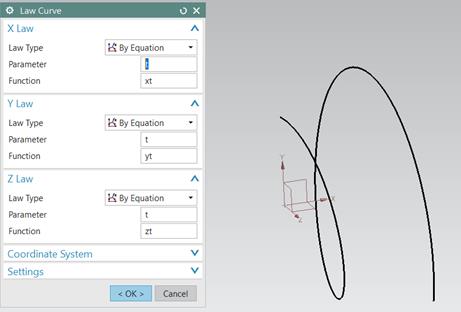
Fig. 3. Law
Curve: helix on the globoid surface of half of the worm
The worm diameter at the general point (Fig. 2)
is:
![]() (1)
(1)
where d1
is the worm diameter in the middle section, d2 is the planet
diameter,
and j1is the
rotation of the planet from the vertical axis.
The helical groove
parametric equations are:
 (2)
(2)
where:
x, y, z – Cartesian
coordinates of the helix point
a – internal axial
distance
r2 –
planet radius
i12
– gear ratio between rolling bodies and worm
For writing in the NX software, you need to define a variable angle
using the parameter t:
![]() (3)
(3)
where t is
a variable parameter from 0 to 1, and fi1 is maximum angle j1.
For the lead angle:
![]() (4)
(4)
where v is the circumferential
speed, and w is the
angular velocity.
For the
pitch:
![]() (5)
(5)
The screw groove in the worm is characterized by a constant pitch
(Equation 5), defined by the number of grooves in the worm and the number of
rolling bodies in the planet. The pitch of the helix varies, depending on the
diameter of the worm.
A helix with a radius of 50 mm and a pitch of 50 mm was used to verify
the software. For a cylindrical helix, the values of the first and second
curvatures are constant, but the values are different. The CURCE ANALYSIS command determines the value of the first radius of
curvature as a variable with a minimum of 50.6067 mm and a maximum of 51.6097
mm for 200 points on the helix. The calculation is the radius of 51.2665 mm.
The second curvature (torsion) is possibly found in More CURVE ANALYSIS Info.
The value of a standard helix with the above parameters is a minimum of
3.015375e-03 mm-1 and a
maximum of 3.145,624e-03 mm- 1,
as specified by the software. The second curvature (torsion) is calculated as
3.104,462e-03 mm- 1. As we can see, the accuracy levels are
very high.
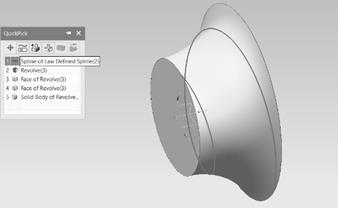
Fig.
4. Helix on the surface of the worm for z2=8
For the globoid worm, the first and
second curvatures are not constant, but they vary depending on the ratio
between the worm and the planet i12,
as well as the ratio between the planet diameter and worm diameter.
The first curvature of curve-squared
(for the general parameter φ):
 (6)
(6)
where
the partial derivations are:
![]()
![]()
![]() (7)
(7)
For the radius of the first curvature of the
worm:
![]() (8)
(8)
For the second curvature of the
helix:
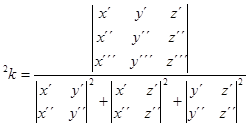 (9)
(9)
Tab. 1
Cartesian
coordinates of the helix in the worm,
worm diameter and lead angle for
d1= 90 mm, d2= 85 mm, z1=1, z2=6
|
j1 (⁰) |
Point (mm) |
d1 (mm) |
α1 (⁰) |
|
|
0 |
x |
0.000 |
90.000 |
8.945382 |
|
y |
45.000 |
|||
|
z |
0.000 |
|||
|
30 |
x |
21.250 |
101.388 |
7.954295 |
|
y |
-50.694 |
|||
|
z |
0.000 |
|||
|
60 |
x |
36.806 |
132.500 |
6.102780 |
|
y |
66.250 |
|||
|
z |
0.000 |
|||
In
Table 1, only three helix points are selected and their coordinates are calculated,
along with the value of the diameter d1i
and the angle α1. In
the calculation, the rounding of the coordinates to six decimal places in mm
and angles to eight decimal places in degrees was considered. Table 2 presents
the first curvature of the helix and its reciprocal value of the radius of
curvature. In the next column, the NX software defines the radius of curvature.
The difference between the radius of curvature is determined by the
calculation, with the rounding considered; the software value is small and
represents a variation of about 0.3%. In turn, it is possible to determine the
first and second curvature of the curve, as well as the radii of curvatures
using the NX software.
Tab.
2
The first and
second curvature of the helix, their radii of curvatures, as per the
calculation,
and the software NX for d1= 90 mm, d2= 85 mm, z1=1,
z2=6
|
j1 (⁰) |
1k calculation (mm-1) |
r1k calculation (mm) |
r1k NX (mm) |
2k calculation (mm-1) |
2k NX (mm-1) |
r2k calculation (mm) |
|
0 |
2.1116e-02 |
47.357 |
47.225 |
3.1321e-03 |
3.1131e-03 |
319.277 |
|
30 |
1.9105e-02 |
52.344 |
52.213 |
2.2494e-03 |
2.2173e-03 |
444.570 |
|
60 |
1.4986e-02 |
66.730 |
66.526 |
0.8252e-03 |
0.8256e-03 |
1,211.254 |
NX10 software allows you to
determine and display the values of the radius of curvature or the first
curvature at individual points, while their number can be determined as needed.
NX also allows you to specify minimum and maximum values, as well as other
data. Fig. 5 presents a graphic view of helix curve analysis with a scale and
extreme values of the radii of curvature. For the determination of the contact
pressure, it is necessary to determine the second curvature of the helix. The
second curvature of the curve (torsion) can be determined by listing the
individual values as needed. The software determines the points on the curve
according to parameter t, which
adjusts according to the number of points in which the data are to be detected.
The accuracy of the values varies slightly depending on the number of points.
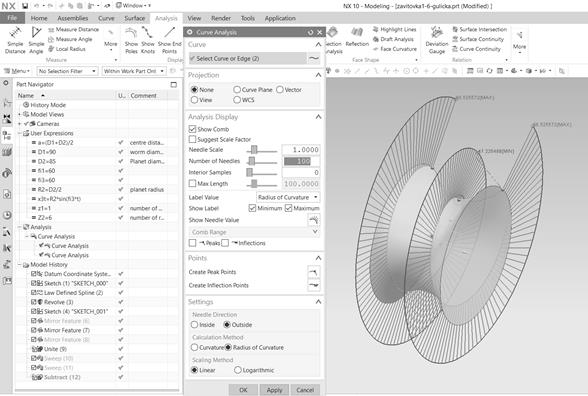
Fig. 5 The radius of curvature of the helix in
the scale of NX software
4. CONCLUSION
In those transmissions where the rolling elements are in the screw
grooves on globoid and toroidal surfaces, it is necessary to determine the
radii of both curvatures of curves. Only certain software packages allow you to
determine both curvatures of curves. NX software lists, in addition to the
coordinates, the radius of the first curvature, or the first curvature of
curve, as well as the torsion, i.e., the second curvature of curve.
Furthermore, the curve values can be determined by using NX software, even
without calculating individual derivations, which appears to be a more
effective and faster method for determining both radii of curves. The accuracy
of the values is high. To determine values at specific points, it is better to
specify the point precisely because the software modifies the parameter t in its own way. This method can also
be used for other transmissions containing helices.
Acknowledgements
This paper was written in the
framework of the VEGA grant, “1/0473/17 Research and development of technology
for homogeneous charge self-ignition using compression in order to increase
engine efficiency and to reduce vehicle emissions”.
References
1.
Gąska
Damian, Tomasz Haniszewski, Jerzy Margielewicz. 2017. “I-beam girders dimensioning with numerical modelling of local
stresses in wheel-supporting flanges.” Mechanika
23(3): 347-352. ISSN 1392-1207.
2.
Wittek
Adam Marek, Damian Gąska, Bogusław Łazarz, Tomasz Matyja. 2014. “Automotive stabilizer bar – stabilizer bar
strength calculations using FEM, ovalization of radial areas of tubular
stabilizer bars.” Mechanika 20(6):
535-542. ISSN 1392-1207.
3.
Czech Piotr. 2012.
“Diagnosis of industrial gearboxes condition by vibration and
time-frequency, scale-frequency, frequency-frequency Analysis.” Metalurgija 51(4): 521-524. ISSN: 0543-5846.
4.
Czech Piotr. 2012.
“Identification of leakages in the inlet system of an internal combustion engine
with the use of Wigner-Ville transform and RBF neural networks.” In: Jerzy
Mikulski , ed., 12th International
Conference on Transport Systems Telematics. Katowice Ustron, Poland. 10-13
October 2012. Telematics in the Transport Environment. Book Series: Communications in Computer and Information
Science Vol. 329: 414-422. DOI:
http://doi.org/10.1007/978-3-642-34050-5_47. ISSN: 1865-0929. ISBN:
978-3-642-34049-9.
5.
Czech Piotr,
Henryk Madej. 2011. “Application of cepstrum and spectrum histograms of
vibration engine body for setting up the clearance model of the piston-cylinder
assembly for RBF neural classifier.” Eksploatacja i Niezawodnosc –
Maintenance and Reliability 4(52): 15-20. ISSN: 1507-2711.
6.
Figlus Tomasz,
Marcin Stańczyk. 2016. “A method for detecting damage to rolling bearings in
toothed gears of processing lines.” Metalurgija
55(1): 75-78. ISSN: 0543-5846.
7.
Figlus Tomasz,
Marcin Stańczyk. 2014. “Diagnosis of the wear of gears in the gearbox using the
wavelet packet transform.” Metalurgija 53(4): 673-676. ISSN: 0543-5846.
8.
Kuehnle M.R., H.
Peeken, Chr. Troeder, S. Ciernak, 1981. “The toroidal drive.” Mechanical Engineering 32(2): 32-39.
9.
Lizhong Xu, Fu
Linping. 2015. “Toroidal with half stator.” Advance
in Mechanical Engineering 7(6): 1-8. Available at:
http://journals.sagepub.com/doi/pdf/10.1177/1687814015589270.
Received 21.04.2017; accepted in revised form 25.07.2017
![]()
Scientific Journal of
Silesian University of Technology. Series Transport is licensed under
a Creative Commons Attribution 4.0 International License