Article citation info:
Vojtková, J. Reduction of contact stresses using involute gears with asymmetric teeth. Scientific Journal of Silesian University of Technology. Series Transport. 2015, 89, 179-185. ISSN: 0209-3324. DOI: 10.20858/sjsutst.2015.89.19.
Jarmila VOJTKOVÁ[1]
REDUCTION OF CONTACT STRESSES USING INVOLUTE GEARS WITH ASYMMETRIC TEETH
Summary. Asymmetrical involute gears have a different
value of the operating pressure angle for right and left side of the gear.
These teeth are suitable for one direction of rotation. Such teeth enable to
change the length of the generating line. They enable to improve the value of
reduced radii of curvature. Asymmetrical teeth allow reducing the values of
Hertz's pressures, especially on the root of the teeth. Hertz pressures
are directly related to the asymmetry.
Keywords: contact stresses, gear, involute,
asymmetric teeth
1. Introduction
In practice, cogwheels with
involute gears are used the most. Their production is common and their accuracy is
aceptable. [1-7]. However, to lower the value of contact stresses, gears with
asymmetric teeth might be more suitable. Their price should not be a main
criterion when working with them. With a well-designed gear with asymmetrical
teeth, a considerable decrease in the values of contact stresses can be
noticed, and in some cases also a decrease in vibrations. From this point of
view, the spur gears with non-symmetrical teeth are becoming a great
alternative. [1-2].
2.
Suitable TOOTH Design
Area For GEAR with asymmetric teeth
The driving side has a
differnet pressure angle than the opposite side, and
therefore an asymetrical tooth is being created. An angle larger than
20° is more advantageous for the driving
side. The angle of the opposite side has a considerable influence only during
the reverse movement. Base circle diameter significantly
decreases with increasing
pressure angle. The larger the difference
between the angles of a profile, the more pronounced is the asymmetry, and hence there is a significant
difference between the diameters of
the base circle. [1].
An asymmetrical tooth, an axis of
tooth, and a pitch circle are drawn on Fig. 1. The circular pitch measured
on the pitch circle is identical for the left and right side. The tooth
thickness, measured mostly on a top land, is changing relative to the angle of
stress, which influences the ability to create a correct tooth.
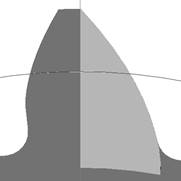
Fig. 1. Asymmetrical tooth, ha*= 1, left side
pressure angle αL=20º, right side pressure angle αP=35º
The minimum number of teeth with
allowable undercutting z´min
![]()
(1)
Where:
ha* − sufficient tooth
addendum,
α − pressure angle [°].
Values of a minimal amount of teeth z´min relative to the angle
of profile α, for various values
of top land tooth height ha*,
are depicted on Fig. 2. The curves take into consideration the allowable
undercutting. For larger values of the profile α angle, the values of minimal amount of teeth are decreasing
pronouncely.
The area of the accurate tooth
design is dependent on the following parameters:
- number of teeth,
- sufficient
tooth addendum ha*,
- pressure
angle for the opposite side of tooth,
- the
stresses on the non-funtional side of the tooth,
- the
required value of top land tooth thickness.
Z´min α (°)
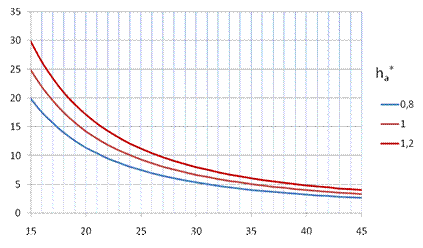
Fig. 2. The minimum number of
teeth with allowable undercut depending
on the pressure angle
Half the top land thickness
![]()
(2)
Where:
da − tip circle diameter [mm],
d − pitch circle
diameter [mm],
m – module [mm],
αa − pressure angle at the tip circle [°].
These parameters imply a possible
design area of an accurate tooth creation, which satisfies the geometrical
parameters. An area for accurate tooth creation for parameters z1=17,
ha*=1 is
shown in Fig. 3. For a certain number of teeth, based on an angle αL, the values of the angle on the right side can be determined in the
graph (Fig. 3). For example, z1=17, ha*=1, αL=20° can
have an angle αP in the interval < 20°,
38.5°>. This area decreases in size with a smaller
number of teeth.
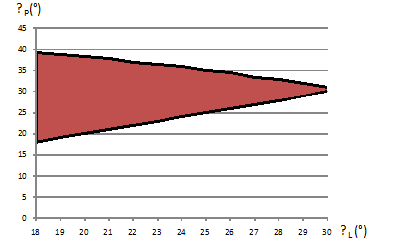
Fig. 3.
Suitable tooth design area for z1=17, ha*=1
Table 1
The top land thickness and contact
ratio for m=10mm, gear ratio u=1
|
ha* |
z1 |
αL (°) |
αP (°) |
saL/2 (mm) |
saP/2 (mm) |
εαL |
εαP |
z2hL |
|
0,9 |
8 |
25 |
38 |
2,692 |
-0,185 |
1,128 |
1,041 |
11 |
|
10 |
23 |
40 |
3,190 |
-0,550 |
1,202 |
1,059 |
22 |
|
|
14 |
19 |
43,5 |
4,013 |
-1,362 |
1,370 |
1,083 |
27 |
|
|
17 |
17 |
45,5 |
4,401 |
-1,898 |
1,488 |
1,097 |
30 |
|
|
1 |
10 |
24 |
32,5 |
2,232 |
0,372 |
1,294 |
1,194 |
18 |
|
14 |
20 |
37,5 |
3,230 |
-0,669 |
1,463 |
1,201 |
26 |
|
|
17 |
18 |
39,5 |
3,697 |
-1,116 |
1,582 |
1,209 |
31 |
|
|
1,1 |
14 |
21 |
30 |
2,375 |
0,270 |
1,553 |
1,370 |
25 |
|
17 |
19 |
33,5 |
2,929 |
-0,351 |
1,672 |
1,361 |
32 |
The limits values of the angles α for the right and left side, with a full degree precision for the left
side and 0,5° precision for the right
side, for a various amount of teeth are mentioned in Tab. 1. The values of half top land tooth thickness are also
mentioned there. The value z2hL is the limit value of the number of teeth, for
the gear ratio u=1. If the number of teeth is greater than z2hL, point A is outside the interval N1N2
(interference). For a larger gear ratio, the value of the limit of the
teeth z2h increases.
3. The radii of curvature and Hertz pressures
A view of various
sides of the tooth, where the length of the contact line and radii are
changing, is on Fig. 4.The change of pressure angle α leads to changes in the radii of
curvature (Fig. 4), which affect the Hertz pressures.
Tab. 2 shows the values of the radii of curvature, mesh points
A, C. [1].
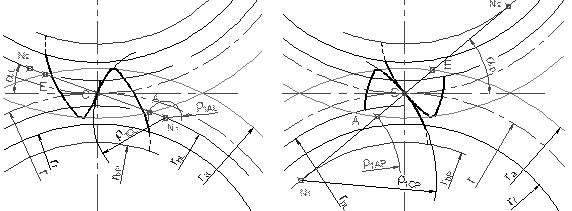
a)
b)
Fig. 4.
Mesh assymetrical toth: a) driving side αL=20°, b) driving side
αP=35°
The
value of Hertz pressure is changing in relation to the contact point. It has
the least advantageous values in the place of the first mesh point, at the
dedendum of the pinion. The regular values of the pressure in the gearing
can be approximately determined in a following matter: For symmetrical
gearing, if the pressure value of 100%
is at the pitch point, then this value at the dedendum is approximately 150% and approximately 95% at the top of the pinion in
relation to the gearing geometry. [8]. The
values of the pressures can be determined based on the circumference force. The
second option is to determine these values on the basis of normal force, which
value changes depending only on the amount of tooth pairs in the mesh, and is
constant for a single contact. Double tooth contact is also being considered in
the calculation.
Table 2
Reduced radii
of curvature and values corresponding to Hertz pressure for Ft=1N
|
z1 |
z2 |
α (°) |
Point C |
Point A |
||||
|
ρ1C
(mm) |
√(Ft/(ρR.cosαt)) (N/mm)-1/2 |
% |
ρ1A (mm) |
√(Ft/(ρR.cosαt)) (N/mm)-1/2 |
% |
|||
|
10 |
10 |
24 |
20,337 |
0,3281 |
100 |
1,769 |
0,5688 |
173 |
|
32,5 |
26,865 |
0,2971 |
91 |
11,048 |
0,2497 |
79 |
||
|
18 |
24 |
20,337 |
0,2894 |
100 |
0,022 |
4,9947 |
1726 |
|
|
32,5 |
26,865 |
0,2620 |
91 |
10,119 |
0,2602 |
90 |
||
|
14 |
14 |
20 |
23,941 |
0,2982 |
100 |
2,351 |
0,4879 |
164 |
|
37,5 |
42,613 |
0,2432 |
82 |
27,643 |
0,1837 |
62 |
||
|
26 |
20 |
23,941 |
0,2615 |
100 |
0,016 |
5,7701 |
2207 |
|
|
37,5 |
42,613 |
0,2133 |
82 |
27,079 |
0,1730 |
66 |
||
|
17 |
17 |
18 |
26,266 |
0,2830 |
100 |
2,634 |
0,4584 |
162 |
|
39,5 |
54,067 |
0,2190 |
77 |
39,408 |
0,1608 |
57 |
||
|
31 |
18 |
26,266 |
0,2490 |
100 |
0,041 |
3,5680 |
1433 |
|
|
39,5 |
54,067 |
0,1927 |
77 |
38,991 |
0,1494 |
60 |
||
Reduced radius of curvature
ρR for the
mesh points:
|
|
(3) |
Where:
ρ1 – radius of curvature with respect to the
pinion [mm],
ρ2 – radius of curvature with respect to the
wheel [mm].
Hertz
pressures are directly related to the asymmetry. The
values of the reduced radii of curvature at the pitch point C and point A are calculated in Fig. 2. The value √(Ft/(ρR.cosα)) is
in proportion to the course of stresses. This value for pitch point C is defined as 100%. The change
corresponding to the change in stresses at a specific point can be seen in Fig.
2. For example, for values z1=
z2=17, ha*=1, an angle αL=18° is the stress at the
pitch point C with the value 100%, in point A with 162%, and decreases for angle αP=39,5° to 77% in point C, and to 57% in point A. If the angle of the driving side is 39,5°, the values of stresses are considerably more advantageous.
ρ1 [mm]

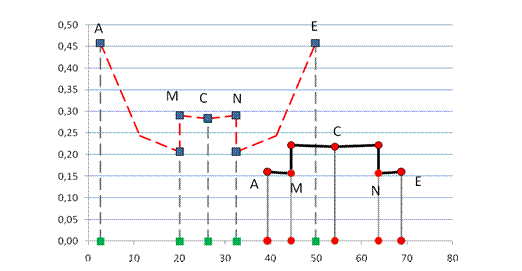
Fig. 5. The course of
mathematical term determining the course of a Hertz pressure, force
Ft = 1N, z1=17, z2=17, ha*=1, ![]() αL=18°,
αL=18°, ![]() αP=39,5° with a double tooth contact
αP=39,5° with a double tooth contact
Hertz pressure by normal force
|
|
(4) |
Hertz pressure by tangential force
|
|
(5) |
Where:
zM
− material factor [MPa1/2],
Ft
− tangential force [N],
Fn
− normal force [N],
bw
− axial face width [mm],
αt
− pressure angle in a transverse plane [°],
E − modulus of elasticity [MPa].
4.
Conclusion
The use of gears with asymmetric teeth can
be a good alternative to reduce
Hertz pressures. Well-designed gearing can be achieved to reduce the size, significantly reduce
contact stresses especially
in the dedendum of the pinion.
This paper
was written in the framework of Grant Project VEGA: “1/0688/12– Research and application of universal regulation system in order to master the source of mechanical systems
excitation.”
References
1.
Vojtková J. 2014. „Effect of asymmetry on radii of
curvature for spur gears with nonsymmetrical teeth“. Scientific Journal of Silesian University of
Technology. Series Transport 84: 47-51. ISSN 0209-3324.
2. Di Francesco G., S. Marini. 2007. Asymetric Teeth: Bending Stress Calculation.
In:
http:// www.geartechnology.com. March/April 2007.
3. Wojnar
G., P. Czech, P. Folega. 2014.
“Problem with Diagnosing local faults of gearboxes on the basic of vibration
signal”. Transaction of the Universities
of Košice 2: 95-100. ISSN: 1335-2334.
4. Czech
P., P. Folega P., G. Wojnar. 2014.
„Taking Advantage of empirical mode decomposition in diagnostig IC engine
faults”. Transaction of the Universities
of Košice 2: 17-22. ISSN: 1335-2334.
5. Czech P., J. Mikulski. 2014. “Application
of Bayes classifier and entropy of vibration signals to diagnose damage of head
gasket in internal combustion engine of a car”. Communications in Computer and Information Science 471: 225-232. ISSN:
1865-0929.
6.
Homišin J., P. Kaššay, P. Čopan. 2014. „Possibility of torsional vibration extremal control”. Diagnostyka 15(2): 7-12.
7.
Haľko J., S. Pavlenko. 2012. „Analytical suggestion of
stress analysis on fatigue in contact of the cycloidal - vascular gearing
system“. Scientific Journal of
Silesian University of Technology. Series Transport 76: 63-66. ISSN
0209-3324.
8. Moravec V. 2001. Konstrukce strojů a zařízení II. Montanex.
[In Slovak: Construction machinery and equipment II].
Received 09.05.2015; accepted in revised form 24.09.2015
![]()
Scientific Journal of Silesian University of
Technology. Series Transport is licensed under a Creative Commons Attribution
4.0 International License

