Article
citation information:
Pawelski, Z., Zdziennicki, Z. Determining the torque
loading of the cycloid gear. Scientific
Journal of Silesian University of Technology. Series Transport. 2018, 101, 131-140. ISSN: 0209-3324. DOI: https://doi.org/10.20858/sjsutst.2018.101.12.
Zbigniew PAWELSKI[1],
Zbigniew ZDZIENNICKI[2]
DETERMINING THE
TORQUE LOADING OF THE CYCLOID GEAR
Summary. Based
on experimental investigations, a very close correlation was established
between the torque loading of the cycloid gear and the laser sensor’s
indications measuring the displacement of the gear body. The method is given
and the relationship between the registered signal of the torque loading of the
gear and the registered laser sensor signal is determined. The practical application
of this property in the industrial diagnostics of cycloidal gears is discussed.
Spectral analysis of the fast Fourier transform (FFT) signal ripple from a
laser sensor is made. These results are compared with the results of the
analysis carried out on the ripples of the torques and rotational speeds of the
cycloid gear. This comparison shows that the spectral FFT analysis of the
ripples of the laser sensor signal is a useful tool in the diagnostics of
cycloidal gears.
Keywords: cycloidal gear; load torque; laser
signal; FFT analysis
1. INTRODUCTION
The test object and
test stand are described in [6]. The test stand has been additionally equipped
with a laser sensor for measuring the horizontal displacement of the cycloidal
gear housing (see Figure 1).
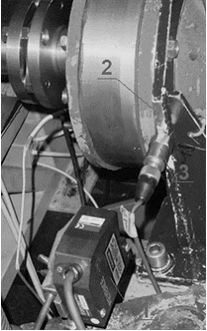
Fig. 1. Laser
sensor on the test bench:
1) laser sensor, 2) the surface
on which displacement is measured by the laser sensor,
3) piezoelectric sensor
Characteristic features of the laser
sensor are as follows:
a.
Manufacturer:
Keyence Corporation
b.
Sensor
model: LK-K157
c.
Controller
model: LK-G5001
The purpose of the analysis is to
check the possibility of determining the property and size of the load torque
by means of the laser sensor signal. The test conditions are given below:
Tested object: Three-disc Cyclo
gearbox (prototype)
Work mode: Reducer
Input speed (mean): 1,600 rpm
Output torque (mean): 495 Nm
Type of oil: ATF M3 Plus
Temperature of oil: 37.4°C
2. MEASURED SIGNALS
The form of the measured and
recorded signals is shown in Figure 2. This figure shows a very large
similarity between the output torque of the cycloidal gear (load) and the
horizontal displacement of its housing (signal from the laser sensor).
This similarity prompted the
question about whether the torque of the cycloidal gear load can be estimated
by means of a laser signal for measuring the horizontal displacement of the
gear housing.
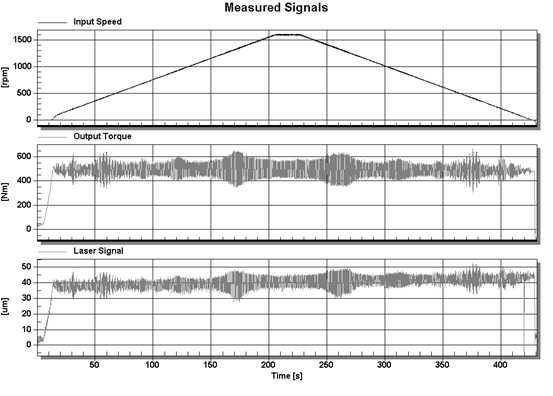
Fig. 2. Measured and recorded
signals
The first step was to determine the
static characteristics of the mean value of the laser signal as a function of
the average torque load of the cycloid gear. The results of these calculations
are presented in Figure 3.
As can be seen from the
characteristics set out in Figure 3, the correlation coefficients between the
analysed values are very high. This motivated us to analyse the dynamic
relations between the torque signal of the load and the laser signal measuring
the horizontal deflections of the cycloidal gear.
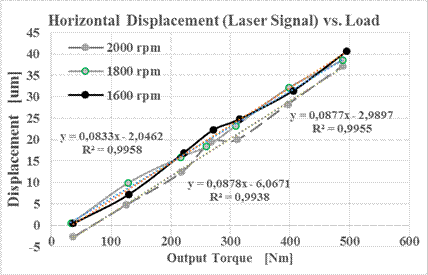
Fig. 3. Static
characteristics of the laser signal as a function of the output torque
3. ANALYSED SIGNALS
The analysis was carried out for
half of the recorded signals, i.e., when the value of the rotational speed of
the cycloidal gearbox increases and remains constant. It is possible to observe
a large similarity in the course of changes in the output torque signal along
with the signal from the laser sensor. This applies to both the time and input
speed functions. The latter are of more practical significance. (Figures 4-5).
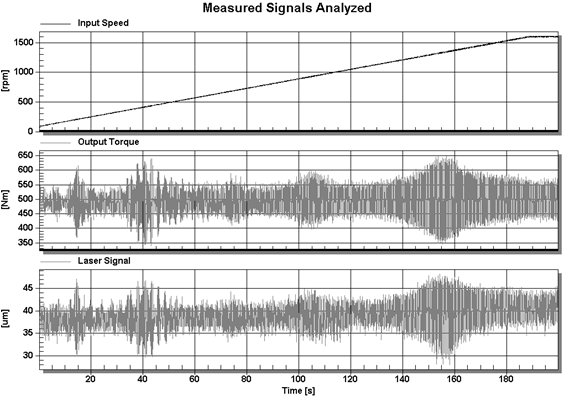
Fig. 4. Analysed signals as a
function of time
As can be easily noticed, the laser
signal course accurately reflects the rotational speed zone in which the output
torque of the cycloidal gear increases.
In Figure 5, characteristic
revolutions can be distinguished: [40, 290, 550, 800, 1,200 and 1,600 (idem)]
rpm. They correspond to amplitudes: ±(110, 150, 70, 100, 150 and 60) Nm
and ±(8, 9, 5, 6, 10 and 4) μm. The reaction torque of the gear
housing is the sum of the torque on the input and output shaft; hence, the
average value of the vibration recorded by the laser sensor increases with the
revolutions as opposed to the torque at the exit from the transmission. In
addition, the character of changes in both parameters is almost identical.
By entering the conversion factor:
![]() (1)
(1)
where:
![]() - torque on the output shaft in Nm,
- torque on the output shaft in Nm,
![]() - horizontal displacement of the gear
housing in μm.
- horizontal displacement of the gear
housing in μm.
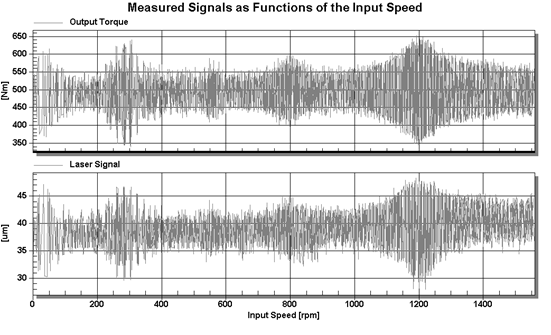
Fig. 5.
Comparison of both torques as function of input speed
The compatibility of both signals is
obtained as in Figure 6.
The analysis of the tested signals
was carried out using the CatMan program. This useful, powerful tool enables
the processing of digital signals containing hundreds of thousands of
measurement points. A screenshot of this program for the analysed signals is
shown in Figure 5. In order to represent the torque of the cycloidal gear
load by a laser signal measuring the horizontal displacement of its housing,
the appropriate coefficient should be determined.
The multiplication factor was
determined by dividing the output torque by the laser signal as the mean value
of the new variable obtained (Figures 5-6). This factor equalled 12.69.
The comparison of the output torque
with the torque calculated from the laser signal (multiplication factor=12.69)
is shown in Figure 5 (as a function of time) and Figure 6 (as functions of the
input speed).
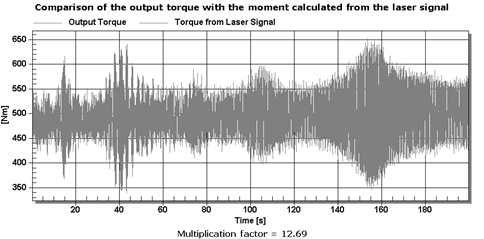
Fig. 6.
Comparison of both torques as a function of time for the factor k=12.69
For the coefficient of
k=13, a comparison of these signal runs is shown in Figures 7-8.
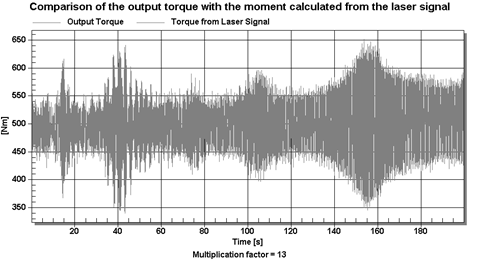
Fig. 7.
Comparison of both torques as a function of time for the factor k=13
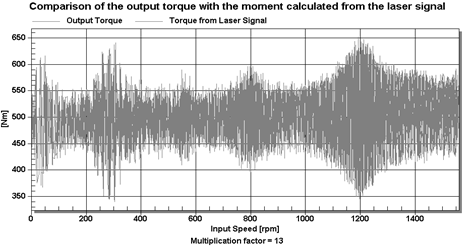
Fig. 8.
Comparison of both torques as a function of input speed for the factor k=13
As for the average value for these
runs, it is practically the same (coefficient k=12.69). However, the maximum
value is 6.5% lower for the moment calculated from the laser signal (Figures 5
and 6).
For the factor k=13, the mean values
of the torques differ by 2.7% (the calculated moment for laser is higher) and
the maximum amplitude for the laser torques is 9.8% higher (Figures 7-8). Thus,
the correction increases errors.
3. FFT ANALYSIS
Time curves of the analysed signals
have been subjected to FFT analysis. The results of the FFT analysis are
presented in Figure 9.
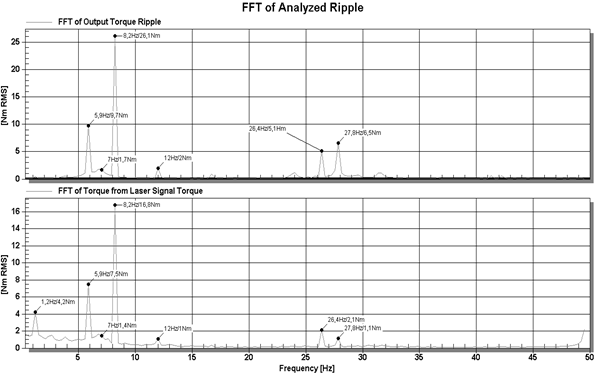
Figure 9. The
results of the FFT analysis
The FFT analysis parameters are as
follows: the number of discrete values=4,096, sampling (or capture)
frequency=1,200 Hz for output torques and laser signal. Thus, the spectrum
frequency range is 0÷600 Hz, while the frequency resolution (spacing
between frequency lines) is 0.29 Hz.
As shown in Figure 10, in the range
up to 50 Hz, almost full compliance of the measurements was obtained from the
torque and laser sensor. The frequencies are identical and the amplitudes are
similar. In addition, the frequencies from Figure 10 are similar to those in
Figure 5, with their comparison shown in Table 1.
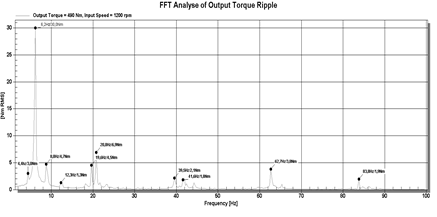
Fig. 10. The
results of the FFT analysis at 1,200 rpm
As shown, for example, in Figure 10,
above 30 Hz, there are higher harmonic vibrations: meshing and fundamental input
shaft.
Table 1 lists the FFT frequencies
for characteristic speeds: (40, 290, 550, 800 and 1,200) rpm during the
acceleration phase and fixed at 1,600 rpm, with a torque at the output shaft of
495 Nm. The aforementioned speeds are approximate, due to the variable
acceleration phase process; hence, the different values read in the course of
FFT analysis.
Taking into account k=12.69 Nm/μm,
the amplitudes from the laser sensor were calculated according to the readings
from the torque counter. The results from the torque sensor are highlighted in
yellow. In addition, the results for a fixed rotational speed of 1,200 rpm
of the input shaft are provided.
Table
1
List of significant
frequencies
|
rpm |
|
|
I |
|
II |
III |
IV |
V |
|
42 35 |
1.0 Hz/1.8 |
|
5.1 Hz/2.1 |
|
|
|
|
|
|
310 278 |
1.2 Hz/3.5 1.2 Hz/3.5 |
3 Hz/2.4 3 Hz/2.4 |
|
|
6.7 Hz/20.7 5.7 Hz/20.7 |
|
|
|
|
446 418 |
|
2.6 Hz/2.8 2.6 Hz/2.8 |
|
|
6.7 Hz/34.3 6.7 Hz/24.1 |
13.8 Hz/2.6 13.8 Hz/1 |
|
|
|
546 523 |
|
3.5 Hz/2.6 3.5Hz/2.3 |
5 Hz/7 5 Hz/5.5 |
|
7 Hz/17.9 7 Hz/12 |
11.4 Hz/6.6 11.4 Hz/2.1 |
|
23.7 Hz/1.7 |
|
804 783 |
|
4.7 Hz/6.3 4.7Hz/5.0 |
|
|
6.7 Hz/23 6.7 Hz/16 |
15.5 Hz/3.9 |
|
|
|
1,200 =idem |
|
4.4 Hz/3.0 4.4 Hz/2.0 |
|
6.2 Hz/30.0 6.2 Hz/20.7 |
8.8 Hz/4.7 8.8 Hz/2.7 |
12.3 Hz/1.3 |
19.6 Hz/4.5 |
20.8 Hz/6.9 |
|
1,224 1,179 |
|
|
|
|
6.7 Hz/47.7 6.7 Hz/33.4 |
|
22.3 Hz/2.9 |
|
|
1,600 =idem |
1.2 Hz/4.2 |
|
5.9 Hz/9.7 5.9 Hz/7.5 |
7 Hz/1.7 7 Hz/1.4 |
8.2 Hz/26.1 8.2 Hz/16.8 |
12 Hz/2 12 Hz/1 |
26.4 Hz/5.1 26.4 Hz/2.1 |
27.8 Hz/6.5 27.8 Hz/1.1 |
The resonant frequencies set during
FFT are characterized by a high conformity of parameters, which allows us to
assign them to the characteristic ranges of rotational speeds in Figures 4-6.
The frequencies in Column II are characterized by high amplitude (resonance of
550 rpm); in Columns IV and V, there are two very similar parameters, which,
when adding up, give a resonance of around 1,200 rpm. A comparison of
significant frequencies for 1,600 rpm and various load torques is shown in
the table below. Columns with the largest amplitudes are highlighted in yellow.
Table
2
List of significant
frequency parameters
|
Hz |
1.172 |
2.637 |
5.859 |
8.203 |
12.01 |
25.2 |
26.37 |
27.83 |
32.81 |
|
FFT Input Speed _37Nm |
0.0374 |
0.0281 |
0.4878 |
2.16 |
0.0173 |
0.6629 |
0.6463 |
0.2759 |
0.4586 |
|
FFT Input Speed _130Nm |
0.0196 |
0.018 |
1.183 |
2.004 |
0.0135 |
0.4305 |
0.4682 |
0.1728 |
0.1 |
|
FFT Input Speed _222Nm |
0.0211 |
0.0280 |
1.209 |
2.093 |
0.0260 |
0.3251 |
0.3045 |
0.1334 |
0.207 |
|
FFT Input Speed _272Nm |
0.1164 |
0.0176 |
0.9384 |
2.132 |
0.0184 |
0.26 |
0.4191 |
0.0605 |
0.1266 |
|
FFT Input Speed _316Nm |
0.1363 |
0.0194 |
0.6705 |
2.194 |
0.0220 |
0.2764 |
0.3545 |
0.0514 |
0.1257 |
|
FFT Input Speed _406Nm |
0.0613 |
0.0171 |
0.4482 |
1.983 |
0.0287 |
0.2125 |
0.1844 |
0.0874 |
0.1065 |
|
FFT Input Speed _495Nm |
0.0656 |
0.0152 |
0.4405 |
2.106 |
0.0393 |
0.1587 |
0.1752 |
0.0758 |
0.1013 |
|
|
|
|
|
|
|
|
|
|
|
|
FFT Output Speed_37Nm |
0.0294 |
0.020 |
0.1288 |
0.0219 |
0.0229 |
0.0103 |
0.1195 |
0.0765 |
0.0079 |
|
FFT Output Speed_130Nm |
0.0316 |
0.0162 |
0.1242 |
0.0129 |
0.0128 |
0.0056 |
0.0767 |
0.0331 |
0 |
|
FFT Output Speed_222Nm |
0.0331 |
0.0161 |
0.0959 |
0.0315 |
0.0152 |
0.0038 |
0.0718 |
0.0271 |
0.003 |
|
FFT Output Speed_272Nm |
0.0311 |
0.0156 |
0.0754 |
0.0407 |
0.0149 |
0.0032 |
0.0725 |
0.0270 |
0.0018 |
|
FFT Output Speed_316Nm |
0.0314 |
0.0152 |
0.0573 |
0.0520 |
0.0149 |
0.0033 |
0.0728 |
0.0216 |
0.0014 |
|
FFT Output Speed_406Nm |
0.0323 |
0.0159 |
0.0384 |
0.0540 |
0.0164 |
0.0024 |
0.0801 |
0.0216 |
0.0024 |
|
FFT Output Speed_495Nm |
0.0338 |
0.0155 |
0.0377 |
0.0623 |
0.0173 |
0.0019 |
0.0833 |
0.0208 |
0.0019 |
|
|
|
|
|
|
|
|
|
|
|
|
FFT Input Torque_37Nm |
0.0147 |
0.0168 |
0.6309 |
0.0700 |
0.0566 |
0.1979 |
0.1689 |
0.2423 |
0.2032 |
|
FFT Input Torque_130Nm |
0.0113 |
0.0150 |
1.407 |
0.4636 |
0.0234 |
0.1083 |
0.139 |
0.2971 |
0.000 |
|
FFT Input Torque_222Nm |
0.0106 |
0.017 |
1.391 |
0.791 |
0.0872 |
0.0770 |
0.0810 |
0.3382 |
0.0481 |
|
FFT Input Torque_272Nm |
0.0272 |
0.0131 |
1.074 |
0.9186 |
0.0789 |
0.0668 |
0.1731 |
0.3745 |
0.0575 |
|
FFT Input Torque_316Nm |
0.0320 |
0.0088 |
0.757 |
1.043 |
0.0837 |
0.0668 |
0.1556 |
0.3435 |
0.0482 |
|
FFT Input Torque_406Nm |
0.0196 |
0 |
0.5115 |
1.056 |
0.0959 |
0.0479 |
0.1241 |
0.3574 |
0.0395 |
|
FFT Input Torque_495Nm |
0.0227 |
0.0114 |
0.4927 |
1.23 |
0.1065 |
0.0553 |
0.1604 |
0.3831 |
0.0425 |
|
|
|
|
|
|
|
|
|
|
|
|
FFT Output Torque_37Nm |
0.4127 |
0.3172 |
12.1 |
5.293 |
1.094 |
0.4709 |
3.393 |
2.57 |
0.2327 |
|
FFT Output Torque_130Nm |
0.3043 |
0.2977 |
27.42 |
12.37 |
0.438 |
0.6719 |
4.329 |
3.977 |
0.000 |
|
FFT Output Torque_222Nm |
0.2979 |
0.3188 |
27.2 |
18.74 |
1.661 |
0.6802 |
4.706 |
5.27 |
0.293 |
|
FFT Output Torque_272Nm |
0.4345 |
0.2416 |
20.78 |
20.95 |
1.442 |
0.6071 |
5.117 |
5.728 |
0.1911 |
|
FFT Output Torque_316Nm |
0.5806 |
0.1966 |
14.59 |
23.22 |
1.597 |
0.5997 |
5.101 |
5.325 |
0.2532 |
|
FFT Output Torque_406Nm |
0.4237 |
0.1728 |
9.868 |
23.04 |
1.833 |
0.6088 |
5.347 |
6.153 |
0.2546 |
|
FFT Output Torque_495Nm |
0.4093 |
0.1939 |
9.326 |
26.01 |
1.998 |
0.3874 |
5.133 |
6.554 |
0.2871 |
|
|
|
|
|
|
|
|
|
|
|
|
FFT of Laser Signal_37Nm |
2.659 |
1.047 |
8.966 |
3.148 |
0.512 |
0.165 |
1.784 |
0.356 |
0.140 |
|
FFT of Laser Signal_130Nm |
3.061 |
0.854 |
20.32 |
7.953 |
0.390 |
0.308 |
1.714 |
0.490 |
0.000 |
|
FFT of Laser Signal_222Nm |
3.578 |
0.857 |
21.06 |
12.37 |
0.449 |
0.295 |
1.791 |
0.839 |
0.184 |
|
FFT of Laser Signal_272Nm |
3.186 |
1.445 |
16.20 |
13.99 |
0.640 |
0.248 |
2.474 |
1.263 |
0.343 |
|
FFT of Laser Signal_316Nm |
3.300 |
1.643 |
11.65 |
15.74 |
0.908 |
0.261 |
2.143 |
1.103 |
0.227 |
|
FFT of Laser Signal_406Nm |
3.340 |
1.918 |
7.607 |
14.51 |
0.564 |
0.242 |
1.814 |
0.979 |
0.228 |
|
FFT of Laser Signal_495Nm |
4.019 |
1.567 |
7.502 |
16.77 |
1.081 |
0.237 |
2.111 |
1.113 |
0.205 |
According to the literature [2,3,5,7],
the rotational speed of the input shaft, i.e., 1,600 rpm, corresponds to
fundamental frequencies of 1.4 Hz and 26.7 Hz and the frequency of meshing,
28.1 Hz. The results in the above table show a high compliance with the theory,
but other characteristic values also occur.
5. CONCLUSIONS
The torque calculated from the laser
sensor signal can be an interesting diagnostic signal. It is possible to
estimate the load torque of the cycloidal gear on this basis.
Analysis of this signal can be a
good alternative for the analysis of signals from piezoelectric sensors in the
low-frequency range.
This paper contains the first step
in discussing this issue.
References
1.
Bao J., W. He. 2015. “Parametric Design and Efficiency Analysis of
the Output-pin-wheel Cycloid Transmission”. International Journal of Control and Automation 8(8): 349-362.
2.
Cochran V., T. Bobak. 2008. A
Methodology for Identifying Defective Cycloidal Reduction Components Using
Vibration Analysis and Techniques. AGMA Technical Paper 08FTM02.
3.
Gaidys R., D. Zizys, R. Dauksevicius, V.
Ostaševičius. 2013. “Segmentation of piezoelectric layers based
on the numerical study of normal strain distributions in bimorph cantilevers
vibrating in the second transverse mode”. Mechanika 4: 451-458.
4.
Lai T., W. Hsieh, G. Chen. 2007. “Geometrical Design of Roller
Drives with Two-tooth Difference”. Journal
of the Chinese Society of Mechanical Engineers 28(6): 641-648.
5.
Naginevicius V., V. Ostasevicius, A. Bubulis, A. Palevicius. 2015.
“Vibration assisted spring loaded micro spray system for biomedical application”.
Mechanika 4: 285-289.
6.
Pawelski Z., Z. Zdziennicki. 2018. “FFT Analysis of Torque and
Speed Ripples as a Diagnostic Tool for a Cycloidal Gear”. Journal of Measurements in Engineering
(in press).
7.
Plugin A., L. Trykoz, O. Herasymenko, A. Pluhin, V. Konev. 2018.
“Independent diagnostic computer systems with the ability to restore
operational characteristics of construction facilities”. Diagnostyka 19(2): 11-21. DOI:
10.29354/diag/83009.
8.
Warda B. 2006. “Test Rig for Lifetime Testing of Meshing of the
Cyclo Gear”. Tribologia 6:
131-140.
9.
Yang B., Y. Liu, G. Ye. 2012. “Research of ArtemiS in a Ring-plate
Cycloid Reducer”. Journal of
Software 7(12): 2671-2677.
10.
Zah M., D. Lates, V. Csibi. 2012. “Thermal Calculation for
Planetary Cycloidal Gears with Bolts. Acta
Universitatis Sapientiae Electrical and Mechanical Engineering 4: 103-110.
Received 01.08.2018; accepted in revised form 14.11.2018
![]()
Scientific
Journal of Silesian University of Technology. Series Transport is licensed
under a Creative Commons Attribution 4.0 International License